
You are here: Home // Window A/C Unit That’s Less Than 6 Inches Tall
This post may contain affiliate links or mention our own products, please check out our disclosure policy .

Window A/C Unit That’s Less Than 6 Inches Tall
Published on May 23rd, 2016 by Ching Fu
Finally there’s a window air conditioner unit that is small enough in size and not a total power hog to use in an RV. Meet the newest window AC unit on the market – Noria !
Perfect window AC unit for a variety of small spaces.

Noria is still in its Kickstarter fundraising stage, but it’s already secured double the funding goal. It will retail for $400, but there’s an early bird special for a bit cheaper. With so many great features that meet the needs of people living in apartments, tiny homes, RVs, and regular houses, it’s not surprising that this unit is getting so much attention.
Noria comes with an adapter to easily fit in a variety of window sizes.

Instead of the awkward size and weight of regular window AC units, Noria was designed to be low profile and lighter. Noria weighs approximately 30 lbs and is sized at 5.8″H x 18.25”W x 15”D, compared to standard window units with the same cooling capacity that weigh 45 lbs and are 12″H x 15″W x 14″D.
DON’T MISS OUT ON DO IT YOURSELF UPDATES
Sign up for the newsletter today.
Please enter a valid email address.
An error occurred. Please try again later.
Thank you for subscribing to the Do It Yourself RV newsletter, keep your eye on your inbox for updates.
The new A/C comes with a window adapter so it easily fits into a window measuring 21” to 36” wide. It’s quick and easy to install the adapter, which goes in first, and creates a secure, sealed frame for the air conditioner to slip and lock into.
Not only is it good looking, but its low profile makes the unit easy to store.

To make the installation even easier, Noria is designed with a handle and rounded corners. Unlike traditional window units that fill up an entire window space, Noria is less than 6” tall so you keep the view from your window. Storage looks a lot easier, too.
Noria uses a refrigerant that’s environmentally and ozone-friendly. This window unit has a 5,000 BTU/hour cooling capacity which will cool a room up to 160 sq. ft. Drawing 460 – 480 watts, it’s totally usable in RVs via a generator, RV battery bank or large solar set up .
Easy-to-read interface.

The intuitive interface consists of a single knob that controls the most important thing: the temperature. Noria can also be set to a schedule via an iOS and Android app, letting you come home to a cool space without using more electricity than needed. During cool evenings, Noria’s fresh air mode can be selected to bring fresh air in from the outdoors.
Control Noria from the palm of your hand.

Its concealed fans, ventilation system and compressors makes Noria a lot quieter than traditional window units. Measured at 50 dB, Noria is about as loud as a moderate rainfall. There’s also a night mode with dimmed lights, so there’s no more blaming the A/C unit for a bad night’s sleep.
This modern and minimal AC unit is great for RVs! It uses a lot less power than roof top AC units that come with most camper models. R emoving a rooftop AC would free up valuable RV roof top space so you could fit an additional solar panel. And it weighs a lot less than roof top units – and window units for that matter.
On top of all that, you get to keep the incredible view out your window!

To learn more, visit this Kickstarter page . Here’s a video showing the Noria in action:
https://youtu.be/nktasCqHjzg
Share this post:
Related posts:.

Is Your RV AC Freezing Up? Here’s What To Do

The Number One RV Soft Starter Is Now 40% Smaller

Is Your RV AC Leaking Water? Here’s What To Do

AC All Solutions
Blog by Skilled About Air Conditioners
Rv Air Conditioner Window Unit: Stay Cool on the Road
Yes, you can install a window AC unit in your RV to ensure efficient cooling and heating for a variety of small spaces. Whether you have a compact camper or a spacious motorhome, a window AC unit can be a perfect custom cooling solution.
RV air conditioners are designed to run for as long as they are connected to a power source, making them suitable for continuous use when connected to residential shore power or a generator.
Portable AC units with smart features offer flexibility for cooling small spaces within your RV where a window AC unit may not fit, ensuring you can stay comfortable on your travels.
If you’re looking for a replacement or nearby RV air conditioner window unit, there are various options available, including the Dometic RV air conditioner window unit and installation kits for RV window AC units.
Table of Contents
Choosing Your Rv Air Conditioner Window Unit
When selecting an RV air conditioner window unit, there are several factors to consider to ensure optimal cooling efficiency and compatibility with your RV.
From assessing the importance of the right cooling system to understanding your RV’s specifications and space constraints, here’s a guide to help you make an informed decision.
Importance Of The Right Cooling System
Choosing the appropriate cooling system for your RV is crucial in maintaining a comfortable and enjoyable travel experience. A well-suited air conditioner window unit will not only keep the interior cool during hot weather but also contribute to energy efficiency and reduced overall operational costs.
Furthermore, with the right system, you can ensure that your RV’s electrical system can adequately support the air conditioner’s power requirements, minimizing the risk of electrical issues while on the road.
Understanding Rv Compatibility
Before selecting an RV air conditioner window unit, it’s essential to consider the compatibility of the unit with your specific RV model. Factors such as the size of the RV, the layout of the interior space, and existing electrical infrastructure need to be taken into account to ensure a seamless installation and optimal performance.
Additionally, understanding the ventilation requirements of your RV will help in determining whether a window air conditioner unit is the most suitable option for your vehicle.
Assessing Space And Power Requirements
Space and power considerations are fundamental in selecting the right window air conditioner unit for your RV. Assessing the available space for installation, as well as the power capacity of your RV’s electrical system, will help in determining the appropriate size and cooling capacity of the unit.
By considering these aspects, you can ensure that the air conditioner not only fits seamlessly within the designated area but also operates efficiently without overloading the electrical system.
Features Of The Perfect Rv Window Unit
When it comes to selecting the ideal RV air conditioner window unit, there are several key features to consider. From energy efficiency to innovative technology, the perfect window unit should cater to the specific needs of RV enthusiasts.
Let’s delve into the essential features and considerations to keep in mind when purchasing an RV air conditioner window unit.
Key Considerations For Purchase
Purchasing an RV air conditioner window unit involves several key considerations to ensure optimal performance and compatibility with your specific RV setup.
Some of the vital aspects to keep in mind include the size of your RV, the available window space for installation, power requirements, and the unit’s cooling capacity. Additionally, considering the unit’s weight and dimensions is crucial to ensure it fits seamlessly within your RV’s space constraints.
Highlighting Energy Efficiency And Btu Needs
Energy efficiency is a paramount factor to consider when selecting an RV air conditioner window unit. Opting for an energy-efficient unit not only reduces power consumption and operational costs but also contributes to environmental sustainability.
It’s essential to assess the BTU (British Thermal Unit) needs of your RV to determine the appropriate cooling capacity. Finding the right balance between energy efficiency and cooling power ensures optimal comfort while minimizing energy wastage.
Innovative Features And Smart Connectivity
Modern RV air conditioner window units are equipped with innovative features aimed at enhancing user experience and convenience.
From smart connectivity options, allowing remote control via smartphone or tablet, to advanced climate control settings for customized cooling preferences, these cutting-edge features elevate the comfort and functionality of the unit.
Additionally, features such as sleep mode, programmable timers, and adjustable airflow contribute to a tailored and efficient cooling experience for RV enthusiasts.
Installation Insights For Window Ac In Rvs
When installing a window AC unit in your RV, follow these steps to ensure a smooth setup:
- Choose a suitable location for the AC unit and measure the window opening to ensure compatibility.
- Secure the AC unit in place using brackets or a mounting kit that is specifically designed for RV installations.
- Carefully position the unit in the window and secure it to prevent any movement while the RV is in motion.
- Connect the power supply to the AC unit and test for proper functionality.
Here are some tips to consider when installing a window AC unit in your RV:
- Ensure that the window opening can support the weight of the AC unit and make any necessary reinforcements if needed.
- Use weather-stripping or foam insulation to seal any gaps around the AC unit to prevent air leaks and maintain energy efficiency.
- Regularly inspect the mounting brackets and connections to ensure they remain secure during travel.
- Consider consulting an RV technician if you are unsure about any aspect of the installation process.
When undertaking a DIY installation of a window AC unit in your RV, it is essential to have the following tools and materials on hand:
Maintaining Your Rv Air Conditioner
Keep your RV window air conditioner in top shape by regularly cleaning the filter and coils, ensuring optimal airflow and performance. Schedule annual professional maintenance to inspect and clean the unit’s internal components, preventing potential issues and extending its lifespan.
Regular maintenance helps your RV air conditioner operate efficiently and keeps your space comfortable during your travels. Maintaining Your RV Air Conditioner. Routine maintenance for longevity
Proper maintenance is essential in keeping your RV air conditioner running efficiently. Regular maintenance can extend the lifespan of your unit and ensure it operates at its peak performance. Here are some essential routine maintenance tasks to keep your RV air conditioner in top condition:
– Clean the filters : Clogged or dirty filters can reduce the efficiency of your air conditioner and strain its components. Regularly clean or replace the filters to ensure optimal airflow and cooling performance. – Inspect the fins and coils : Over time, the condenser coils and fins can accumulate dirt and debris, hindering heat transfer. Periodically clean these components to maintain efficient heat exchange and prevent overheating. – Check the seals and gaskets : Inspect the seals and gaskets around the unit to ensure they are intact and free from damage. Tight seals are crucial for preventing air leaks and maintaining proper insulation.
Troubleshooting common issues
Despite regular maintenance, your RV air conditioner may encounter common issues that require attention. Understanding and addressing these issues promptly can prevent further damage and ensure continuous comfort during your travels. Here are some common problems and their troubleshooting tips:
– Poor cooling performance : If your air conditioner is struggling to provide adequate cooling, check for airflow restrictions, dirty filters, or refrigerant leaks. Clear any obstructions and clean the filters to improve performance. – Unusual noises : Strange noises such as rattling, grinding, or squealing can indicate a problem with the fan, motor, or other internal components. Inspect the unit for loose or damaged parts and seek professional assistance if needed. – Water leaks : If you notice water leaking from your air conditioner, it could be due to a clogged drain line or improper unit leveling. Clear any blockages and ensure the unit is properly positioned to prevent leaks.
When to seek professional help
While regular maintenance and troubleshooting can address many issues, some problems may require the expertise of a professional technician. If you encounter the following issues, it’s time to seek professional help:
– Refrigerant leaks : Handling refrigerant requires specialized knowledge and equipment. If you suspect a refrigerant leak, contact a professional technician to locate and repair the leak, and recharge the system. – Electrical malfunctions : Any electrical issues or wiring problems should be addressed by a qualified technician to ensure safety and proper repairs. – Complex mechanical repairs : For complex mechanical repairs or component replacements, it’s best to entrust the task to an experienced professional who can effectively diagnose and resolve the issue.
Regular maintenance and prompt attention to issues can significantly prolong the life of your RV air conditioner and ensure reliable performance throughout your adventures.
However, if you encounter complex or persistent issues, don’t hesitate to seek the expertise of a professional for a thorough assessment and resolution.
Upgrade Options And Alternatives
Looking to upgrade your RV air conditioner window unit or explore alternative cooling options? From portable AC units to non-ducted applications, there are various options available to enhance your RV’s cooling system.
Let’s delve into the specifics of each alternative and compare them to traditional RV AC systems. Additionally, we’ll review the latest market additions, such as the innovative Noria unit, to help you make an informed decision for your RV’s cooling needs.
Exploring Portable Ac And Non-ducted Applications
When it comes to upgrading your RV air conditioning system, portable AC units and non-ducted applications offer convenient and versatile options. Portable AC units are especially beneficial for RV owners seeking flexibility and mobility.
These compact units can be easily moved from one location to another, providing cooling relief wherever you go. Additionally, non-ducted applications provide a viable alternative for efficiently cooling your RV without the need for complex ductwork installation.
Comparing Window Ac And Traditional Rv Ac Systems
When comparing window AC units to traditional RV AC systems, it’s essential to consider factors such as installation, efficiency, and cooling capacity.
While window AC units offer a simpler installation process and adequate cooling for smaller RVs, traditional RV AC systems are designed for optimal performance and durability in varying climate conditions.
Evaluating these factors can help you determine the most suitable option for your specific RV cooling requirements.
Reviewing Latest Market Additions Like The Noria Unit
The Noria unit stands out as one of the latest additions to the RV air conditioning market, offering innovative features and efficient cooling capabilities.
Whether you have a compact camper or a spacious motorhome, the Noria unit ensures reliable cooling and heating to keep you comfortable on your travels.
Its advanced design and performance make it a compelling option for RV owners seeking an upgraded cooling solution. Exploring the features and benefits of the Noria unit can provide valuable insights into the potential advantages of incorporating this cutting-edge technology into your RV.
Frequently Asked Questions On Rv Air Conditioner Window Unit
Can you put a window unit ac in an rv.
Yes, you can install a window AC unit in an RV for efficient cooling and heating, keeping you comfortable in various small spaces. It may require a customized solution.
Can I Put A Portable Ac In My Rv?
Yes, you can put a portable AC in your RV for efficient cooling and comfort. It may require a custom solution due to the RV’s design, but it’s possible for both compact campers and spacious motorhomes.
How Many Btus Does It Take To Cool An Rv?
It takes around 13,500 to 15,000 BTUs to cool an average-sized RV effectively.
Can You Leave An Rv Air Conditioner On All The Time?
Yes, you can leave an RV air conditioner on all the time as long as it’s connected to a power source like shore power or a generator.
Whether you have a compact camper or spacious motorhome, a window AC unit can provide efficient cooling and heating solutions to keep you comfortable during your travels. With the availability of various portable and affordable models, you can easily find the right fit for your RV’s cooling needs.
Additionally, with a reliable power source, running an RV air conditioner continuously is possible.
Related posts:

Leave a Comment Cancel reply
Save my name, email, and website in this browser for the next time I comment.
- Privacy Policy
RV Trips & Travel
Advise to Keep you and your RV in Good shape
Air Conditioner · January 20, 2022
Installing a Window AC Unit in an RV step by step
You might just need a bit more cooling in your RV. Whether you have an in-unit air conditioner in your RV or not, the heat of summer can still get to you. That’s probably why you are considering getting a window AC unit for your RV.
Mounting a window AC unit is a simple task for a do it yourself RV owner. You’ll need some tools and an instruction manual, but we can help you get this done.

Mountain a window AC on your RV involves some decisions including whether or not to make a frame. You may need to make a frame to hold your AC in place. You’ll also need to choose it’s placement based on the availability of power. Frame or not, screws or bolds are the next most important part ofmounting your AC unit to an RV.
Does it measure up – mounting a window AC unit in an RV.
You’ll first need to decide where to mount your window AC unit, then you can decide how to mount it.
Which parts of your RV get the warmest? Does this part of the RV also have a window or a place to open? Your AC unit needs both an outside air supply and electricity, so keep that in mind.
An RV AC unit needs a relatively large amount of electricity, measured in amps, to start up. Most RV AC units will need 16-18 amps to get kick started. This is about the same as a smaller air conditioning unit but less than a large one that can take 30 amps.
Inside of your RV breaker box, check the capacity of the breaker where you want to plug in your AC unit. RV breakers can come in a range from 10amps up to 30. Also, check to see what else is plugged in on the same circuit and how many amps that requires to run at the same time.
If you plug too much into one circuit and the air conditioner turns on, your circuit breaker might turn off the power to those outlets if it gets overwhelmed.
An RV AC unit needs a good frame to be useful – and not potentially fall and hurt somebody.
Your home is not much different from your RV for an air conditioner. The air conditioner needs a window frame to drag outside hot air in and cool it.
In the case of most RVs, you can readily attach an air conditioner to the rear of the RV and have it poke out of a window and add negligible length of your RV. This situation is ideal because it might not require modification.

If your heat problems are on the side of the RV, you might want to consider adding the AC unit there instead. The side can add width to your RV, which isn’t always ideal.
Making a frame
Consider consulting your RV’s manual to see which frames are meant to handle an AC unit. AC units are not light.
You might need to reinforce a frame with wood or plastic and screws to make it sturdy enough to hold an AC unit. This is often done by bracing wood pieces or 2 x 4 or smaller on the inside of a window so that the hole is the right side for an air conditioning unit while also having the weight capacity to not break.
Ideally, you can make the frame and air conditioner removable too. Build a top and bottom frame that keep the air conditioner from falling in by having wood pieces surround the fins on top of the AC unit. The AC unit itself will provide the pressure that keeps the bottom part of the frame in place.
The easiest way to do this is to measure the distance between the top of the window frame and the top fin. Just make sure it’s big enough to cover all gaps in the windows while offering a space to keep the top part of the unit from moving. You might need to make smaller, rounded cuts to the wood for this to work.
Much of the frame can be screwed or glued to the inside of the RV to avoid making big holes on the outside. You can also paint the frame so it looks uniform with the rest of the RV.
The window needs to be larger than the smallest size of the AC unit. Measure both the AC unit you want and the size of the frame and hole you have.
One fundamental issue you might come across is that the window in the area you want to cool is not big enough, or lacks a window at all. One potential solution is to create a hole for the purpose, though it might not be worth making a hole in one specific spot if you aren’t using the air conditioner often.

Will the mounting brackets that came with my AC unit work?
Honestly, probably not. These are moreso made for a home unit and are designed for an already built frame – and to keep from scratching both the home’s paint and the air conditioning unit itself.
Can making a mount effect resale value?
Done right, a well made made for an air conditioner can raise the resale value. The mount can be some work that someone else didn’t have to do, so a buyer might appreciate the presence of an already placed, nice looking mount.
Any safety considerations?
A couple of them.
A window unit air conditioner makes your RV a bit wider. Be careful when pulling into parking spaces – you may hae added some inches, or even a foot to the width of your RV.
A good power inverter and electrical management system can be quite helpful. You did some hard work getting the air conditioning unit installed, so don’t let a power surge or a lack of current wreck the motor in your air conditioner.
If you have any doubts about the safety of your mount, or you notice that it’s weakening – fix or or call a contractor and see if things can be done better. A falling AC unit is quite dangerous as units can be rather heavy.
Mounting an RV AC unit can be simple with the right tools and some measurements. Some RVs are just about designed to accept a rear installed unit while others might require some wood or plastic working to make them safe and reliable.
You’ll also want to check to make sure you are installing your AC unit in a place with an outlet and enough amperage to power the air conditioner unit.
We hope you stay cool this summer!
RV Tips in your Inbox!
We don’t spam! Read more in our privacy policy
Check your inbox or spam folder to confirm your subscription.
You’ll Also Love

Why my RV Refrigerator freezes everything and how to prevent it.
Copyright © 2024 RV Trips & Travel
How To Install a Window AC Unit in a Travel Trailer

Installing a window AC unit in a travel trailer can seem like a daunting task. However, with the right tools, understanding of the process, and a bit of patience, it can be done efficiently. This comprehensive guide will walk you through the process, provide tips for optimal performance, and help you troubleshoot common problems that might arise after installation.
To install a window AC unit in a travel trailer, first choose a suitable location that can support the weight of the AC unit. Measure the dimensions of your AC unit and mark the area on the trailer wall. Cut a hole in the wall according to the marked dimensions. Depending on the weight of your unit, install support brackets or a frame. Slide the AC unit into the hole, ensuring it’s aligned with the air intake and exhaust holes. Insulate around the unit, connect it to the trailer’s electrical system, and test its performance.
Choosing the Right AC Unit
Before diving into the installation process, it’s crucial to choose the right AC unit for your travel trailer. The size of the unit you need will depend on the size of your trailer. A general rule of thumb is needing 500 to 650 BTUs of AC per foot of RV. For example, for a typical 24-foot RV, a 15,000 BTU air conditioner is recommended. However, other factors such as the number of people in the RV, the insulation, and the climate of the location you’ll be traveling to should also be considered.
Essential Tools and Materials
To install a window AC unit in a travel trailer, you’ll need the following tools and materials: – Cordless Drill – Drill Bits – Level – Tape Measure – Screws – Foam Insulating Strip – Foam Weather Stripping – Mounting Support Bracket (if necessary)
Installation Process
Here’s a step-by-step guide to install a window AC unit in your travel trailer:
- Choose the location : Decide where you want to install the window AC unit in your travel trailer. The location should be able to support the weight of the AC unit and should have enough space for the unit to fit.
- Measure and mark : Measure the dimensions of your window AC unit and mark the area on the trailer wall where you’ll be cutting the hole for the unit.
- Cut the hole : Using a jigsaw or another appropriate cutting tool, carefully cut the hole in the trailer wall according to the marked dimensions.
- Install support brackets or frame : Depending on the weight of your window AC unit, you may need to build a frame or install support brackets.
- Insert the AC unit : Carefully slide the window AC unit into the hole you’ve cut, making sure it’s properly aligned with the air intake and exhaust holes.
- Insulate and seal : Insulate around the AC unit to prevent hot air from entering the trailer and to ensure a tight seal.
- Connect to power : Connect the window AC unit to your travel trailer’s electrical system.
- Test the unit : Turn on the AC unit and check its performance.
Safety Precautions
Safety should always be a priority when installing equipment. Some key safety measures to follow include reading the manual, wearing appropriate protective gear, following the steps outlined in the manual, observing general safety precautions, and checking for compatibility issues.
Maintenance Tips
Proper maintenance of your window AC unit is crucial for its optimal performance. Some maintenance tips include cleaning the air filter monthly, checking for insect/animal nests, cleaning the condenser coils once per season, inspecting cooling coils for frost or ice, and scheduling regular professional maintenance.
Troubleshooting Common Problems
Common problems that might arise after installation can include hardware failures, software errors, network problems, or user errors. To resolve these issues, you can check the installation guide, identify symptoms and causes, run Windows Update, unplug extra hardware, repair hard-drive errors, troubleshoot software installation issues, check for compatibility issues, and seek assistance.
In conclusion, installing a window AC unit in a travel trailer is not as difficult as it may seem. With the right tools, understanding of the process, and a bit of patience, you can enjoy a cool and comfortable travel trailer in no time.
Frequently Asked Questions
How do i choose the correct size drill bit for the installation.
The size of the drill bit you need will depend on the size of the screws you’re using for the installation. Usually, the size of the drill bit should be slightly smaller than the diameter of the screw.
How do I know if I need to install support brackets or frame for my AC unit?
If your AC unit is heavy or if the wall of your travel trailer is not strong enough to support the weight of the unit, you should install support brackets or a frame. Always refer to the manufacturer’s guidelines on this.
What type of power source do I need to connect my window AC unit to in my travel trailer?
Most window AC units are designed to run on standard household electricity (110-120 volts). If your travel trailer’s electrical system can provide this, you should be able to connect your AC unit directly. If not, you may need an adapter or a converter.
How often should I schedule professional maintenance for my window AC unit?
It’s generally recommended to schedule professional maintenance for your window AC unit once a year. However, if you’re using your AC unit extensively, you might need to schedule maintenance more frequently.
What should I do if my window AC unit is not cooling my travel trailer effectively?
If your window AC unit is not cooling your travel trailer effectively, it could be due to a number of reasons such as dirty air filters, low refrigerant levels, or a malfunctioning thermostat. It’s best to consult a professional in such cases.
Related Posts

How To Use Fels Naptha in a Washing Machine

Why Does AC Make Me Sneeze?

How To Tighten the Handle on a GE Refrigerator

How To Change Roomba Dust Bin

Who is the Manufacturer of Simplicity Vacuum Cleaners?

How To Reset the Water Filter on a Kenmore Refrigerator
About the author, stanley gilmore, leave a comment cancel reply.
Your email address will not be published. Required fields are marked *
Save my name, email, and website in this browser for the next time I comment.
Stanley is an appliance repairman with 10 years of experience. He has seen it all when it comes to broken home appliances and decided to share his knowledge by writing for ApplianceTeacher.

How Soon Can You Use an Oven After Using Easy Off?

How To Fix the F3 Error Code on an LG Oven

How To Fix a Garbage Disposal That Shakes

How To Set Auto Mode in LG AC

Where Is the Charcoal Filter on a GE Microwave?

How To Disable the Child Lock on a Samsung Dishwasher
- Find a Location
Choosing An RV Air Conditioner Unit

The most popular, and for good reason, RV roof air conditioners don’t take up any space inside the RV. They are the most effective at distributing air, especially in a ducted system. These units provide the most efficient cooling and many can also deliver heat if you have a model with a heat pump or strip.
Although leading the charts in performance , they also lead the charts in power draw and replacement cost.
RV Window A/C Units

It wasn’t until the Coleman Lantern LT series that I really noticed the emergence of window or wall-mounted units inside RVs.
One issue with using an overhead unit on a small camper is the potential to freeze you out. Most manufacturers consider a small RV air conditioner to be 13,500 BTU, which is too much for a small RV, even on the lowest setting. With a smaller RV, you also likely have a more limited power supply, and window units draw about half as much power as an overhead unit, on average.
Portable RV Air Conditioner Units

The most likely use for a portable air conditioner in an RV is to supplement a roof or wall-mounted unit. Their downsides include reduced cooling capacity, added setup time, and reduced storage space. However, there are also positives, such as quiet operation and less strain on your wallet.
Portable air conditioners are also an option for RVs without an air conditioner or a temporary A/C replacement. The best part is that adding one does not require significant modifications, like cutting into the roof or walls.
What Are the Different Rooftop Air Conditioner Components?
RV roof air conditioning systems are a collection of components that work together to deliver cool air throughout your camper. The main component is your roof-mounted unit, followed by the distribution box, a control module, and the thermostat. Some units come as a kit with all the needed items, whereas others require you to purchase them separately. Here’s how each component in the system functions:
The A/C Unit

The main component of an air conditioner for RV roofs is the unit itself. The unit contains all the internal air conditioning parts, such as the coils, condenser, compressor, etc.
Distribution Box

The distribution box is mounted inside the RV to the ceiling directly below the A/C unit. It distributes air throughout the RV through one or multiple vents.
Control Module
The control module is mounted to the distribution box or inside the unit. It controls all the settings, such as air speed and temperature. It is the system’s brain that communicates with the A/C unit, distribution box, and thermostat.

The thermostat tells the A/C unit when to turn on/off. It can be mounted on the wall (electric) or to the distribution box (manual).

The shroud protects the internal components of the A/C unit. Typically constructed of polypropylene, these covers are durable and weather-resistant.
The air filter is installed inside the distribution box in front of the vent. It blocks allergens, such as dust, pollen, mold spores, and more, from entering the RV.
Ducted versus Non-Ducted RV A/C Units
There are two types of roof-mounted A/C units: ducted and non-ducted. In a ducted system, ducts run through the RV’s floor, walls, or ceiling, and vents deliver the air throughout the floorplan.
A non-ducted system has only one vent at the distribution box. Air blows straight down from the unit into the RV. Non-ducted systems are standard for small RVs, while ducted systems are common in larger RVs with multiple rooms.
Distribution boxes are usually specific to ducted or non-ducted RVs, so you’ll need to know which type you have before selecting one.
How To Choose an RV Air Conditioner
The choice of an RV air conditioner can be overwhelming. There is an endless list of options and plenty of compatibility concerns. Let’s go over some common deciding factors to help you make a suitable choice.
There are two schools of thought behind choosing the right RV air conditioner brand. The first is choosing the same brand you have now to ensure compatibility. The second is choosing a different brand, with the expectation that you may have to replace multiple components to ensure everything works together. It’s a good idea to look at each brand and pick one that offers a system with the features you need. Some top RV air conditioner brands have been attached below for your convenience.
- Dometic (Brisk, Penguin, Blizzard, FreshJet)
- Coleman-Mach
Size (BTU Rating)
When most people talk about an RV air conditioner’s size, they’re referring to its BTU rating. British Thermal Units, also known as BTUs, are essentially a measure of power. The higher the BTU rating, the more cooling capacity the unit has. Most manufacturers offer a smaller 13,500 BTU RV air conditioner and a larger 15,000 BTU RV air conditioner. There are some oddball ratings as well, such as 11,000 BTU for smaller RVs.
Several factors, such as the size of the RV, insulation properties, and number of rooms, must be considered when choosing the correct size (AKA BTU rating) for your RV. We recommend sticking with the manufacturer’s suggestion, which you can get by calling the manufacturer directly with your vehicle identification number (VIN).
If your unit did not come with an air conditioner and you want to add one, you can use the general size chart below as an estimate.
Manual or Electric
A manual system is controlled via the distribution box, which means you must adjust settings directly on the ceiling unit. This may pose an issue if you’re shorter or have a high ceiling.
An electric system uses a wall-mounted thermostat for operation. Although most prefer a wall thermostat, manual systems are easier to install because you don’t have to run wires through the walls and ceiling.
There are many features to consider, but not all brands offer the same options. It’s important to select only what you need, as the more features a unit has, the more expensive it will be. A few examples of standard features are listed below:
- Heat Pump – Provides extra heat in colder months. Works best above 40 degrees Fahrenheit.
- Heat Strip – Designed to remove the chill, it should not be a primary heat source.
- Soft Start – Reduces start-up energy demands, allowing for a smaller generator.
- Condensate Pump – Channels condensation away from the roof and out a drain tube.
5 Best RV Air Conditioner Models to Consider
Are you feeling overwhelmed by all the A/C models out there? Our top five RV A/C units will help you get a reliable system to keep you cool this summer.
Dometic FreshJet 3 Series RV Air Conditioner

The most innovative rooftop air conditioner on the list is a Dometic RV air conditioner, the FreshJet 3. The FreshJet offers upgraded efficiency, quieter operation, and e-coated coils for added durability.
15,000 BTU Model Tested
Furrion Chill HE RV Roof Air Conditioner

The Furrion Chill is a highly efficient rooftop air conditioner with durable features like vibration protection and a thermal-insulated shroud.
15,500 BTU Model Tested
Coleman-Mach 15 Air Conditioner

One of the most tried-and-true RV rooftop A/C units on our list is the Coleman Mach. This high-performance air conditioner offers superior cooling and unrivaled durability.
Dometic Penguin II High-Capacity Air Conditioner

What’s unique about the Penguin is its low-profile design, which improves aerodynamics and helps cut down on fuel costs. Pair this with a high-performance motor for maximum cooling power, and you have an excellent rooftop option.
GE Exterior RV Air Conditioner

The GE air conditioner is cost-effective and reliable. It has rubber grommets to reduce vibrations, a glossy shroud to increase aesthetics, and easy-to-maintain coils for cleaning.
What Size Generator Do I Need for My Air Conditioner?

Generally, most 13,500 BTU RV air conditioners will require at least 3,500 starting watts, and 15,000 BTU RV air conditioners will need upwards of 4,000 starting watts.
When camping off-grid , there’s no access to shore power. Air conditioners draw too much power for your batteries, forcing you to use a generator . Unfortunately, generator sizing can be tricky. Due to space, weight, and fuel concerns, you’ll usually want to use a generator that is as small as possible.
Like generators, most air conditioners have running and starting wattage requirements. Starting watts represent how much power the unit requires on startup, and running watts represent how much power it needs to stay running. The starting watts can be almost double the running watts. You can reduce the power starting requirements with a soft start .
Learn more in this generator sizing guide .
Do I Need An Air Conditioner Cover?
If you don’t have an RV cover, a rooftop air conditioner cover is noteworthy for protecting the assembly when your RV is in storage. Use an air conditioner cover to keep dust, debris, moisture, and other potentially damaging substances from negatively impacting your air conditioner’s vital components.
Choosing an air conditioner is important, so we hope you found this guide helpful. Whether it’s a rooftop unit, wall mount, or portable system, keeping you and the family cool during warmer months is the ultimate goal.
Let us know what RV air conditioner unit you prefer or if you have any questions in the comments below.
Leave Your Comment Cancel Reply
Save my name, email, and website in this browser for the next time I comment.
Shop By RV Type

Your Adventure Awaits
Copyright © 2023 cwi, llc all rights reserved.
- RV Glossary |
- Privacy Policy |
- California Privacy Rights |
- Do Not Sell or Share My Personal Information |
- Targeted Advertising Opt Out |
- Terms of Use
- Skip to primary navigation
- Skip to main content
- Skip to primary sidebar
Our Gold Road
Vintage Trailer DIY & Family Camping

Installing a Window A/C in your trailer
How to install an A/C on my trailer? A question we realized we must answer quickly after buying our first tiny trailer. We needed an A/C in our 1984 Uhaul CT-13 fiberglass trailer especially since we camp mostly in Texas. There were 2 options we had to choose from. We could have either installed a roof top air conditioner or figure out a way to use a window A/C in our trailer. We chose the latter.

The solution for you will depend on what type of trailer you own or plan to renovate. However, if you choose to install a window A/C unit as we did then let me give you some pointers. We want to give you an option that doesn’t include having an A/C sticking out the side of your beautiful trailer. Oh yeah…And of course there is a video down below to help you as well.
Things to remember when installing a window ac in your trailer.
1. Air intake
2. Hot air exhaust
3. Condensation
4. Electric
To assure your air conditioner works properly, you must remember to have a plan for outside air intake, heat exhaust as well as condensation.
First, you will need a hole cut on the side of the trailer (or we have seen some people install vents in the floor to pull air from underneath the trailer) so the A/C can pull in ambient air from outside. This air is blown through the condenser coils to cool them.

Second, you will need a hole cut directly behind the A/C unit to allow the heat from the coils to escape from the trailer. You need to make sure this hot air is not entering back into the trailer. We have seen some individuals insulate on top of the unit to keep this hot air from entering the trailer. However, we created a funnel system on the back of the A/C unit to force the air out through the hole we cut in our trailer.

Third, you will need to take into consideration the condensation that is created by the unit as it is cooling the air. Typically, the units are designed with the fan near the condensation pan to pull up the water and cause it to evaporate quicker, but this isn’t a perfect system, especially in hotter states. If your A/C doesn’t already come with some sort of condensation tube adaptor kit or attachment, then you will need to drill a hole in the condensation pan to allow the water to drain from the A/C unit. To assure this water exits the trailer completely, you will also need to drill a hole in the bottom of the trailer as well. Then you will need to attach a hose or create some sort of funnel system to guide the water out of the trailer. If you don’t create a system to catch the condensation then you will end up with water soaking the floor of your trailer.
Finally, and this will be short, let’s talk electric. I am not an electrician, so I did not come up with some fancy way to wire the A/C into the trailer. I just plug the unit into the outlet inside my trailer every time I need to use it. See…nothing fancy.

These are the most important things to remember if you plan to install an A/C inside your trailer. To see everything we did during installation be sure to watch the video below.

Reader Interactions
Leave a reply cancel reply.
Your email address will not be published. Required fields are marked *
- Home & Kitchen
- Heating, Cooling & Air Quality
- Air Conditioners

Image Unavailable

- To view this video download Flash Player
FOGATTI RV Window Air Conditioner, 6500 BTU Cools up to 180Sq.ft, 4-in-1 AC Unit and Lower Noise, Suitable For RV and House-workshop, included Window Installation Kits (Matte Grey)
Delivery & support, about this item.
- Maximize Cooling: 6500 BTU Cooling capacity with up to 180 sq.ft RV space or same size room. Operates at noise levels as low as 50dB, providing a peaceful indoor environment for a comfortable rest and sleep experience during your camping journey. Incorporating R32 refrigerant, the air conditioner is environmentally friendly, efficient, reduces greenhouse gas emissions, and provides rapid cooling.
- Versatility Mode: The 4-in-1 mode window air conditioner integrates four functions, typically including cooling, fan, dehumidification, and Sleeping, to meet various seasonal and environmental needs.
- Simplified Mobility: Fogatti window air conditioner is lightweight and easy to carry, allowing for convenient movement to different locations in the caravan or for use in various indoor and outdoor settings. The window air conditioner is easy disassembly and installation with flexbility, therefore, it can be directly placed on the camper's window or other suitable positions without complex setup processes.
- Energy Saving: Window air conditioners are typically compact and lightweight, incorporating advanced cooling technology to enhance cooling efficienc. At the same time, they often use the envirinment standards R32 refrigerant, which is more efficient and requires less refrigerant compared to R410A. This allows them to achieve optimal cooling performance while being more energy-efficient, resulting in lower power consumption.
- Easy Installation: Fogatti RV window air conditioner is designed for simple installation on the windows of the RV, without the need for complex modifications. First, make sure you have the neceeary tools and additional installation accessories. Then find a suiable location for installinf the RV conditioner and install brackets and mounting devices in achosen location. Finally, test all the functions of the AC to ensure its cooling is working correctly.
- (PS: Due to version issues, there may be color differences) If you have any questions, please feel free to contact us.
Videos for similar products

Product information
Technical details, additional information, warranty & support, product guides and documents, what's in the box.
- RV Air Conditioner, Mounting Bracket*2, Accessory, Drain-pipe
Product Description

Compare with similar items
Looking for specific info, customer reviews.
Our goal is to make sure every review is trustworthy and useful. That's why we use both technology and human investigators to block fake reviews before customers ever see them. Learn more
We block Amazon accounts that violate our community guidelines. We also block sellers who buy reviews and take legal actions against parties who provide these reviews. Learn how to report
- Sort reviews by Top reviews Most recent Top reviews
Top reviews from the United States
There was a problem filtering reviews right now. please try again later..

- Amazon Newsletter
- About Amazon
- Accessibility
- Sustainability
- Press Center
- Investor Relations
- Amazon Devices
- Amazon Science
- Sell on Amazon
- Sell apps on Amazon
- Supply to Amazon
- Protect & Build Your Brand
- Become an Affiliate
- Become a Delivery Driver
- Start a Package Delivery Business
- Advertise Your Products
- Self-Publish with Us
- Become an Amazon Hub Partner
- › See More Ways to Make Money
- Amazon Visa
- Amazon Store Card
- Amazon Secured Card
- Amazon Business Card
- Shop with Points
- Credit Card Marketplace
- Reload Your Balance
- Amazon Currency Converter
- Your Account
- Your Orders
- Shipping Rates & Policies
- Amazon Prime
- Returns & Replacements
- Manage Your Content and Devices
- Recalls and Product Safety Alerts
- Conditions of Use
- Privacy Notice
- Consumer Health Data Privacy Disclosure
- Your Ads Privacy Choices
- Skip to main content
- Skip to secondary menu
- Skip to primary sidebar
- Skip to footer

Jeffsetter Travel
Travel Consultants and Travel Tips
8 Most Efficient Air Conditioners for Your RV
April 3, 2021 by Charlotte Phillips
Last updated on July 4th, 2023 at 04:50 pm
All of our reviews are based on exhaustive research, industry experience and whenever possible, hands-on testing. When you make a purchase using one of our chosen links we’ll receive a small percentage of the proceeds. This supports the site and keeps Jeffsetter running. You can read more here .
Looking for something to keep you cool as you travel the country in your RV this summer? I can’t blame you, especially if you’re heading into the desert or other equally hot places!
An air conditioner is one of the easiest and most successful things to use to beat the heat. But air conditioners are often inefficient and expensive, especially in an RV.
Are you looking for an energy-efficient air conditioner for your rig so that you can keep yourself and the whole family cool?
Let’s learn about your different RV AC options, as well as many other important things to consider before you make your final purchase! But if you want to skip the research and just see our favorites you can check them out here:

- Plug and play
- Redesigned with RVers in mind

- Lowest profile on the market
- Efficient cooling refrigerant
- Backed by a 2-year warranty

- Budget-friendly
- Lightweight and portable
- Easy to install
Types Of RV AC Units
The first step is determining what type of RV AC unit best works with your rig and lifestyle. Thankfully there aren’t too many different types to choose from, and the choice should be an easy one to make once you have determined your needs and wants!
Here are the three main types of RV AC units available for your consideration.
Rooftop AC Unit
Have you ever noticed large plastic covers atop the roof of newer RVs? These covers are most likely hiding a rooftop AC unit, the most common type of RV AC option. Most RVs, even back in the day, have the option to install an AC unit on the roof. Nowadays, AC units are standard atop the roof of your new rig, maybe even two (sometimes three, with a luxury fifth wheel )!
They can occasionally be a bit of a pricey nonstandard feature, but usually, it’s worth it to have AC aboard your rig. Rooftop AC units can be either ducted throughout the rig or non-ducted. This is an important distinction when it comes to your rig, and if you do not already have ducts installed you’ll want to stick with a non-ducted option for ease.
Ducts are usually what is found in standard homes with air conditioning. These ducts are installed throughout your RV, and the air is directed from the roof through these specified vents.
Most luxury RVs will have ducted ACs. Rooftop AC units can be just as useful non-ducted but tend to be a bit less efficient. This means the non-ducted unit simply blows cold air in from the ceiling. This can be perfect for smaller rigs like mine, or rigs with very few doors and walls.
However, much like the rest of the AC examples below, a ducted AC unit will no doubt be the most efficient and effective in cooling your home on wheels, especially if you own a larger rig with divided rooms.
Window AC Unit
My vintage rig does not have an air conditioner and, living full-time in the Pacific Northwest, this often does not trouble me. However, the summers can reach over 100 degrees sometimes, and this past summer I had no choice but to install a window AC unit in my RV.
Window AC units are meant to be permanent install in a window or cut out in your wall. The bulk of the unit sticks out of a window with filtration and a fan inside to keep you cool. Most units require or recommend support for the unit on the outside of the rig, which means it could be inconvenient if you are hitting the road often.
I’ve found these units to be quite heavy and unyielding in the past, a deep inconvenience if you have to remove them from your rig’s windows before driving. However, the price point is often quite reasonable, and new units are typically lightweight too.
Window AC units are also a bit trickier to fit correctly should you be installing one after your rig is built. However, there are a wide variety of sizes , efficiencies, and styles of window AC units. If you are doing a custom build where the unit can be permanently and safely installed or need something to work in a pinch, a window unit may be exactly what you need!
Portable AC Unit
Another option with a wide range of prices and styles is portable ACs. These can be useful, especially if you plan on removing them from your rig to use elsewhere in the future. Portable units are a bit misleading in their name, however, as even portable AC units need some sort of vent to the outside world.
The other style of portable AC unit is a swamp cooler, but these are not the same as air conditioners. While swamp coolers may work in a pinch, they simply use cold water and fans to work. This process puts a lot of moisture and humidity into the air and your rig, which can be a nightmare, as I’m sure you well know.
However, swamp coolers are very affordable and truly portable, often extremely compact. They would be a great fit for RV living if they didn’t produce so much humidity! So I recommend steering away from them and making sure you are looking at a proper AC unit, not a swamp cooler when shopping.
Portable AC units can do in a pinch , much like window units. They are movable so long as you keep a venting spot nearby, which means you may find this useful when it comes time to go to bed. You can bring the cool air with you! Well, so long as you can vent it out a bedroom window.
What To Look For In An RV AC Unit
If you’re still unsure what to look for in an RV AC unit, I can help. If the style of the unit didn’t narrow it down, here are some other factors to consider before you make your final purchase.
Existing AC Unit Location
Do you have an existing AC unit on your rig, but it’s time for a new one? The most natural choice for you to make is to simply replace your old unit and install the new unit in the same location.
However, if you don’t like your current style of AC unit, you may consider installing a different style or the same style in a more efficient location. This can bring a lot of headaches and hassle, so keep this in mind before you make a decision.
Obviously using the same location and style of AC unit will be the best bet for those of you simply replacing an outdated model. You may find the old location works just fine with a new, higher-efficiency unit installed there!
Are you a full-timer in Arizona, or the occasional weekend warrior to the balmy parts of our wonderful nation? Your predicted usage of your AC unit may be something to consider before making a final purchase.
Much like everything else in your RV, the amount of use it sees greatly affects the efficiency of the product or device. Purchasing an efficient and expensive AC unit may be worth it for you if you plan to visit hot places often, or live full-time in your rig.
However, if you deem an air conditioner necessary but only plan on using it a few times a year, chances are you can go with a cheaper model and notice no real issues.
Space, Space, Space
I’m sure you’ve no doubt realized, when it comes to storage and general living, space inside an RV is always at a premium. The last thing you want to do when purchasing an air conditioner is to buy one that takes up too much space in your rig.
A roof AC unit is usually the style of unit that’s most out of the way, but you have to consider the rooftop clearance of your rig before installing. Window units are the next most streamlined choice, but even these units can jut out pretty far into a particular space.
Portable units will be the most in the way (and also not completely portable), so these will be the unit you may struggle with the most. Keep your desired measurements handy when you sit down to make your final purchase!
BTU Requirements
A BTU, or British Thermal Unit, is how all air conditioners are measured. More BTUs equals more power, more cooling, and more everything! However, more BTUs also means more money, more often than not.
Determining your BTU needs can determine the AC unit you need to efficiently cool your RV. But how can you calculate something like that? Check out this formula and consider if your RV might be better suited with one or two AC units.
BTU Calculation:
Cubic Feet x Temperature Increase or Decrease in Fahrenheit x .133
Cubic Feet x Temperature Increase or Decrease in Celsius x .2394
Walls and doors should be taken into consideration when calculating your BTU needs. This is why a lot of larger fifth wheels these days have more than one air conditioner- the cold air struggles to pass by walls and doors to cool efficiently .
For maximum efficiency, knowing your desired BTUs will help, and if your BTU number is quite high based on the cubic feet of your rig, another air conditioner may be the answer.
Installing Your RV AC Unit
Installing your new RV AC unit may be a bit of an involved process, depending on your final choice and whether or not you want a professional to help you. If you plan on doing the installation yourself, it’s definitely possible!
Make sure you utilize your AC unit’s manual and follow all suggestions. The last thing you want to do is void a warranty, should your unit come with one. If you are installing a new rooftop AC unit, it’s recommended to have another hand around for your own safety.
These units, no matter how new, can be heavy and unyielding at the best of times. Lugging one up a ladder by yourself can be a lot! Take your time, be safe, and make sure you have all the necessary tools and equipment before getting started, such as one of these foldable ladders if you don’t already have one!
Maintenance And Tips For Your RV AC
Your RV AC unit can last many years, often for the life of your RV should you perform proper and routine maintenance. Much like most other parts of your RV, maintenance is the best way to ensure a long life for your rig.
AC units are usually fairly low maintenance, needing only filter changes from time to time which is an extremely easy thing to do. The only other thing you may have to do is recharge the liquid freezing system but refer to your manual before doing anything too extreme.
Having a cover for your unit is usually necessary too, should it not come with one already. Your rooftop AC unit absolutely needs one to protect it from the elements, and some window units may also benefit from a cover.
Otherwise, keep the vents dust free and pay attention to your unit’s efficiency as the months go by. High-efficiency AC units often need less maintenance and, while they can come at a higher price tag, they may be worth purchasing should you be wary of routine maintenance.
What About My Amperage?
If using your air conditioner is a high priority while on the road, you must consider your overall wattage and amperage . Most new rigs have 50-amp power systems, which is usually enough for AC units.
However, your air conditioner needs the most wattage out of all other appliances, including electric heaters or microwaves. Make sure you know how many watts your AC unit uses upon start-up. An air conditioner’s running wattage is always lower than its start-up wattage. Your electrical system will need to be able to compensate for the start-up wattage!
If your 50 amp rig includes two AC units (as many often do) and you hope to power them both at the same time, you’re going to need to make some sacrifices in terms of other appliances. You won’t be able to run everything at the same time.
Keep in mind your needs versus your wants. It’s a nice idea to want to power your entire rig and all major appliances at the same time, but your rig may not be able to handle it! Wouldn’t you choose a nice cooled rig instead of using a hair dryer?
8 Most Efficient AC Units For Your RV
Have you determined the best style of AC unit for your RV? What about your required BTUs and usage needs? If you’re ready, so am I! Here’s my list of the most efficient air conditioners perfect for your RV!
Best Overall: Dometic Brisk II Rooftop Air Conditioner, 15,000 BTU
Dometic brisk ii rooftop air conditioner, 15,000 btu.
It’s a perfect fit for replacing an old AC unit, and Dometic has been one of the biggest names in the RV game since the beginning, so I trust their handiwork! The Brisk Air II uses its smart design, tighter specification allowances, and improved materials to maximize airflow and performance so keeping cool in summer is easy. This RV AC unit offers a 15% airflow increase and is 19% lighter than previous models, which means direct improvements when replacing an older version.
This particular model works ducted or not ducted, but frustratingly, there is a need to purchase additional accessories for ducted options. However, having both ducted and non-ducted options provides me with the flexibility I need while I’m living on the road. It’s lightweight compared to many other units but weighs around 85 pounds, so I think I’d need my partner to give me a hand with the installation.
This is a considerable amount of weight to add to the RV roof, so I recommend proceeding with caution when installing it on the roof! However, it should have no trouble fitting any old AC spots; just make sure you know how much weight your roof can support .
All in all, this is one of the best AC units out there for RVs- powerful, reliable, and backed by a two-year warranty from Dometic which I love as there’s someone to call if things get hairy!
You can find out more about this unit along with the latest price on Amazon by clicking here.
Lowest Profile: Dometic 640315CXX1J0 Penguin II
Dometic 640315cxx1j0 penguin ii.
This model of Penguin AC comes in at around 100 pounds and runs at 13,500 BTUs. This is a relatively heavy weight for installation which I think is the main drawback of this AC unit. However, I just recruit some family, friends, or my partner to give me a hand when heavy additions to my RV! This Dometic Penguin also only rises to 9 and a half inches tall, which means I feel secure going under any overpass in my rig – low branches won’t snag this AC unit either!
This particular model is meant for non-ducted rigs, so this is something to keep an eye on for those preferring a ducted option. However, much like other Dometic AC units, it’s a fairly simple plug-and-play appliance so once it’s in place, the rest of the installation should be relatively straightforward.
It also utilizes energy-efficient refrigerant, perfect for me since I have an eye for efficient cooling! I’m a little nervous about heights, and always prioritize safety first, so make sure you’re careful getting this unit up to the roof!
Check out the latest price on Amazon by clicking here.
Best on a Budget: COSTWAY 12000 BTU Portable Air Conditioner with Remote Control
Costway 12000 btu portable air conditioner.
This 12,000 BTU model efficiently manages the ambient temperature of spaces up to 400 sq/ft, removing heat and humidity for seasonal or year-round comfort which as a full-timer, is exactly what I need! Designed with cooling mode, dehumidifying mode, fan mode, and sleep mode, this conditioner meets various demands, especially in small spaces such as my travel trailer.
I love the convenience having a remote control brings, as I can operate the air conditioning unit from a long distance, so my partner, dog, and I can return to a gorgeously cool rig after a long summer hike. The included slide-out filter is super easy to clean too, I just have to rinse it under the faucet and I’m rewarded with fresh, cool air! A window kit is included for easy installation, and all it needs is a sliver of access to the outside world.
This portable air conditioner has two drain ports – an upper drain port and a lower drain port. And you can choose between manual drainage and continuous drainage, which may be useful to some of you. It measures 12 x 29 x 13.5 inches and weighs around 50 pounds. Plus it has attached wheels, which means you’ll be able to move it with ease.
The only issue I can see with this AC unit is that it may not be the best fit in an RV given that it does take up a considerable amount of space. However, if you don’t have an existing rooftop AC unit and want something that is incredibly efficient and easy to install, this may be a great unit for you.
You can see the latest price and reviews on Amazon by clicking here .
Best Rooftop AC: Dometic Air Conditioners 651816CXX1J0 Penguin II

Dometic Air Conditioners 651816CXX1J0 Penguin II
- Heats and cools
- Great warranty and customer service
From 60°F to 38°F, this Penguin II heat pump can keep RV interiors comfortably warm, as well as cool. Space is luxury in an RV, so I tend to lean more towards items that do more than one job, as it saves space, money, and time in the long run! This unit operates entirely on 120-volt AC electricity, so there’s nothing to light and no LP gas supply to worry about which I love as it makes things even easier.
It’s also less than 10 inches tall! It’s incredibly easy to install when replacing an old AC unit, and is, therefore, more efficient in every way. Plus it works with ducted and non-ducted RVs. As previously mentioned, Dometic offers great customer service and two-year warranties which proves Dometic trust their products, and I do too! There’s no denying this is a fantastic rooftop AC option, however, there are a few downsides in my eyes.
Firstly, it weighs over 100 pounds which is a substantial amount of weight to handle, especially for solo RVers. It also requires a specific thermostat which is sold separately, which as a result bumps the overall cost up a considerable amount. All in all, though, this AC unit is the best of the best in terms of rooftop options. It’s great to have an all-in-one, and may come in handy should your propane or other heater fail.
You can see the latest price on Amazon by clicking here .
Best Window AC: Midea MAW10R1BWT Window Conditioner 10000 BTU Easycool AC

Midea MAW10R1BWT Window Conditioner 10000 BTU Easycool AC
- Remote controlled
This 10,000 BTU model provides fast and efficient cooling power and dehumidification, ideal for rooms up to 450 square feet. An intuitive design remote control and a LED digital display panel make it easy to change all the settings from across the room. I love this type of convenience as it makes things super easy for both my partner and me. This window unit installs easily without significant modification to the existing window frame, and all mounting hardware is included which is a game-changer, as nothing frustrates me more than additional purchases for a product!
This unit is recommended for specific-sized windows: minimum window height- 14 inches, minimum window width- 23 inches, maximum window width- 36 inches. I think this is the only tricky part when it comes to installing this AC in a rig, as most RVs aren’t designed to hold a window or wall AC unit.
Thankfully this AC only weighs around 60 pounds, much lighter than the rooftop models I previously mentioned, so solo installation is completely possible! I particularly love that it cools the air quickly. which is what we need with a dog on board , but also runs quietly so it doesn’t interfere with RV living.
Check out the latest reviews and more on Amazon by clicking here .
Best Portable AC: BLACK+DECKER Portable Air Conditioner, 12,000 BTU with Heat

BLACK+DECKER Portable Air Conditioner, 12,000 BTU with Heat
- Cools and heats
- Low amp and efficient
- Compact and easy to use
- Installation included
It can sometimes be a bit of a hassle to find a two-in-one RV AC option, but fear not, as I’ve found a BLACK+DECKER Portable AC that’s a winner. A household name for many appliances and accessories, Black and Decker have put together a portable AC unit that also heats! This appliance is a powerful, portable, and energy-efficient option for when a permanent AC installation isn’t suitable.
An adjustable fan speed cools the air up to 55°F, heats up to 81°F, and provides steady and fast cooling and heating for rooms up to 250 sq. ft. This is ideal for my travel trailer, and the fact it has dual functions means I can save money by not using my propane heater ! The simple remote control and top-mounted LED display with a 24-hour timer allow me to precisely control the air temperature. To clean the filter, I just slide it out twice a month, rinse it thoroughly under running water, and put it back.
Combining 4 energy-efficient modes in one small unit (17.1 x 13.8 x 28.1 in.), the cool, fan, heat, and dehumidify settings meet all of my RV’s cooling, heating, and ventilation needs. There are additional settings too, namely sleep, max, and air swing functions that control airflow, all whilst only drawing 10-12 amps.
Weighing around 60 pounds, it’s not too heavy, but it does take up a considerable amount of space which may not be ideal for small RVs. However, if you’re looking for a semi-compact unit able to both cool and heat your rig, whilst also having an included warranty from Black and Decker, it may just be worth it.
See more from this RV AC unit and read the latest reviews on Amazon by clicking here .
Most Versatile Option: Zero Breeze Mark 2 Battery Powered Portable Air Conditioner

Zero Breeze Mark 2 Battery Powered Portable Air Conditioner
- Versatile charging options
- Lightweight
I like versatility in my rig, which means I expect a lot from the RV products I purchase! I’ve already talked about a BLACK+DECKER portable AC unit, but I’ve found an impressive unit from a lesser-known brand that really packs a punch. This Zero Breeze Mark 2 Battery Powered AC is compact, measuring just 0.9″D x 8.3″W x 1.6″H, and is ideal for when I head out on the road alone as I can move it around to exactly where I need it to be.
I enjoy using the useful handle as it makes maneuvering the device around convenient and easy. Since it only weighs 16.5 lbs it also doesn’t add a substantial amount of weight to my RV which is ideal as it’s pretty loaded already! This little unit doesn’t skip a beat with function and ability as it has a strong compressor, 24V operating voltage, high-performance battery system, and has the capability to be powered by 4 x 100W solar panels which is the perfect option for off-grid camping and boondocking .
Some RV AC devices I’ve seen require the use of ice or water, but this little device doesn’t need either, and as soon as it’s plugged in, the air gets cooler in such a short space of time. I like the use of a Smart Battery as it only takes 5-8 hours to be fully charged. This may be too long for some, but I think it’s a small price to pay for such a cool (pardon the pun!) and functional little unit.
The remote control makes using this Zero Breeze unit a breeze, and included with the AC device is a 24V power adapter, battery, dual-duct exhaust system, front air duct, drainage tube, and a user’s manual.
Check out the latest reviews and prices on Amazon by clicking here .
Quietest Rooftop AC: Furrion CHILL Rooftop Air Conditioner with Electric Control

Furrion CHILL Rooftop Air Conditioner with Electric Control
- Enhanced safety features
- 2-year warranty
I travel year-round in my RV and I love nothing more than returning to my rig in the height of summer, switching the AC on, and cooling right down! Some RV AC units get the job done, but make an absolute racket during the process!
Well, not with this super-quiet Furrion CHILL Rooftop AC! It fits on the roof, has 15,500 BTUs, and includes an air distribution box, and a single basic wall thermostat so there’s not much else required to get this bad boy up and running, as discussed in the video below:
Although this unit runs quietly, it still cools in an energy-efficient way, thanks to the addition of two fans with individual motors to get the air inside an RV cooled fast! I’ve mentioned before how much I value safety and I think it’s awesome Furrion has taken things to the next level with the safety of this AC. There’s a start capacitor to aid the initial start-up of the device if the power in an RV is a little on the low side and short-cycle protection too.
I find I’m always trying to protect my RV from the sun , but Furrion is ahead of the game as they’ve created a UV-resistant cover to protect internal components. There’s also thermal insulation to aid in heat regulation so the device doesn’t overheat, even when the sun is beaming down and it’s scorching outside.
The running of this AC is quiet as I mentioned earlier, but the rubber dampeners also help make things more peaceful as they help prevent vibration! It’s features like this that prove to me Furrion has designed a product with RVers in mind, which I think makes all the difference.
For extra security, there’s a 2-year warranty, so I can keep cool and comfortable knowing my device is covered by Furrion.
Find out more and see the latest price on Amazon by clicking here .
Finding an efficient air conditioner for your RV is easier than ever before. While rooftop AC units are traditionally useful, keep in mind all of your options before making a final purchase. No matter what, it’ll be easy to keep cool this summer with one of these units!
Important Links
- Advertising Policy and Affiliate Disclaimer
- Privacy Policy
- Contact Jeffsetter Travel Blog
- Ask Jeffsetter a Question
Recent Posts
- Trip Report: Visiting Maui Post-Fire
- Hilton Honors Surpass 2024 Review
- Oneworld is Getting New Members
- Tragic Drowning Reignites Tourism Debate
- Alaska Air Will Offer Surprise Upgrades

Guiding Adventurous Souls Through RV Life

How to Install a Window Air Conditioner in a Pop Up Camper
Share with a friend
Last Updated on March 14, 2023 by Jessica Lauren Vine
Do you wonder how to install a window air conditioner in a pop up camper?
One of the most important aspects of enjoying a weekend of camping is having an air conditioner. A pop up camper will quickly become a hot box if you try to spend any amount of time without an air conditioner. However, because of how pop up campers work, they can’t have a permanent air conditioner installed on them.
To thoroughly enjoy your pop up camper, you should learn how to install a window air conditioner in a pop up camper. Window air conditioners can easily be installed and removed each time you set up and break down your camper.
In this article, we’re going to take a look at how to install a window air conditioner in your pop up camper, as well as how to remove it. We’ll also look at the best types of window air conditioners and what you can do to help yours last as long as possible. Let’s dive in!

Table of Contents
Is a Window AC the Best Option for a Pop Up Camper?
A window air conditioner for your pop up camper isn’t just one of the best options. It’s one of the only options. Outside of a window AC, you really only have two other options: a portable air conditioner or a rooftop unit.
Portable air conditioners are the easiest air conditioners to install, and they operate similarly to a dehumidifier. You can have it sitting anywhere inside your camper, and all you need to do to operate it is plug it in and turn it on. Most portable air conditioners also have a flexible hose coming out of the back that needs to be vented to the outside.
A roof-top air conditioner is another popular option for campers of every sort, but they don’t usually come installed on pop up campers. Installing one yourself is hard work, and rooftop air conditioners are much pricier than window air conditioners.
That brings us back to window air conditioners. They are the cheapest option and require basically the same amount of work that a rooftop air conditioner requires. Let’s take a look at how to install one if that’s the route you decide to go.
How to Install a Window Air Conditioner in a Pop Up Camper
Let’s take a look at how to install your window air conditioner in your pop up camper. In order to complete this project, you’re going to need some tools.
Tools You’ll Need to Put a Window Air Condition in a Pop Up Camper
- Utility knife or another sharp work knife
- Tape Measurer
- Saw to cut wood
- Drill
- Screws
- Drill bit
Choose Your Air Conditioner
In order to begin your project, you first need to choose the right air conditioner for your camper. Pop up campers are notoriously small so you won’t need a large air conditioner. In fact, many people either purchase the cheapest or smallest window AC that they can get their hands on. Other people keep their eyes open for a used or free one and take anything they can find.
In general, most any window air conditioner is going to be big enough to cool down your camper. Smaller air conditioners are actually a better option for your camper because you’ll have to build a bracket to support it.
Choose Your Location
After you have your air conditioner and you’re into how to install a window air conditioner in a pop up camper, you’ll have to pick where you want it. Your options when it comes to the location are fairly open. Some people like to have their air conditioner in the solid part of the camper, while others prefer the fabric tent portion. Another aspect that people look at is whether they want it high up or down low.
Higher air conditioners are slightly more efficient because cold air naturally falls down rather than floating up. Having your air conditioner up high will provide a more natural cooling feeling for your camper. However, you might find it more difficult to support your air conditioner based on how high up it is.
Cut Your AC Hole
Once you’ve picked your location during learning how to install a window air conditioner in a pop up camper, it’s time to cut the hole that the AC will sit in. If you decide to install the AC in a section made of fabric, cutting the hole is easy. Make sure that the fabric is pulled tight so that you cut a hole the exact size that you need. Use a tape measurer to measure the size of the window AC. Make sure that you measure the backside of the air conditioner that will be sticking out rather than the front that’s inside the camper.
You’ll want to cut the hole as exactly as you can so that your air conditioner fills it and leaves little to no gaps anywhere. Once you have your hole marked, use a utility knife to cut out the insert where the air conditioner will reside.
If you opt to install the air conditioner into the solid portion of the camper during the process of learning how to install a window air conditioner in a pop up camper, you’ll follow most of the same steps as above. Measure your AC and mark your hole where you want it to be installed. Use a Sawzall to cut your hole to the exact dimensions of the air conditioner. While cutting the hole is more difficult, the advantage of putting your AC in the solid section of your camper is that there will be added stability. You’ll still need to build a bracket for the air conditioner, but the bracket won’t be the only support system.
Build Your AC Bracket
Once you have your location selected and your hole cut, it’s time for the toughest part of the installation – building your support bracket. This is the most essential part of the installation, as your bracket will be the only thing that keeps your air conditioner from falling out of its location.
Your bracket should be made out of wood or metal, but wood will be easier to work with. Use treated wood so that the wood doesn’t rot and wither if it happens to get rained on or if there’s humidity. Treated wood is meant to withstand outdoor elements whereas untreated wood is meant for indoor use.
Your bracket should consist of a solid base that supports the air conditioner on the back and both of its sides. The more difficult part of building the bracket is figuring out where to attach the bracket to the camper. If you install your air conditioner up high on your camper, you can build a bracket that attaches to your roof.
If you install your AC down low, the bottom of your camper should have a solid structure that you can attach to your bracket. This is something you can’t ignore when you’re learning how to install a window air conditioner in a pop up camper.
Another option that will make building your bracket easier is to install your air conditioner at the front of your camper so that the back end sticks out next to your propane tanks. Your propane tanks have their own bracket and support system that they sit on. Installing your air conditioner next to them means that they can sit on the same bracket, and you won’t have to build your own.
The downside of this is that it isn’t the most optimal spot for cold air distribution. A better option is to put it where you want it and put your carpenter hat on to build your own bracket. No matter which route you decide to go, the main thing is that your bracket is solidly supported. Your bracket can only provide the same amount of support that it has itself.
Make Sure It’s Tilted Backward
After you’ve built your bracket, cut your hole, and put your AC in its place, there are a few final touches to make sure that it operates properly. For starters, make sure that it’s tilting backward and not forward. Your air conditioner will produce condensation runoff in the form of water. If your air conditioner is tilting forward or is perfectly level, there’s a good chance that the water will end up inside your camper.
Tilting your air conditioner slightly backward ensures that you won’t wake up in a flooded living room.
Make Sure Your AC is Close to an Outlet
Another thing to keep in mind when you select your location for the AC is that it needs to be close to an electrical outlet. Your window air conditioner should have a standard three-prong cord on it. As long as you install it within reach of an outlet, you should have no difficulty operating it. Just make sure that you don’t use an extension cord to operate your air conditioner, as this is a fire hazard.
Seal the Area Around the Air Conditioner
With your air conditioner successfully installed and ready to roll, the final step is to seal the area around it. It won’t do you a whole lot of good if all the cold air it produces gets blown right back out of the camper. You can use foam insulation pieces, insulation, the sides of the air conditioner, or even sunshade aluminum foil to seal the areas around the air conditioner.
Keep in mind that you’ll have to remove the AC anytime you are towing your camper or moving it up and down so you don’t want to use anything permanent as a sealant. Once your AC is sealed, supported, tilted the right way, and plugged in, turn it on and perform a practice run. If everything is working as it should, congratulations on your new air conditioner!
Pros of a Window AC in a Pop Up Camper
Window ACs in pop up campers are a great option for a number of reasons.
- Window AC’s are usually cheaper than portable air conditioners and rooftop units.
- Window AC’s are more efficient or just as efficient as any other option available.
- Window AC’s take up very little inside space because the bulk of the unit is outside. Portable air conditioners take up the interior space of an already small camper.
- Window AC’s are quieter while they’re operating than either of the other two options.
- Window AC’s provide large amounts of cooling in a hurry and are one of the most powerful options for a camper.
Frequently Asked Questions on How to Install a Window Air Conditioner in a Pop Up Camper
Is a window air conditioner a good idea for a pop up camper.
Yes. This is about the only good option for cooling your pop up camper.
What are the benefits of putting a window air conditioner in a pop up camper?
One of the biggest benefits is that a window air conditioner can cool your pop up camper in a hurry.
How to Install a Window Air Conditioner in a Pop Up Camper – Final Thoughts
Well, there you have it, how to install a window air conditioner in a pop up camper. Nobody wants to spend their evenings sweating while they’re trying to sleep. The only around this in the heat of summer is to install an air conditioner. Whether you only camp one weekend a year or live in your camper year-round, a window AC in your pop up camper will greatly increase your enjoyment level.
- Latest Posts

- How Long Do RV Generators Last? 2024 Answer - October 29, 2022
- How Do RV Generators Work? 2024 Answer - October 28, 2022
- How Do You Attach an Awning to an RV? - October 16, 2022
Related Posts

Can RV Air Conditioners Be Recharged?

Are RV Murphy Beds a Good Idea?

How to Heat a Camper Without Electricity

Are RV Mattresses Different Than Regular Mattresses?
Leave a comment cancel reply.
Your email address will not be published. Required fields are marked *
Save my name, email, and website in this browser for the next time I comment.
Enjoy The Wild
Outdoor activities/ Adventure/ Survival/ Travel Blog
How To Put a Window AC in an RV?
Last Updated on 01/14/2024 by Brian John
From the three options open to RV users to help keep their motorhome cool all year round, this can be either by the window, rooftop or portable air conditioners . RV owners have found the window AC option most advantageous, they are lower cost and require less preparation work and space than the other two and most of the units are extremely very efficient. These next few steps will give you a detailed understanding of how to install a window AC into your RV.

Preparing The Window
Prior to fitting the window AC unit, a lot of preparation work needs to be carried out; much less then installing a roof or portable air conditioning unit, but it is just as important. Many RV users prefer to use either the passengers’ seat window at the front of the vehicle or the rear window, this allows for the cool air to circulate around the RV, or so it is said.
The only real requirement is that the window must be larger than the smallest size of the AC unit; this may require you to measure the unit as opposed to using the measurements on the box. As most fully operating RV windows are circular, meaning they are not a sturdy base for installing the AC unit, also most of the adaptors included in many AC units are not helpful for installing them into RV’s.
Many RV owners recommend that creating an adapter that will allow the AC to be raised from the RV’s windowsill, but that is able to cover any gaps left in the window. This can be built quite easily with wood, plywood or any durable material, it is imperative that this adaptor is measured over and over to ensure there are no visible gaps, it is advised to prepare this apparatus using the AC unit one wishes to install as the guideline.
Creating this adaptor can be tricky, many people measure out one sturdy frame which can slot into the window and hold the AC unit with ease. However, it has been suggested that creating separate parts for the top and bottom of the AC unit is easier to measure, prepare and install. The bottom adaptor should be created with a raised lip closest to the outside of the window; this method stops the AC unit from tilting both in and out of the RV. This can be created with careful measurements and a power-saw quite easily.
Installing The AC Unit
After preparing the window for the AC unit’s installation comes the actual fitting, if the measurements have been correct then it should be a simple task. If you have chosen to create the unit which is all in one, position this into the window and slide the AC unit in between the gap till the smallest edge of the AC fits into place.
If you have chosen to make the two-part fitting, please slot the bottom fitting (with the slightly raised lip) onto the bottom of the RV window. Then take the top fitting and wedge this into the top of the window, this may require two people, one person to hold this in place whilst the other person slides the AC unit into the empty space until it is properly fixed in.
Both the AC unit installations described above allow for the RV’s owner to install an uninstall the unit easily, and for the RV to travel as freely as is needed. There are other, more dated ways to install a window AC unit which could impact the actual use of the RV, by cutting into the shell of the RV, making any of the windows unusable or adding any extra diameters (such as placing the AC unit on the outside of the RV window, as opposed to the inside). These have not been listed as they are not such desirable solutions to install a window AC onto an RV, they are considered dated and impractical.
The Future of Window AC’s for RV’s
Described above are the steps to installing a window AC into an RV with the least damage to the RV or its ability to be roadworthy. It may seem like a very elongated method and the future of Window AC’s does not look to follow suite. The traditional big AC unit will become a thing of the past, there are many products in development that are less than six inches tall, adaptable to a variety of windows, easy to store and easy to read interface and your window will not become unusable.
Sharing is caring!
Window Air Conditioner to Cool an RV
There is has been an interesting discussion on the ProMaster forum on using a window air conditioning unit to cool camper van conversions. These window AC units are compact, cheap and fairly efficient, so they could be a good solution for cooling camper vans which are typically less than 100 sqft.
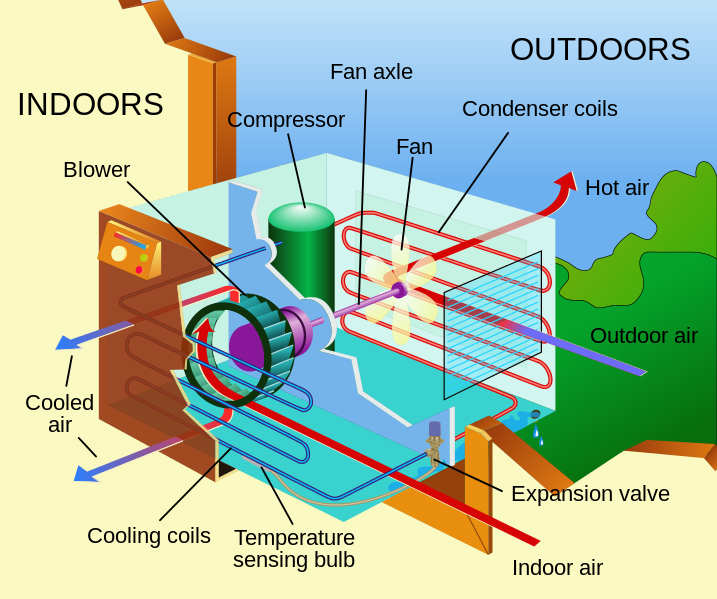
One way to install one of these units in a camper van is with the AC unit fully inside the van (say under a bed platform). Normally these units are installed in a window, and the condenser coil on the AC is outside and a condenser cooling fan picks up outside air from vents in the sides of the unit, forces this air through the condenser heat exchanger, and exhaust it out the back. If the unit is installed inside the van, then provisions must be made for cooling air for the condenser coil. Most of these installs use inlet ducts that go through the floor to supply the intake for condenser cooling air, and the condenser outlet vent can either be a rectangular vent cut in the side of the van, or more holes through the floor.
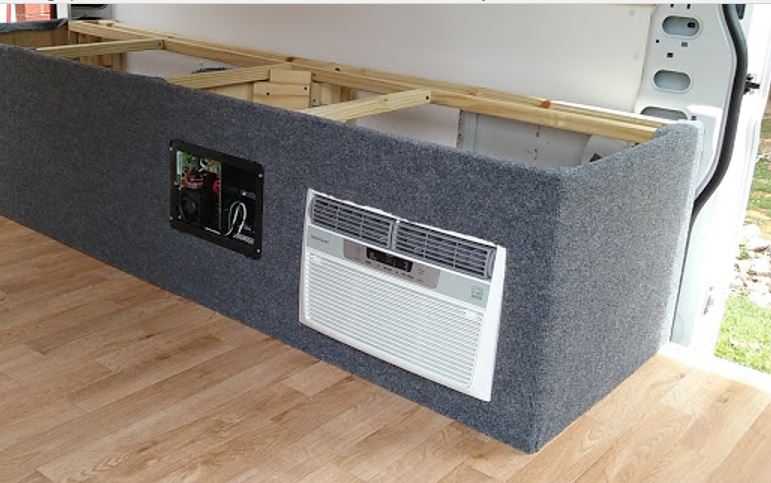
Its unclear how much these floor and sidewall vents impact the performance of the window AC unit.
Quick bottom line:
Its clear from the table below that the degradation in AC performance as you restrict the condenser cooling area can be severe — all the way up to having the AC shut down.
As you restrict condenser cooling air, the condenser temperature goes up, the cooling provided goes down, and the power consumption goes up quite a bit. If you are trying to get to an AC that will run off batteries, the added power consumption would be a problem.
On this 10K BTU AC, the configuration with four 4 inch condenser inlet ducts and no restrictions at all on the exhaust still increased condenser temperature by 10%, increased power consumption by 9%, and reduced cooling by 2%.
Going to a configuration with two 4 inch inlet ducts and two 4 inch outlet ducts increased condenser temperature by 43%, increased power consumption by 54%, and decreased cooling by 15%. This would effectively make an EER 10 AC into an EER 5.5. This seems pretty dismal to me, and the AC may not even be willing to operate for long periods under these conditions.
It seems like one approach that could be workable would be to place a louver vent panel in the side of the van that is about the same size as the AC’s heat exchanger (16 by 11 inches on this AC) to serve as the AC exhaust vent, and then use as much duct area through the floor as you can get in for the condenser intake.
Update: Added a test (bottom of this page) using a fan to force air through the condenser heat exchanger. This works quite well — the performance is essentially the same as the bare AC. See test below.
Update August 2018: Santiago has done some further testing with a 6000 BTU/hr window AC and come up with some good data. See this page for his design, prototype and testing…
His design completely packages the window AC unit within the van. The outside air to cool the window AC unit is brought up through openings int he floor.
Test Setup:
The test described below looks at how much these restrictions on the condenser cooling air flow effects performance. The tests are done on a window AC that I had had lying around. Its a 10,000 BTU/hr Fedders. At full cool, the nameplate says it draws 1100 watts. It has an EER of 9.0. So, its larger than ideal, but it should give an idea of what goes on. The AC is probably about 12 years old.
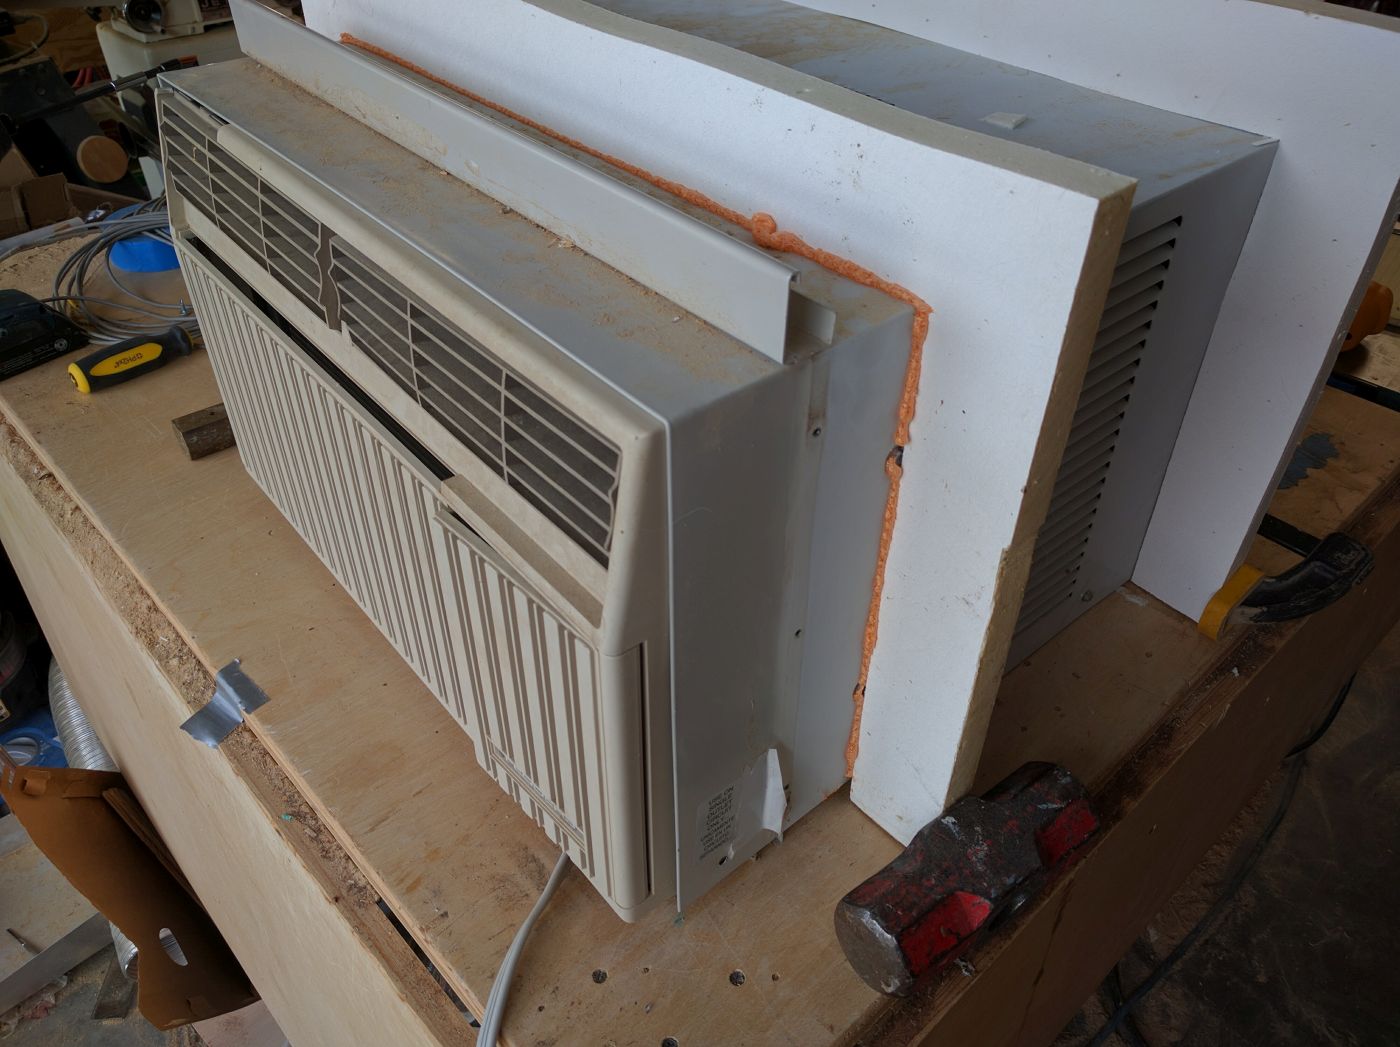
I built an outer housing for the AC unit that allows restricting the flow of cooling air to the condenser both on the intake and exhaust side. The amount of restriction can be adjusted by plugging some of the 4 inch pipe vents.
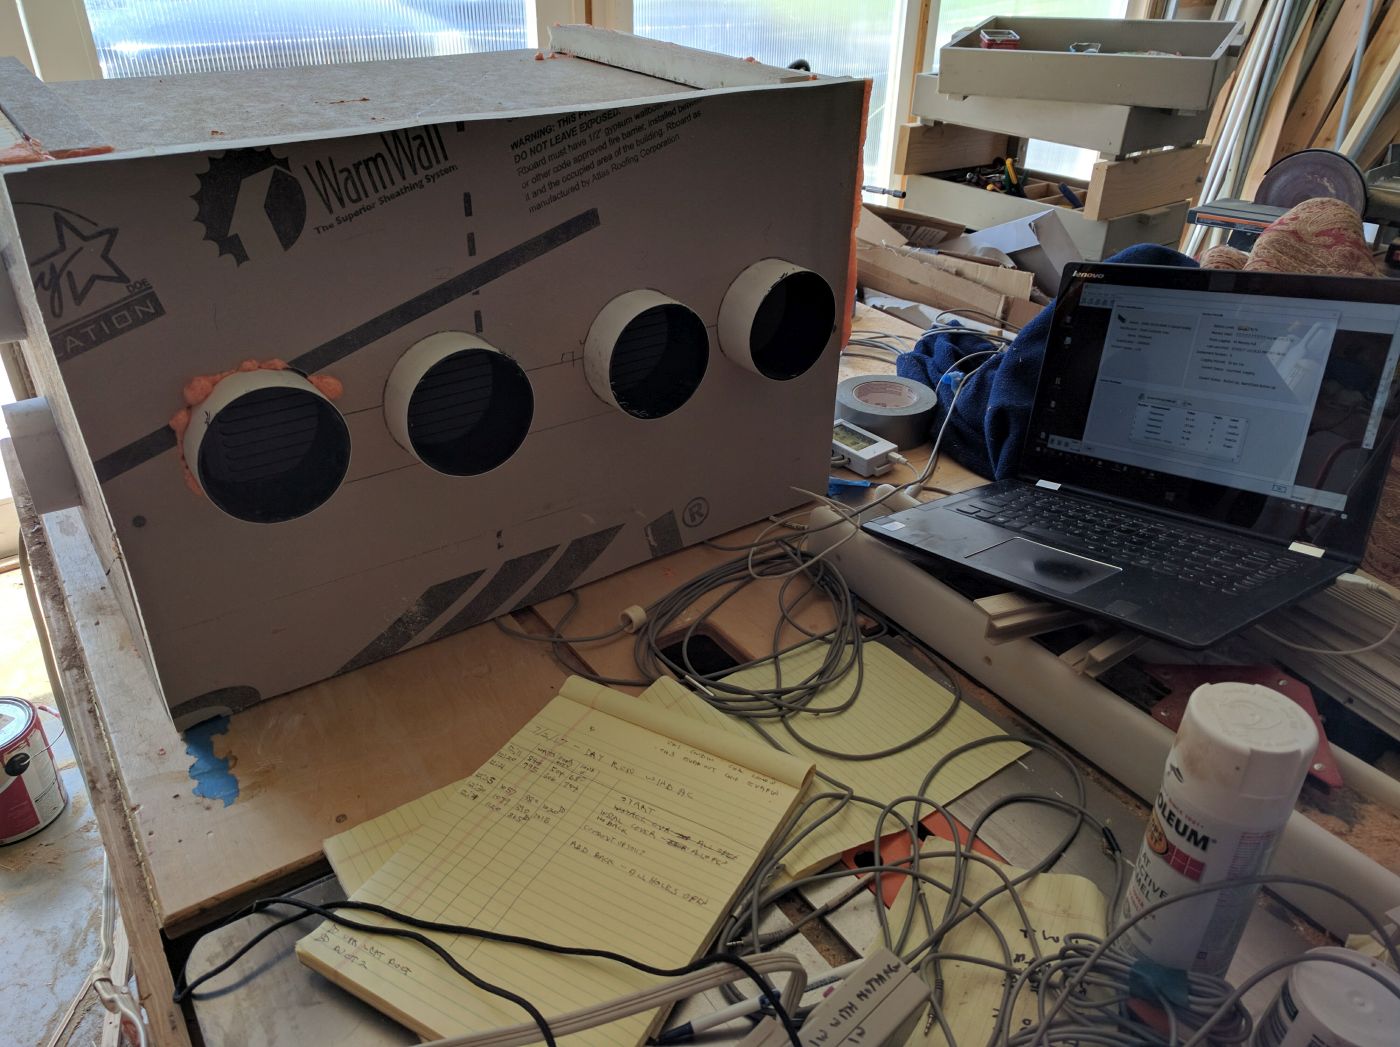
There are four 4 inch ducts on the sides that can be used to restrict the intake cooling air flowing into the condenser, and there are four 4 inch ducts on the back panel that can be used to restrict condenser cooling air exhaust flow. The back can be left off entirely to test for no exhaust flow restriction.
There is 2.5 inches of clearance between the added housing and the AC unit on the sides, and 4 inches on the top.
The pipes are nominal 4 inch (actual 3 7/8 inch ID).
There is also an added blower/fan on top of the housing that can be used to provide a forced flow of air into the condenser intake. To be tested later.
The following five configurations with ever increasing vent area restrictions were tested:
- Basic AC unit with no restrictions (as a baseline)
- Condenser Intake: four 4 inch diameter ducts Condenser Exhaust: no restriction at all — back not installed.
- Condenser Intake: four 4 inch diameter ducts Condenser Exhaust: four 4 inch diameter ducts
- Condenser Intake: two 4 inch diameter ducts Condenser Exhaust: four 4 inch diameter ducts
- Condenser Intake: two 4 inch diameter ducts Condenser Exhaust: two 4 inch diameter ducts
- Condenser Intake: one 4 inch diameter duct Condenser Exhaust: one 4 inch diameter duct This last config made the AC go into some kind of protective mode and was aborted.
This table below summarizes the results — it shows how much the power consumption, condenser temperature go up and how much cooling capacity goes down for each increase in flow restriction.
Bear in mind that this is a 10K BTU/hr and most of the window ACs used in camper vans are 5K or 6K BTU/hr — so, somewhat less vent area may be needed for the same performance.
Parameters measured: power consumption, evaporator inlet and outlet temperatures, condenser inlet and outlet temperatures, airflow.
Airflow is estimated by measuring air velocities using a Kestrel Anemometer.
The area of the condenser heat exchanger is 1.26 sqft.
The area of the intake grills for the condenser cooling air is 1.125 sqft.
The exhaust grill on the AC is actually larger than the condenser coil so it does not restrict it at all.
Each 4 inch duct (actual ID 3.875 inches) provides 0.082 sqft of area, so 4 of them provide 0.33 sqft of area — an about 70% reduction in area compared to the intake grill on the actual AC.
The plot below is from the logger that was used to log the temperature sensors. The added numbers (1 throug 5) are for the various duct configurations (see above).
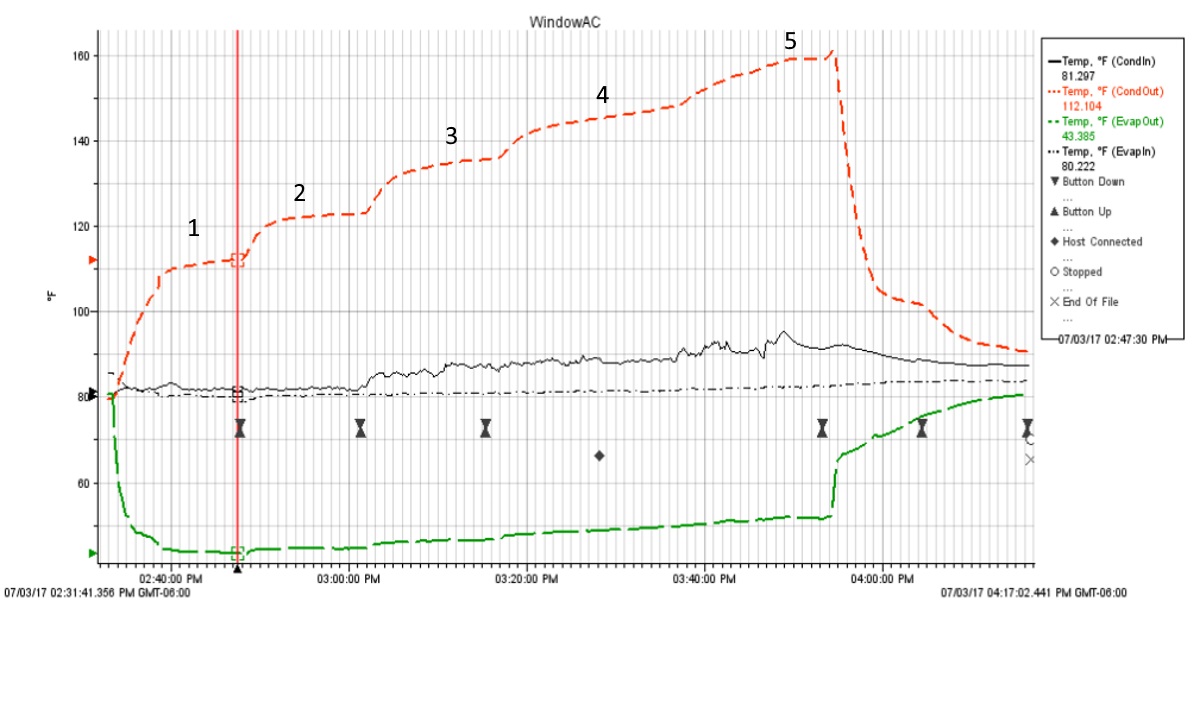
Red dash — Condenser exhaust air temperature (F) Black solid — Condenser inlet temperature (F) Black dash — Evaporator inlet temperature (F) Green long dash — Evaporator outlet temperature (F)
I ran each configuration for 15 or 20 minutes to let the AC get to a stable condition, but you can see that the condenser temp is still going slowly up at the end of each test — so, the condenser temps shown in the table are not quite up to what they would be for a long run.
The plot shows the condenser inlet temperature rising toward the end, this was likely bad sensor placement, as the condenser air was just being drawn from the room (as was the evaporator intake air).
I tried to go down to only one 4 inch intake duct and one 4 inch exhaust duct. Very shortly after I did this, the Kilowatt went up over 1800 watts and started beeping (its only good to 1500 watts), and then tripped and shut off the power. I took the Kilowatt out and plugged the AC in again. In a short time it apparently tripped something in the AC — it continued to operate and produced some cool air, but condenser temperature and cooling output dropped. So, I guess the AC was saying enough is enough! I turned the AC off, let it cool off overnight, and it seems to be back to normal now.
Test With Inlet Fan on Window AC (much better)
This test looks at using a fan to force air into the condenser heat exchanger inlet. The idea being to try to achieve about the same airflow as the base AC operating free of any restriction.
Bottom line is that this worked well. It achieved essentially the same performance as the base AC with no restrictions on the condenser cooling air.
The fan is a Dayton 4WT44A from Grainger. It is rated 680 cfm delivering to free air . It appears to achieve about the same volume of cooling air through the condenser heat exchanger as the base AC operating with no restrictions does. The fan draws 25 watts, so only a small fraction of the 1000 watts the AC itself draws.

More info on the Dayton fan…
In the test setup, the fan blows air into the space between the cover over the AC and the AC to provide the condenser heat exhanger with cooling air. The performance of the AC with the cover and inlet fan is nearly the same as the bare AC, so this configuration works quite a bit better than the non-fan driven configurations of the first test (above).
One way to set this up in a van would be to have the fan fit tightly over an opening in the floor such that the fan blows air into the space between the AC unit and the cabinet/cover you have enclosed the AC unit in. The opening in the floor should be about the same size as the fan (so as not to restrict airflow), and the cabinet over the AC should provide enough space between AC and cabinet for good airflow. The cabinet needs to be sealed well enough to prevent air leakage into the van. The condenser exit must be vented out through the side of the van with a vent that is large enough not to restrict the flow — ideally about the same size at the AC condenser heat exhanger. The outlet vent could also be through the floor, but I think it would be hard to find enough area for a good vent.
Bear in mind that this AC is a 10,000 BTU per hour unit, so if you are using a 5000 BTU/hr unit, the fan and vent areas could be correspondingly smaller
- Condenser Intake: Fan pushes are through the condenser heat exchanger. Condenser Exhaust: no restriction at all — back not installed.
- Back to the Basic AC.
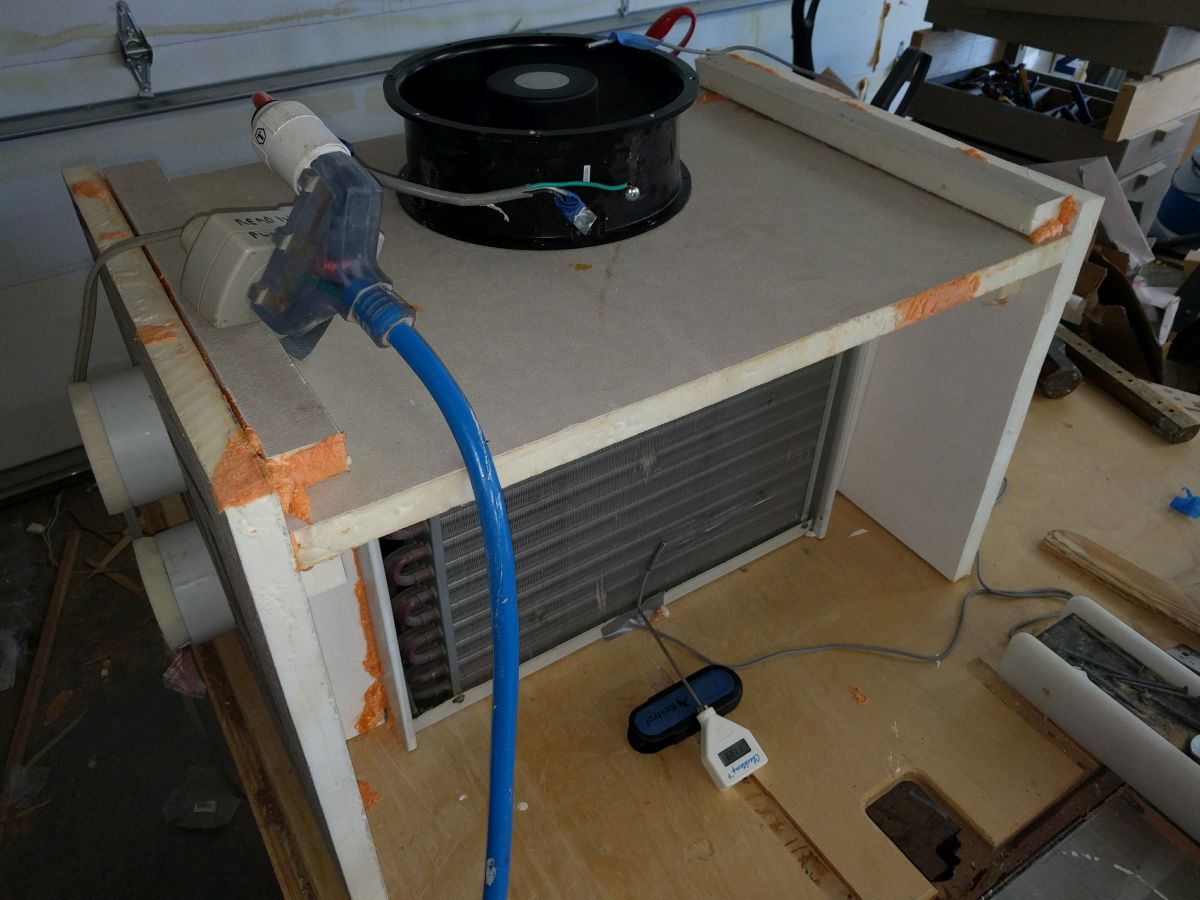
So, the fan forced cooling of the AC condenser heat exchanger provides the same cooling with no increase in power consumption (other than the fan) as the base AC.
Note that there is a discrepancy between the 680 cfm the fan is rated at and the 815 for so cfm in the table above — this is probably due mostly to the approximate way that I measure the condenser airflow — I just take 4 air velocity readings at the quarter points on the heat exchanger, then average them, and multiply by the heat exhanger area. So, not so accurate, but it does give a way to compare airflow between the base AC configuration and the fan forced air configuration. The result is that the airflow is very similar — which is good.
Fan: note that a lot of fans are rated on how much air they deliver when operating into free air (ie no resistance). This is not the case for this application — there will be some flow resistance and the fan has be able to produce good flow with this resistance. As a starting point, if using a 5000 BTU/hr Ac, I’d look for a fan that can deliver of the order of 400 cfm while working against a pressure drop of about 0.1 inches of water. This is just an educated guess, but maybe better than nothing. Good fan manufacturers provide a plot that shows airflow delivery vs pressure drop in inches of water.
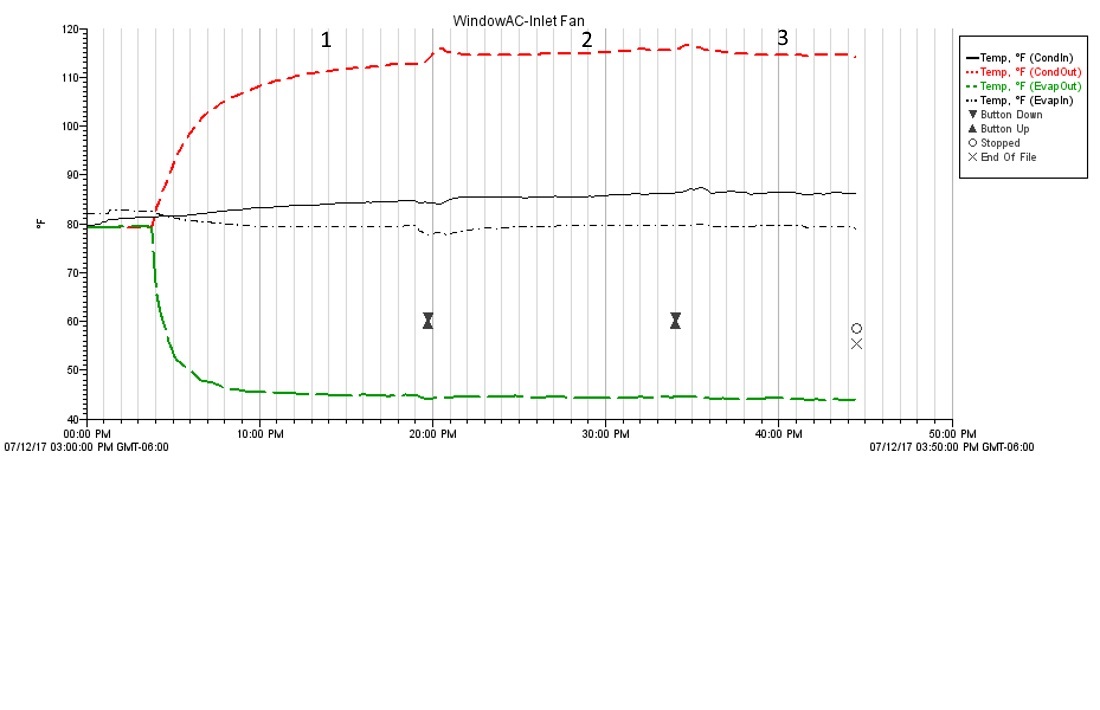
Red – condenser heat exchanger exit temperature (F)
Black solid — condenser heat exchanger inlet temperature (F)
Black dash — evaporator coil inlet temperature (F)
Green – evaporator coil outlet temperature (F)
Any comments, suggestions, ideas … are most welcome.
90 Responses
This is an older post but still good info for people like me wanting to do the same. I totally enclosed a 6000 BTU new unit in the back of my 5th wheel where the TV used to sit. I used four rectangular rain and bug-proof vents. These have large louvers turned down slightly. For the condenser exhaust, two 10″x10″ opening vents. For the input air, one 10″x12″ and one 6″x14″. There is some restriction from the screens. I don’t know what the actual flow is. I did initially try just one 10″x10″ on the exhaust side. It got almost too hot to the touch and I wasn’t getting very good cooling on a 90+ degree day. Everything ran, just seemed to struggle. Added the second 10″x10″ to the exhaust side, and it is much better. I am satisfied for now. Each area is separated and well sealed.
A couple of exterior pictures – it is a clean enough look for me. The side picture shows the first evaporator input on the side, and the other evaporator input on top on the rear. The first exhaust out is below it – this seemed inadequate when running in 95 degree heat. The second picture shows the additional 10″x10″ condenser exhaust. The contour of the body forced the placement of those two somewhat apart. The exhaust grille is centered between them, and there is a 4″ opening gap the exhaust grille and the interior of the box. The exhaust air goes out both fairly evenly. After running for some time the air from each and the vent temps are close. https://photos.app.goo.gl/okoccNQqHEP6J6eq5
Oops, the second picture didn’t post: https://photos.app.goo.gl/goEFHDc29VNJhdDD9 . I have a small generator that powers this unit and don’t plan on solar or battery/inverter use. Probably can’t run the a/c and the microwave at the same time on the 2K generator either! I will report after some actual use experience….
Hi Tom, Good data – thanks.
Please let us know how it works out and if you make any more changes.
Hello again.
After searching to no avail, I decided to build the inverse of you: An entirely-outdoor, ducted AC unit. Surprisingly, this product does not exist. The closest thing I found to it was for dog-houses, but that product isn’t being sold any more.
Here is a pic of my hack: https://drive.google.com/file/d/1BBPjdl8LbNe6xZCkMCUm4HYGKiZ2ex3W/view?usp=sharing
It will live it’s life under my home, in an open-air crawl space. I will be controlling it with an Arduino.
The Arduino will act as a thermostat, and call for cooling by triggering a smart-plug. Upon power to the plug, the unit will cool the air in my home, without me hearing any compressor noise or worrying about any condensation leakage.
To ensure this would work, I needed to find a very “dumb” window unit, one that just has a couple switches and a dial for control. I peg the dial, and keep the switches in the ON position, then just control it by controlling the plug. I don’t use the thermostat on the unit itself (hence pegging the dial). Hope this helps someone.
Hi Josh, Pretty slick.
Please let us know how it works out.
re: “An entirely-outdoor, ducted AC unit. Surprisingly, this product does not exist.” Oh, those do exist, although normally they have much larger capacity than a window unit. google: “What is an HVAC Packaged Unit?”
FYI: We’ve started using the Midea “U-series” (e.g.: MAW10V1QWT) on travel trailers, mounted just above the floor at the front. These have most of the advantages of a mini-split but installation is almost as easy as a normal window A-C. The condenser section extends out about 11 inches, and it does need external support (a basic bracket is included with the unit).
It might be possible to mount one of these in a cargo van rear door if the hinge & internal support structure is beefed up enough to handle the weight (~55 lbs).
Hi Elvis, Looks like a nice unit – especially with the CEER of 15.
I have a 2nd spare tire mounted to the back door on my van that weights about the same as an AC. The door skin is reinforced, but not the hinges or latches. So, might be able to mount the Midea on the back door without a whole lot of enforcement.
One thing that bothers me a bit about the 120VAC units in a camper van is that the heat generated by the inefficiency of van inverter goes into the van as heat and just requires more output from the AC. I wonder if it would be worthwhile to cool the inverter with out side air?
It sure would be nice if there were more direct current air conditioner options. There are the very small (2k-3k BTU/Hr) cabin cooler units that use Secop (formerly Danfoss) compressors more commonly found in refrigerators, a few rooftop mount units to help big trucks meet “no-idle” regs. (e.g.: Kingtec), or a few mini-splits (Hotspot Energy). Other than that, gotta use an inverter.
Even some major air conditioner manufacturers (e.g.: Lennox) are (or were recently) marketing “hybrid” condenser units that are actually regular 240vAC units with an add-on integrated inverter. so it’s possible to do that in this camper-van A-C application too, as long as the inverter manages to handle the start-up load. The inverter heat should be pretty minimal, but if it’s dedicated to the A-C it could be mounted so that waste heat is vented to the outside air.
IMO, the ideal Air Conditioner in a van (at least in terms of space efficiency, if not thermal efficiency) is the OEM A-C that’s under the hood… but unfortunately the only ones that run off of batteries are on hybrid vehicles… and none of the US-market vans suitable for conversion are available in a hybrid. Maybe Ford will eventually offer a hybrid Transit? Or maybe an electric compressor from another Ford model could be retrofitted (but in this day of computer-module controlled everything, that’s unlikely).
FYI: The photos at the top show a window air conditioner sitting on a wood floor inside a plywood box. The inside bottom of this enclosure is not shown.
But if intending to operate the air conditioner when the vehicle is parked on a slope, a provision must be made to allow condensate drainage. The OEM drainage path works only if the unit is relatively level (outside end slightly lower). If the vehicle is parked on even a slope that causes the front of the A-C to be lower than the back, the condensate will overflow the relatively shallow OEM internal drainage pan, and possibly leak into the vehicle.
For what it’s worth, I’m cooling 700 square feet of a house with a little 5000 btu window AC. I mounted it in the 26″ wall sleeve of the former mini PTAC that was there but had failed. Since the replacement PTAC was $700 and the used window unit was only $50 it was worth a try. Here’s the wall sleeve: https://www.acwholesalers.com/Amana-PBWS01A/p100211.html HOWEVER It didn’t cool effectively until I performed the hack shown in this picture: https://photos.google.com/photo/AF1QipNnsCUTDhH2OOkUGbwUhxnySh-hGnRb0v8luULF It was a matter of separating incoming and outgoing condenser airflows. My point is that an oversize box next to the wall of your van is the cheapest and easiest way to accomplish the project. In this case the project is to use a window unit without having it protrude from the wall of the van. One just needs to find or make a good looking louver. The one that comes with the wall sleeve doesn’t cut it: https://photos.google.com/photo/AF1QipNGm9NXZuYp38tKz3xVP1kO9ORc2eAfJbATeNe2
Hi Kevin, Thanks!
The 2nd link to the picture does not seem to work – any chance you could fix it?
Here’s a nicer LG grille: https://pisces.bbystatic.com/image2/BestBuy_US/images/products/4861/4861737_sa.jpg;maxHeight=640;maxWidth=550
Mine is Amana and it just looks cheap and too easily damaged for an RV: https://lh3.googleusercontent.com/jcaugdcH8c_SFoOzxJhqKTOuGnprdlQOze7ZmLak2pRe5xB9nFyuAuMeTgaWe4S2kAvkSUBTdV_XSxx8RdRuYEuxeWs_B6RH0CPJ5l41e_pYL-WjW96vXSVmxsWsDtj6DS0uQNRJLtJadgPR6SG6lq26vVmG1tzjeLPak36WhwwT5kRfunRL7Ot_0zW_ggH4Hdo7VFRRtPWUHdAev6ZzJA9csv9u0ZO7AtDYEHubnDdcgzV_CQxezI-LgQLZjMV6CIDeoP2vHKnLyWBlcqgicAH9X8n777bAEdiJU4WmldQnltM9QywEebHvnCdbHAYC6-KdEt74Yo98HB1EgbK45FQWBIHMN8gyooH6Z18KDgul9GJvvConvk_yKbIQ9quofZO6HgdLIBDO7POCY4XQqrxZnfuMjp_0IQlamJxNegHbns8uXDW0tPH_qzB5oPdbN8IaF8pwbOPBqv87uR9AnA9MogVBlLt2zEOs6YmhIx41F3pYem1qAdSGr9o3d937szLc1ZZwZKJotZXb_NNpA5BrG2qpS15p5dSuBBFc-sOuz-HIdRwgloC-kXvOdQJhUX95xRPI9RDHIeeUeJC73hPy0kINt1_rWhJ408tyDzapgBSKJnQp7z98LZYIFB2aoX-SHBYWbIke2JMAn4nbcyCbsu7ib5KVXtIrtk5me7j2BnIu7hFiL7LSkraL6_Pu_EFgc6tCpnx9gWXyZJgM3PTiGQ=w758-h568-no?authuser=0
Amazingly explained! I am getting curious about the way you are using a window air conditioning unit to cool camper van conversions. I have seen a lot of blogs & videos it but this one is simply awesome. I will definitely give it a try.
Hey Gary. Thanks for the write-up and testing.
I was wondering about an inverse setup: Have the entire AC unit outside, and only duct the evap-coil (front) of the unit, leaving the condenser-coil (back) of the unit unmodified.
Do you think this would be a more machine-friendly solution?
I know these units are sharing a blower for both the evap and condenser side, so restricting one side is likely putting a stress on the other. However: Openings for the evaporator-side of these units are already restricted by design (compared to the condenser side).
Essentially I want to turn a window ac unit into one of the (now discontinued, and apparently faulty) ClimateRight units seen here: https://climateright.com/products/cr2500ach?variant=34672044671128
Hi Josh, I’m not sure — I think you would have to give it a try with the actual duct size you would connect the evaporator to to van with. It does seem like the evaporator side flow is less than the condenser side flow, so it might be easier to get good efficiency with the hookup you describe. You could do some testing with various duct sizes and see how it works. A KiloWatt meter would give you some idea when you are restricting the flow too much.
Not that it matters for what you plan to do, but those ClimateRight units appear to have pretty low efficiency (low EER) – so, a good, high EER window unit is probably a better bet for efficiency.
Would like to hear how it works out if you give it a try.
Window AC unit choices are bumming me out.
There are very few all-in-one HVAC *Window* solutions, which is strange to me because pretty much every mini-split is an all-in-one HVAC solution and they share the nearly identical mechanical parts to window units.
The search for the following is proving futile: – Low BTU (aka: small size, and no clam hands) – Heat Pump (aka: reverse cycling and not just resistive heat) – Defrost Feature (aka: ability to operate heat-pump below 40F) – Fan on Demand (aka: ability to leave the unit ON without the fan always running) – Inverter Compressor (aka: quiet / most efficient tech)
The only unit I found that comes close ( Amana AH093G35AX ) lacks the inverter tech (so it’s only 9.9 EER, and perhaps noisy). It also lacks the defrost ability, but makes up for it with an additional resistive heating function for below 40F (at the expense of power-use since it only comes as a 240V unit).
It’s frustrating that no one seems to take true advantage of the relatively simple reverse-cycling of an AC window unit to get HEAT. So many of the newest and most efficient window units seem to completely abandon heat, or have it as a lame after-thought.
If you know of a good all-in-one window HVAC solution, I’m all ears. But for now I see two options: Option #1: Buy the Amana AH093G35AX. Option #2: Buy a conventional AC only unit, and also buy a common (resistive) area heater.
Hi Josh, Yes, that does seem strange that the combo heatpump/AC units are not common.
There are some small mini-splits that people have used in RVs, tut not sure they would fit your needs or be small enough in BTU/hr to work for you.
I’ve put together some ideas on various cooling schemes on this page — might be worth a look: https://www.buildagreenrv.com/design-and-build-information-for-camper-vans/cooling-and-air-conditioning-for-a-camper-van/
I would be careful on going too low on the cooling capacity. There have been people who have successfully used 5K BTU/hr units on well insulated vans, but I don’t think you will be happy with anything less for hot/humid conditions. If you search the ProMaster forum for posts by Jracca, he has a detailed description of how his 5K unit has worked out.
You might also try posting your question on the ProMaster, Transit and Sprinter forums — there might be some ideas there.
“It’s frustrating that no one seems to take true advantage of the relatively simple reverse-cycling of an AC window unit to get HEAT.”
Agreed. The evaporator fin spacing of a typical window unit is too tight, so it’s a major redesign.
Hi, Please let us know how it works out.
I purchased an old pop up camper with ac on the top. I removed it due to leaks. I have instilled a window unit where the hot water unit was originally. It fit perfectly and the exterior door is vented. As I read your article, I get lost with all the details. (I’m not a havoc person.) My question is how did you deal with the water draining from the window unit?
You might find the answer on this page: https://www.buildagreenrv.com/design-and-build-information-for-camper-vans/cooling-and-air-conditioning-for-a-camper-van/
As far as I can recall, the window ACs have a slight slope toward the outside so that the water coming off the cooling coil runs outside if it does not first evaporate? Gary
An HVAC tech might approach this problem by moving the condenser section into a separate section from the evaporator section (which would require cutting the lines, brazing, evacuating & recharging). That would basically turn a window A-C into a mini-split unit.
So, instead of trying to shoe-horn a window A-C into the interior of a van, why not use a small (9,000 BTU/Hr) mini-split unit?
A small mini-split would be a *LOT* more efficient than any window air conditioner, and heat pump versions are readily available.
The other option is to use a dual hose portable A-C. Not as efficient as a mini-split, but better than a window A-C with the added fans required to make it work in a van.
Hi Elvis, I guess its all a bunch of tradeoffs…
The window AC offers an efficient (EER 12 for the best of them) in a very compact package for very little money. I did recently see an installation down low on the back door of a ProMaster that looked pretty good and looked pretty straight forward to do and that should give full window AC performance since there is no need to redirect any of the flows.
I did see one very detailed description of an installation of a window AC where they did separate the condenser and installed it below the floor. It was very complicated and time consuming — just can’t see many going that way.
The mini-split are promising and I mention them on the AC page, but not all that easy to fit one in, and not much choice yet in the size needed.
The numbers I’ve seen on the two hose portable ACs show about the same EER as the window ACs. People do use them – on the down side, thet take up a fair bit of floor space in a small van, but on the plus side you can just take them out on trips where no AC would be needed.
Lots of choices.
Aside from cost, the biggest advantage of a 5000BT window AC is weight. Try finding a portable A-C that weighs only 40-lbs. There aren’t any under about 60 lbs.
Same problem for mini-splits, but the smallest ones are 9,000 BTU/Hr. However they are a lot more efficient: up to 15 EER & 25 SEER, along with which comes an invertor-driven variable speed compressor, so there’s fewer problems with startup surges compared to the on-or-off cycling of a cheap window A-C.
I am in an RV and the bedroom window is an inch too small vertically to fit the smallest window AC. :/
So, I was thinking about doing a build like the one shown near the top of the article, in the cabinet, but I can’t find any more info on that.
In my case the side intakes would be free and clear, taking in the air in the RV (sitting on a built in dresser) and I would encase the heated output off the back and direct it out the window. It is a near match so the back would not be blocked.
Would that work? Am I missing anything?
Hi Mandi, There is a bit more detail on the window AC install in an RV on these pages: https://www.promasterforum.com/forum/showthread.php?t=65489 and https://www.buildagreenrv.com/design-and-build-information-for-camper-vans/cooling-and-air-conditioning-for-a-camper-van/
I’ve also saw one in which the window AC unit was placed low in one of the rear doors of a ProMaster van. It looked pretty good, and since none of the flows had to be redirected, it should perform quite well. Just another option.
If by side vents, you mean the louvered openings on the side of the AC unit, then you don’t want those openings to vent inside the van. These openings are inlet air to cool the hot condenser coil, so the flow is into the side louvers, through the condenser coil and then out the back of the AC. If you use air inside the RV to feed these, then that air will have to be pulled into openings elsewhere in the RV, and it will be hot outside air. You need to connect those side vents to outside air.
I had the same problem… Did you check the LG LW5016 & LW6017R (sold at Home Depot). These have the lowest height required – slightly over 11 inches (less than the stated height of 11.13) – of any window air conditioner. They also have very low power consumption (440w & 520w), and slightly better humidity removal than most other 5,000/6,000 BTU A-Cs
Great website, love all the detailed information. I have a small travel trailer (16ft) with a very noisy roof AC (and no roof vent) that rarely gets used, but when it is needed it is a necessity. I have been thinking about improving the situation for a while now and your discussion is very interesting. Here is what I hope to accomplish: replace ac with a small 5K BTU, quiet, less expensive, lighter, window AC. Move the weight off the roof. Use the roof opening to install a fancy vent/fan. The plan is to add a nicely sealed door and a heavy duty slide out drawer to the side of the trailer. To use the AC: the door would flip open, AC slide out and seal around door opening. This would allow for the ac to operate as intended, keeping the hot stuff and noise outside. It would be made to be “universal” to facilitate easy replacement of AC unit. It’s a big project but doable. I will send an update when completed.
Regards, Craig
Hello, Interesting read, In my case, I have a small Scamp trailer and mounted a 5k btu GE Window unit in a very small space that was about 13” high 18” wide and 21” deep with portioned fresh outside air and used 2 50cfm bath fans mounted on the side (directly behind the condenser) with each fan venting thru the floor with a 3” hole. The fans turn on with the ac and works great. The bench/Bed above the ac just barely gets warm when running at the coolest setting all day. Using the side by side fans to exhaust condenser heat as opposed to pushing in fresh air for me seemed to work best in my application.
Thanks Frank, Sounds good. Any chance of getting some pictures?
You can email the pictures to me, or attach them to a reply. email here: https://www.buildagreenrv.com/contact-gary/
I just found this website and this thread – came here for installing windows in a sprinter. I have a 2006 Dodge/Mercedes sprinter that has only windows in back doors and up front (windshield and doors). But I then saw this discussion on air conditioners. Even though I didn’t read every word you guys have written about the topic, here is what I did. I bought a $250 portable 8000 btu air conditioner that sits behind the driver’s seat and the exhaust hose is attached to a custom made 1/4″ plywood piece that fits inside the driver’s window taking up about half of the window (from top to bottom) so I close the window to hold it in place. When connected to shore power I plug it in with its own extension cord (using a splitter) and it works like a charm. I can leave it in place or pull it out a bit and direct the air toward the back and get a great air flow and cool down. If the van has gotten super hot and the outside temp is in the 90s then it has to work pretty hard but it can do it. Just thought I’d throw in my 2 cents.
Thanks Andrea,
What brand of portable AC are you using?
Hi Gary, Its an LG that I bought from Lowes 2 years ago when I first got this van. It does take up some valuable real estate but has been worth it. I have been on this trip 9 weeks now (California.Oregon.Washington.Alberta.Montana.Utah). Very happy to find your site, very good! Thanks.
I summarized my window AC testing few days ago and created a PDF encompassing the write up, data and photos of test set up equipment and sketch of proposed plenum build.
The PDF was updated to version 2 yesterday.
I will be going on vacation next Wednesday. Is there anything else you need?
Hi Santiago, We are up in Yukon/Alaska with VERY limited internet – none at all most day.
Thanks very much for putting the pdf together and will have a look once we get to good internet.
This is how you would mount a cheap window AC to function as a heat pump for heating the RV in winter. The COP will be 3+.
In this case, however, you need to exhaust the cold air, and deliver the warm air to the space.
Also you have to defeat the thermostat, but this is done by jumpering around it. This is easily done with the dial thermostats, not so much with a digital model with remote.
A 5000 btu unit would provide plenty of heat for an insulated van, so this could be a good choice for those of us trying to go 100% electric in colder climates.
I haven’t found anyone actually trying it yet, one unknown is the how cold can it be outside and still have it provide heat. A plug in style 120V thermostat could provide automatic operation.
Hi Kevin, Was there supposed to be a link there showing the proposed AC mounting?
Here’s a quick sketch.
You’ve made a box to blow ambient air into the cavity that encloses the condenser and condenser fan. In order to use it as a heat pump, we just reverse the box. I’m proposing that the box should enclose the “user side” of the unit. Now the window AC provides heat to the camper from the condenser side, and the cold air from the evaporator is removed from the space.
I also don’t want to hijack the thread because it’s about cooling the van. I’m interested in heating the van with a $120 “heat pump” hack.
Nice — quite a “cool” idea.
Maybe efficient enough to make electrical heat practical.
Please let us know if you try it.
Hi Gary, I did try it and it iced up quickly at 45F outdoor temp in relatively dry Denver. So basically a failure.
Thanks Kevin.
You are right, I am guessing what the pressure drop will be through the AC and as it loops through that and back down to the floor. Think enclosure, ducts, condenser coil and getting around the condenser propeller fan.
What I need to do is to measure the new AC sitting on a bench with no restrictions and am crossing fingers that its’ design condenser cooling flow will be a lot less. If so then I can drop down to the EBM-PAPST 143 series that is smaller quieter and consumes 29 watts.
Granted the EBM-PAPST 200 series (61dbA) is not great noise wise. The next smaller model the 143 series (58dbA) is better but still 1 dbA higher than the Dayton 10″. High fan RPM is not our friend.
Looking at http://www.fsec.ucf.edu/en/publications/pdf/FSEC-CR-1674-05.pdf PDF page 5 under heading “Impact of Air Flow on Outdoor Unit Condenser”
“The total external static pressure of the original fan producing approximately 2,200 cfm was about 0.12 iwc.”
This is my pressure drop starting point. Then there ducting losses. I have no idea what it would be on a small window unit operating with 30,000 fewer BTUs. No doubt condenser tube/fin design as well as air velocity determines pressure drop so it might be a realistic number from large to small units?
Once I have a real unit to play with and get baseline flow data I should be in a better position to decide on fan. The Dayton 10″ I believe I can purchase on eBay for a lot less than Grainger. I should be able to squeeze it in. Its’ fan curve makes me nervous due to potential pressure drop from floor inlet to floor outlet. I realize the AC has a propeller fan pushing through the coils. Would the propeller fan assist or hinder the Dayton 10″ ? I am not smart enough to predict that. All I can do is try the 10″ Dayton, cross fingers that it can get the AC units’ design cfms end to end. Am partial to low noise and power consumption.
Appreciate your fan offer but I think I will look at eBay again. Should the Dayton not work out I have another project I can use it on and it’s perfect for it. Plan B would be a fan with fan curve that pushes the cfms through.
Gary as always, thank you for your input and different points of views. I like learning and this is the site to do so.
Hi, I’m not sure exactly what they mean by total external static pressure of the fan in the pdf, but I’d guess it includes the pressure drop through the condenser itself. On the window AC, the built in fan in the AC will handle all the pressure drop through the condenser and the internal air path — your external fan only has to handle the pressure drop you add due to your added ducting outside the AC.
It is hard to estimate your added ducting pressure drop, but you might find the calculators listed on this page: https://www.builditsolar.com/References/references.htm for “sizing pipe, ducts …” But, its probably going to come down to just trying a fan and seeing how it does on maintaining airflow that is about equivalent to the base unit.
One item you might consider for both testing and the final setup is a motor speed controller — depending on the kind of motor the fan uses, the motor speed controller might let you adjust air velocity and fan noise to to the lowest value that still gives good performance. https://www.amazon.com/Casolly-Variable-Controller-Exhaust-Inline/dp/B07BMR4THQ/ref=sr_1_3?ie=UTF8&qid=1532619980&sr=8-3&keywords=fan+motor+speed+control&dpID=51yXEx7TDnL&preST=_SY300_QL70_&dpSrc=srch I’ve used these on several blowers to good effect, but have not tried it on the Dayton fan.
Hello Gary,
Unfortunately, the AC will arrive 8/01, the Kestrel 1000 is on its way. No fan order until I get basic numbers. Meantime if heat wave subsides a bit will start shopping locally for square tubular steel as it’s backbone of all cabinets, covered with good looking surfaces wife picked out that hides the steel frame.
You make a convincing argument that the ACs’ condenser propeller fan will hold its’ own. With that I think the Dayton 10″ is the one. I prefer the smaller EBM-PAPST models but to get that performance they generate more noise. Not good.
Initially, I thought of DC fans. In this flow range it was 24vdc and higher. Also not as quiet but I wanted to adjust speed for varying operating environments. I know I can step 12v to 24/48vdc but it was the noise level.
Then EC fans, promising speed control but again not as quiet in the flow range I think I need. The Dayton 10″ you use is not rated to be controlled per Dayton, it uses a PSC motor and I can see why Dayton adds those warnings. So it will likely be the mild manner relatively quiet Dayton 10″ unless next week’s flow data states otherwise.
On the Florida Solar research pdf, if you read the paragraph where I hand copied the line I wrote it explains that yes they were after the pressure drop through the test condenser. I could be wrong but that’s what I got from that.
Thanks for reminding me to calculate whatever traditional ducting I plan on using for pressure drops. It will be minimal as the biggest “ducting” I see is the enclosure itself as it guides the air stream exiting the fan into the mid section of the AC unit feeding the propeller. After passing through condenser coils heads down towards the van floor exit opening then once outside turns 90 degs and is whisked away.
I think I will remove the ACs’ metal housing or at least open it up big time as there is an insulated and sealed wall between the cold side (evaporator) and hot side (condenser). Why restrict cooling air with weather protection vents you don’t need? Will not permit flow to short circuiting condenser.
Welcome more ideas, comments or suggestions. Meantime will wait till I get flow data next week. Thanks for all you do.
Hi Santiago,
I will be following your progress with interest. I am contemplating a similar plan for my Promaster conversion. I picked up a 6000 BTU A/C when I was at Costco the other day, but it is currently sitting at the bottom of a stack of other project equipment. Like you, I had originally thought about both the intake and exhaust going through the floor. I am now leaning toward a floor intake, with the exhaust going out the lower rear quarter panel. This area currently has the existing one-way vent for door closing. It is also hidden behind the plastic trim on the outside. The thought is that the vent can be exposed when using the A/C, but it could be covered by the plastic trim the rest of the time. If you come up with a workable plan for both intake and exhaust, I might try to copy, although my layout leaves the center aisle open as a walkway, so my “garage” floor is more limited. As I’ve read some of your posts, I’ve started to wonder if replacing the existing condenser fan with one that maintains the same flow at a higher pressure drop might be an alternative to adding the Dayton fan. I guess I need to pop the case open sometime and get the nameplate info off the existing fan/motor to see if that might be a possibility. Thanks to both you and Gary for the good ideas and for taking the time to post them. Andy
Glad I am not alone doing this. You bring up two interesting points.
The rear quarter hot vent, what do you mean by “the vent can be exposed when using the A/C, but it could be covered by the plastic trim the rest of the time”?
I am totally in favor of opening the condenser exhaust vent to the outdoors when using the AC then closing afterwards since it will only be used while parked. I know the vans’ bottom wall area is double hulled and covered with black plastic pop out covers. Have you found that to be the case way in the back where the vans’ air vent is ? Honestly, I haven’t looked there and you might be on to something! To be clear, you mean exhaust through the existing air vent, onto an existing van cavity that obviously vents to atmosphere … right ? Will take a closer look tonight.
If that does not pan out and it sounds like your AC grill will face the center hallway, look to see if there is room underneath for the exhaust vent. Mine has the AC grill around 6 inches forward of the wheel well and more or less centered. Am fortunate that the intake/exhaust will land right about a large free floor area.
As to replacing the ACs’ propeller fan with a more powerful AC fan, hard to predict the outcome. That would require testing after the AC is installed and plumbed in as you need to consider the install as a new “system” from end to end.
Will comment on the test results I see next week and hope that offers some direction. I plan on constructing a temporary enclosure that matches the one designed. After all baseline data is recorded, add the fan and exhaust the same way I am planning so to simulate the actual van install on the bench. One concern I have is the throw beyond the condenser. If back wall is too close will that affect performance? I’ll find out. Obviously I also need to preserve my garage space.
Thanks for your ideas Andy.
I’m not sure if there is a way to paste photos here in the comments, so I will attempt to describe my plan a little better. It is still just a plan and I may find that some of my assumptions are incorrect.
My idea would be to remove the existing air vent “fixture” in the rear quarter panel since it is a little small (5″x5″?) and likely has too much restriction (I assume that the doors will still close OK with only the vent on the passenger side, but will need to test by taping one side off). I would then cut a larger hole in the rear quarter sheet metal (8″ diameter or maybe 8″x8″ looks like about the max possible) and then put some sort of grill or screen over this hole in the sheet metal. This would be hidden behind the plastic trim (the door “vent” simply vents out between the gap between the plastic trim and the sheet metal, but this has a relatively small area). I would then make a cutout in the plastic trim that is the same size as the cutout/grill in the sheet metal. The cutout piece could just be removed when the AC is running, or maybe hinged and flipped up to expose the exhaust vent grill. When the A/C is not running, the cutout in the plastic trim would be covered with the piece of plastic that had been cut out. You would still be able to see the outline of the cutout, but hopefully it wouldn’t be too noticeable. If I ever decide to eliminate the A/C completely, a sheet metal patch could be installed with the original door vent and then it would be covered by a replacement plastic trim without the cutout. The modification to the sheet metal wouldn’t be visible from the outside.
Anyway, that is my current thought. Like I said, I originally planned to have the vent in the floor, but was a little concerned that my intake and exhaust would have to be right next to each other, and didn’t know if I could direct them well enough to keep the exhaust from recirculating to the inlet.
If we can’t find a way to share photos via Gary’s site, you can contact me directly at [email protected] .
Hi Andy, Santtiago, Added a plugin to allow pictures to be attached — look for the picture on this page for instructions. Once you guys get further along, we can added a dedicated page for your projects with detailed description and pictures. Thanks!!
No photo needed just yet, your explanation is clear.
If your floorplan has the AC on one side or the other with AC cold discharge facing center of van, I can see why you want to vent through the van wall. I lucked out as my AC will be almost centered and discharging cold air towards front of van. Cold discharge will be about 3 feet off the floor.
The black plastic trim “hidden vent door” could be very difficult to pull off. Issues that while not impossible would be hard for me to deal with are careful cutting and matching of trim with no more trim material for a redo, hinging and water sealing. Maybe you are a very good craftsman but that would make me very nervous. I always mess something and need replacement material. As plan B, my plan C, you might want to consider a similar vent scheme a little higher over the trim and through the sheet metal wall.
Ok, if you are over the smelling salts and back on your feet, think of metal cover with seal all around and securely attached. It would be painted same as van. Just put plate back when done using the AC. You would still have sealing issues but …. it’s plan B. If I ever implement this scheme I will use painted sheet metal I cut out when doing one window install so trip to body shop for matching spray not necessary.
As much as I hate introducing potential water leak, if I could not exhaust through the floor I would find a way to do a plan B because at least it would not have a grill on display all the time. The biggest issue would be getting a good seal, have a strong attachment so it won’t fly off and make it blend as best as one can. The same can be said doing this under the trim but you will also have a blending issue there as well.
Think it through and take the path that you are most comfortable with. The main thing is that you will have a well performing AC. Perhaps you are proficient dealing with what looks like ABS like trim? You might want to find a section from a junk yard and cut door to fit opening exactly. Maybe you can source plastic with similar surface texture and color so you can cut more than one door? Nothing wrong with having a seam show.
My Anemometer just arrived, still in the box will check out tonight. AC comes Wednesday and I need to get thin inexpensive material to construct the AC housing/plenum to run tests after baseline tests are done. Will share with the site.
Gary, thank you for the photo capability. That will come in handy I am sure.
By the way Andy, I am in Orange County CA if that helps. Just started my 159″ build. Added CRL fixed window and MaxxFan with top aluminum flange sandwiching the plastic fan flange between it and the Hein roof adapter. I also came up with a simple way to compress the rubber seal within the flange channel when installing if that is of interest.
Thanks for the good comments. You are correct that getting a good match in the trim area could be a challenge, but I think that it is possible. The advantage there is that I can by an unlimited number of replacement trim pieces if I make a mistake (although they probably aren’t that cheap). Also, I would prefer to cut a hole in the sheet metal there, where is it already a little “ugly” and can be covered by the trim. Once I dig in a little deeper, I’ll see if this is realistic.
It’s good to hear that you are in Orange County. I’m in San Diego, so not too far away. Maybe we can arrange to meet up sometime.
Gary – Thanks for making the effort to set up the photo link and for the great website.
Sounds to me you have thought this through and have much confidence in yourself and skill. That’s great !! Go for it. One way or another I would like to learn how you pulled this off because I would like to do similar in other areas using the vans’ black plastic trim on future through the wall cut outs. I do not need it on my AC install as its location is too far from wall. With clear floor below, no need to run duct to outer wall.
If you can document how you cut and re-used the “door” that will pretty much blend in when put back. I like your plan.
Hi Andy, Santiago,
I’ve added a plugin that allows pictures to be added to posts. If you do a “Reply” to a comment, there should be an option now to attach a file to the comment, which can be a picture or a document. There should be a picture attached to this comment if it works…
Started to build a better test plenum trying to construct the beginnings of patterns to transfer to sheet metal on the condenser exhaust. While doing so, it hit me that maybe 10″ diameter in/out ports is not such a good idea. Of course I would love 18″ diameter ports but there are limits in life. It hit me that while there is room for them, 10″ diameter seems out of place for where this little AC is going. Decided to start over with 8″ diameter and that requires a plenum re-draw on the bottom side leading to the van’s floor. Also specd’ in two slide gate valves to isolate AC when not in use.
Now the DC fan I need with PWM is not stocked anywhere, manufacturer said they only build small batches of ten now and then. So more changes using same fan but with a fixed rpm. It’s on order and I should be able to test with fan this weekend. This de-tuned fan draws 23 watts, 1.9 amp at 12vdc and 47dB., rpm fixed at 2000. A compromise but it’s available. $118 by the way.
The HVAC style parts I ordered won’t arrive in time for me to build new plenum before leaving on our 5 week vacation in a week or so. The new and improved steel plenum test data will be late September early October.
Will still submit all I have to date in a PDF probably Monday or so as want to show with and without fan comparisons. I should have revised drawing finished as well.
I will say this, yesterday while testing using the original 10″ in/out ports, ambient went as high as 97F, that’s the temperature entering the evaporator. The outlet was 65F. This went on all afternoon, consistently hour after hour. Only penalty I could see was that the wattage increased to 570 watts, design is 490 watts at a low ambient I am sure. More baseline testing will be coming up after I remove the plenum to reduce in/out ports to 8 inch diameter.
Bottom line, without fan assistance, operating at half the manufacturers’ design condenser airflow, at pretty high ambient (97F) the AC delivered a 32F cooling delta T. Hoping the fan will lower AC power consumption enough to pay for its own wattage requirement.
Been busy designing my 6,000 Btu/hr 100% inside mounted window AC unit. It will likely be a Frigidaire FFRE0633U1 12.3 EER 4.6amp/490watts, 56 dbA, around $187.
The AC and enclosure will be below bed/garage area. Van floor has a 10.5″ x 45.5″ area available for through the floor venting directly below enclosure. AC and enclosure has a 24″ wide x 27″ deep floor footprint. No other space in garage required. I plan on slide gate to isolate in/out vents through the floor. Enclosure will be insulated as the fresh intake is really hot outdoor ambient and the condenser side way hotter as you know.
Will be buying the AC real real soon as I need to test NEW, unmolested, on bench condenser airflow to see what the Frigidaire engineered design airflow is. Thanks for the Kestrel recommendation, ordering today.
Based on 3 ton unit condenser research by the Florida Solar Energy Center http://www.fsec.ucf.edu/en/publications/pdf/FSEC-CR-1674-05.pdf I took their 3 ton test unit’s design condenser flow of 2200 cfm and obtained a Btu/cfm ratio of 16.4. Assuming similar design criteria applies to a 6,000 Btu window AC, who knows but it’s a start, the condenser air flow needs to be 370 cfm. This is my starting point but only when I have the real 6,000 Btu AC to measure will I know.
Once I know the real required condenser cooling airflow, I am pretty sure the axial fan will be a EBM-PAPST model W2E-200-HK86-01. 115vAC, 60Hz, 61dbA – Performance as follows:
0.00″ iwc 990 cfm 67 watts 0.13 iwc 530 cfm 71 watts 0.26 iwc 500 cfm 75 watts <—- expected design pressure drop 0.40 iwc 430 cfm 80 watts
At Mouser $179 https://www.mouser.com/ProductDetail/ebm-papst/W2E200-HK86-01?qs=kakCB4mkm8oc1MRVmRb2Lg%3D%3D
The EBM-PAPST Axial fan line is documented at https://www.ebmpapst.com/media/content/info-center/downloads_10/catalogs/axial_fans_1/Axial_fans_2007_EN.pdf
If my actual airflow test indicates a much lower air flow, there are lesser flow/power capacity EBM-PAPST models to choose from. This is why I need to buy the AC unit to test before ordering fan.
I realize adding 70 to 80 additional fan watts to the ACs' 490 watts is a bummer but that's a compromise I can live with considering this is still much more efficient than all portables I have seen. I suspect those that install 100% internal ACs are not getting the efficiencies they thought due to running their condensers at hotter temperatures than factory design. Icing on the cake is no roof AC, no wall venting grills or large diameter holes and best part, I can run off the house battery.
Hi Santiago, Sounds like a good plan. Great that you are taking actual measurements so we know how it performs as installed in your van vs a “normal” installation.
I’m a bit concerned about the fan — its pretty noisy (61 db?) and does consume a lot of power.
I’d consider whether you can make the Dayton fan that I used work for you. Its really not much larger, and its quiet and moves a lot of air – power consumption is only 25 watts. Its even a bit cheaper. https://www.grainger.com/product/DAYTON-Round-Axial-Fan-4WT44?gclid=Cj0KCQjwv-DaBRCcARIsAI9sba9PmgcinQZRE6ZFrCheQCVfV1jy6iBPXKGuayaFLT-L7jvRf6jFagoaAqjaEALw_wcB&cm_mmc=PPC:+Google+Main+1-_-Dynamic%20Search%20Ads-_-Abrasives-_-&adgrpID=2217756863&kwdID=&s_kwcid=AL!2966!3!75010783943!b !!g!!&ef_id=W0j@cwAAAKc0jFP6:20180725185946:s
This is the pressure drop curve: https://www.builditsolar.com/Projects/SpaceHeating/Dayton10inchaxial.htm While I don’t know for sure, I think you may be overestimating the pressure drop. I have built several 4 by 8 ft solar collectors where I measured the pressure drop and most were 0.1 inches of water or less — they have inlet and outlet duct restrictions that are probably more severe than your AC install will be — but, its hard to do a really good estimate.
I’ve used these fans on several solar projects and really like them.
I have a couple, so if you want to borrow one, let me know and email me a shipping address.
Hi Gary, while adding Noico to van UPS delivered AC a day early.
After dinner and a bit cooler outside, 86F in garage, I tested condenser airflow. Using Kestrel 1000 I scanned entire rear coil/finned area row by row as if I was mowing a lawn. Hovered Kestrel an inch over the fins and used a steady feed. Did this three times, after zeroing meter, and all tries were consistent. Condenser area is 1.1800 ft2, AVERAGE velocity was 410 ft/min. This means 484 cfm. Oh noooo. I was hoping to need a smaller fan. Delta T was 15 degF (86F to 101F)
It gets worse.
I was looking forward to cutting large opening on bottom of cabinet as I already designed air intake within the cabinet footprint and was going to force fed cooling air from below.
No can do, all mechanicals bolted there, not touching it. There are very large rounded/smooth intake grills on top and both vertical sides. A lot more and bigger than the 10,000 Btu AC you tested and most others I’ve seen. Seems like good airflow is important to this 6,000 Btu model and its 12.3 EER.
I can still keep the exhaust under the cabinet but the intake will need to move out some so as to circulate all three cabinet sides with vents.
I ran AC pedal to the metal and still was very quiet despite compressor, fan and vents inches away. In real life all but front grill with evaporator fan will be under bed.
Back to the drawing board on the plenum. One more look at fans as the Dayton 10″ has the cfms (480) but at 0.05 iwc ! this is worrisome.
Hi Santiago, Well, nothing ever easy I guess 🙂
It sounds like you have a good reading on the compressor flow. Maybe next step should be to see how sensitive it is to reduction in flow rate — maybe a cardboard mockup of the kind of inlet you plan to use without the extra fan to see how much the cooling drops and power consumption rises?
On the tests I did above, even the first step of inlet restriction is pretty severe — maybe a small inlet restriction with extra fan would not restrict flow enough to impair performance very much. Guess what I’m saying is that it would be good to know how sensitive it is to keeping that flow up to 480 cfm.
I agree, next step is to mock the new plenum I will re-design and create same configuration that will be in the van complete with floor entry/exit ports – healthy sized ports. With this and no fan will compare to stock window install having no restrictions. Hopefully the AC condenser propeller fan will be able to handle it with minimal performance loss and no fan.
Next step will be to consider a 12vdc Orion OD254 10″ fan with one of three factory set shaft speeds. 2400 rpm 830 cfm 60db 65w 2000 rpm 690 cfm 47db 23w 1650 rpm 550 cfm 39db 13w
I will likely go for the 2400 rpm 65w 60db fan AND use a rheostat to adjust shaft rpm as needed to reduce power and noise.
To actual install will also add full time condenser delta T monitoring probes so that depending on location and cooling needs, fan speed can be adjusted to conserve power while maintaining same high level of performance.
Hopefully the no fan test setup will work good enough. Either way will test for power consumption, condenser delta T and condenser airflow.
Hi, Sounds like a plan.
That’s an interesting fan. Electrically commutated motor I guess. Quite a range of rpm, cfm and power use. I did not see anything on how you change the rpm.
Good morning Gary,
The fan is 12vdc and offered in three set shaft rpm flavors by factory.
After testing complete mock plenum if I see that the AC needs help breathing then I will order the 65w version. Same fan but seems the factory electrically sets them up for three performance configurations (65w,23w and 13w).
They are PWM ready and so I will buy a suitable PWM dc load controller that will adjust speed power/speed from maximum (2400 rpm 830 cfm 60db 65w) all way down to whatever it can handle comfortably. Orion already states it can handle (1650 rpm 550 cfm 39db 13w).
So with a DC fan, no DC>AC conversion loss and ability to speed control over varying cooling conditions. I can see myself collecting a lot of data while on the road, from Alaska to Key West. Some places you need little to no AC, others you crank it up.
By the way, I gave people over at Sprinter forum this link so they can comment or whatever they want. I see you post over there now and then. I am SantiagoPM over there and started last March when the Promaster forum showed me the door. After last few days of June issue, I left Promaster forum permanently.
Question: Won’t this AC thread get too long as time passes? Eventually when I have build content to document, will store somewhere and if you want, link it to your website. I imagine my document will be in sections with all the AC content there as well. Welded steel interior furniture, Lithium, etc all different sections.
Hi Santiago, Sounds like a good plan, and the fan seems good as long as the rpm can be controlled.
Agree that we need to organize the material on the AC into something better than a long string of comments. When you get to that point, I’m happy to make room for some pages on it here (just send me the material), or if you have another home for it, I can just link to it.
Kinda good news.
Baseline stock unit with 91 F ambient (intake air) unrestricted (intake/exhaust) used 490 watts.
Created cardboard plenum that closely mimics my design and ran using condenser propeller fan only as I don’t have auxiliary fan, yet.
This afternoon I ran high ambient, 97-98 F with 9″x9″ intake and 8″x10″ exhausts restrictions – no auxiliary fan.
For now I will state that 97 F ambient (intake air) had exhaust of 124 F 543 watts 98 F ambient (intake air) had exhaust of 125 F 550 watts
Preliminary condenser air flows were 300 cfm (partial restriction) vs 485 cfm baseline no restrictions. Will check again tomorrow now that intake is more fully restricted.
Will run more test tomorrow during early morning to see numbers with low ambient 70-80 F. Will continue to run all day until ambient reaches high 90s.
I see I can attach a PDF file here. Will plan to do so and include plenum drawing, photos of cardboard test plenum and whatever data I have.
The plenum design is 1″ & 1-1/2″ Iso board. Not comfortable with that from structural point of view. Will look into galvanized sheet metal for sound bullet proof install then top with Iso board or equivalent insulation.
For your information, when I first started, I did not touch intake til near end. With stock intake (wide open), it became increasingly clear that each additional step taken towards restricting exhaust towards 8″x10″ port size goal reduced performance more than I imagined. Back pressure upon exit from condenser coils seem to be caused more by turbulence when hitting back wall, 8″ away. Another reason for sheet metal as I can try to sculpture directional curved sheet metal guides. The exhaust velocity at certain spots upon exit indicated much turbulence.
Do you think a power increase of 60 watts (490 to 550 watts) with ambient close to 100 F and delta T around 27 degrees (97 – 125 F) is acceptable ? This is without auxiliary fan.
Will try auxiliary fan soon if I can get one before leaving on vacation. It seems the additional wattage of the auxiliary fan might pay for itself, power wise, if it reduces compressor power consumption.
Hi Santiago, 97F ambient sounds kind of toasty — where are you located?
Sounds like you are making good progress — I think this will be quite helpful to people doing similar AC projects — thanks!
Please do add the pdf with drawing. I think that the attachment feature will work OK, but if not, just email it to me and I’ll add it to the page.
One thing you might add to the testing is to measure the cooled air inlet and outlet temperature, in that you might be getting both a power increase and cooling decrease at the same time as you restrict condenser airflow.
You are getting a 12% increase in power use with the restrictions. I guess this is not so bad, but it would sure be nice to get it lower. Of course, if you do add the fan, the fan consumes some power itself — clearly not worth saving 60 watts on the AC itself if using a fan that uses 68 watts. But, the fan at lower power settings might be worth it.
Smoothing out the curves in the ducts and plenums seems like an excellent idea.
Hi Gary, question.
First I need to tell you that I can just as easily email you specific detailed questions so as to not hog your presentation with material others might not find of interest. Let me know.
Your non-fan test configuration 1, baseline no restrictions. Condenser air flow through the AC housing vent slots, intake flow, is approximately 870 cfm based on your averaged flows leaving the condenser.
My question is this : in actual use, you are saying this 10k Btu unit IF installed on a window has a condenser cooling flow of approximately 870 cfm? Then configuration 2 reduces intake, exhaust areas dropping airflow to approximately 300 cfm causing the exit temperature to rise.
This tells me that I need to do all I can to more closely simulate same cooling flow I will measure in my 6,000 Btu AC as measured in my base line.
Your test using the fan worked very well when the condenser exit flow operated unrestricted as if it was mounted in a window.
Since very few of us will have the luxury of a full size condenser vent, I wonder how the fan-based test would have gone if the condenser was restricted by exit area?
With whatever exit restriction is applied, it seems that for the AC to ideally operate as designed it would need to have, in your 10K Btu unit, 870 cfm more or less pass through. With that the condesnser won’t know its really locked up in a box instead of mounted outside with no restriction. Ideally I see the goal of cooling the AC condenser the same as if it was mounted on a window. In reality the flow will be less but hopefully with minimal restrictions or efficiency and AC longevity will suffer.
Hi Santiago, I think you have it right, and I think it is a good question as to how much the exit area could be restricted in the fan configuration without noticeable performance drop. I should have probably tested some form of restriction on the exit vent in the testing I did, but it would be hard to set it all up again as I scrapped the external housings I made for the test.
When you get your 5 or 6K AC, maybe you could check it with no restrictions, and then start adding exit vent restriction until you see the performance start to take a dive. And, maybe also measure the exit air velocity as you go so people would have an idea of the actual airflow. If you have one of the Kestrel type wind meters, they are dandy for this kind of velocity measurement. https://kestrelinstruments.com/category-all-meters?gclid=Cj0KCQjwnNvaBRCmARIsAOfZq-1TesAXAipLq7u9oIr21SUWjON9Uwp-ALD8c_0m_CwP-pW3G2m-ZhMaAgRCEALw_wcB The 1000 is fine. I have an extra I could loan you if you like.
In hindsight, the least restriction I imposed on the flow was pretty severe, and it may be that a small restriction would not significantly reduce performance. On the other hand, a really good fan and descent size vents might actually improve the AC performance to better than the base unit 🙂
As to emails or comments, I like comments better in that others may be thinking about the same issues, or maybe it gets people thinking about some of the ins and outs they would want to think about. But, email if fine also.
I did consider roof venting but not enough room. it would also increases probability of water leaks.
Fortunately, the location I am looking at now has ample clear floor space to vent through and will be approximately half way up, floor to ceiling wise.
The 4 channel Onset looks good. $40 for one TC is a bit but quality stuff costs. Will consider as I like capturing data as its only way to understand what’s REALLY going on.
Yes I am using the free SketchUp Make and its ok. If it was diluted I can’t speak to that as I never used it before. I do like its simplicity and accuracy. Wish it did more but it’s good enough. Today the Pro version is like $600 !!! Every time I look at it it does not seem to offer anything I need. A lot of beautiful 3D rendering for sure but I don’t need that. If it offered stuff that I could use more to easily pre build on paper stuff I plan on building, I might consider the Pro, the $600 price tag is hard to swallow though. I hope they don’t dilute the free Make version to force us to go to Pro.
What AC install I end up with, will document and share here. By the way, by end of year will have 400 or 500 Ah LiFePO4 installed. If interested I can share it here.
Thank you again for your insight.
Hi, Yes — would like to put up material on both the AC and the Li batteries. I think the AC install would be very interesting to people — especially if you can measure the performance and confirm that one of these window ACs can be installed in such a way as to not degrade its performance. I guess that probably means measuring its performance before you install it, and then again after the install. Pictures of the install would also be very helpful. Always looking for good material.
The 4 channel Onset logger actually uses thermistor sensors rather than thermo couples, but they do sell loggers that use thermocouples as well. After trying both, I like the thermistors better overall unless trying to log extreme temperatures.
In addition to the $600 price (up some from what I paid), they basically require that you buy their yearly upgrades. If you skip one, you have go back to buying a new version at full price. Does seem a shame that they seem so focused on the money.
Hi Gary, thanks for your thoughtful reply.
Thinking of 6,000 possibly 8,000 Btu AC. You are right on the scarcity of smaller 1600 rpm (quieter) axial fans. Will keep looking.
Am drawing in SketchUp baffled housing that encompasses the entire AC unit and one or two axials. Will start with one axial but will design in support for second axial should field data require second fan. Could also test one fan either as sole intake or exhaust as well as two but the data taken when ambients are very high will dictate that.
Unfortunately van side vent is not pleasing to my eyes so it will have to be floor venting. Nothing to do with stealth just a personal preference I have had on previous RVs as well.
Plan B is to reduce duct diameter but increase velocity to keep cfm where it needs to be even though the fan won’t be as quiet. I did mention that’s plan B ….. still better than a big hole on side of van.
Goal now is to raise AC inside the box higher so that both in/out openings are within its’ footprint. I recommend SketchUp Make to all readers that want to do a build “dry run”. Fortunately the location is beneath the crosswise bed/garage and there is ample room.
To measure in real time, what T/Cs and readers do you use? Placement to capture condenser in/out temperatures? Evaporator not too concerned with as its out in the open and as your data shows will be fairly consistent despite the condenser catching on fire behind the scenes ; >)
Thank you once again Gary,
Hi, I suppose another possibility would be to mount the AC higher and have the inlet and outlet go to the roof? Would not be visible from the ground, higher location of AC would be good for cold air distribution, and might be easier to find an open spot on the roof for the two vents vs through the floor. You would have to work out the weather proofing. Wonder if one could use a Maxxfan for the airmover?
I use data loggers from Onset Computer. The new 4 channel one is quite nice as it both logs and gives current readings for up to 4 sensors. http://www.onsetcomp.com/products/data-loggers/ux120-006m?gclid=CjwKCAjw-dXaBRAEEiwAbwCi5iJAje71bT0Tkns9r4EFoFOX5htgZ0J3jt9dfQuaH7LNF-GgBaCjaBoC9twQAvD_BwE I’ve used various Onset loggers for years and find them to be very reliable and accurate with good software. The free ‘lite” version of the software is fine. Only downside from my point of view is that price of sensors adds up.
Do you use the free version of Sketchup? I used to use Sketchup a fair bit to the point where I bought the pro version sometime back. Recently I had some need for it again and went to update the pro version, but found that they don’t offer an upgrade for the older version I had — this was disappointing in that it was not cheap to buy. Recently saw a comment that the free version has more limitations than it used to — do you find this to be the case?
Hi Gary. Read this long ago reviewing second time.
First I have to tell you once again, you do great work and provide an invaluable service to us, thank you.
The 10″ axial fan force feeding the condensers’ inlet is great news. Condenser outlet area is quite large and designed to “hang out there” as a window fan. It would seem that a decent size exit opening is in order for efficiency.
Problem is that two quite large openings, say 10″ diameter each could easily be show stoppers.
What is your opinion of using one axial for feed the condenser as you did, below the AC enclosure and limit the exit run to a much smaller diameter duct provided it had a similar cfm rated blower fan that can better handle smaller ducting pressure drops. Unlike the intake fan, the exit blower would already have positive pressure generated by the ACs’ condenser fan “priming” it.
Thank you, Santiago
Hi Santiago, One thing to keep in mind is that the test AC is a 10k BTU unit — if you used a 5K BTU unit, the airflows could probably be about half, so inlet and exit areas could be smaller.
It may be possible to do the inlet opening through the floor, so only opening on the side of van would be for the exit air. If you provided a full size exit vent for a 5K BTU unit, it would probably need to be about 1.26/2 = 0.63 sqft (about 9 inches square). The more fan you use (either on entry or exit) the more you could probably reduce the vent areas — ie use the fans to increase air velocity and therefore reduce the duct area for the same airflow. Its also possible that you could reduce the exit vent size a bit without effecting performance a lot, but the first part of the text above shows that if you do significant area reductions the unit will take a big performance hit.
I guess, if it were me, I’d try to do it with just a single fan on either the inlet or outlet. Two fans could also work, but maybe adds more complexity than its worth?
The 10 inch Dayton fan that I used is a dandy with good flow, low noise and low power consumption for the airflow it produces. I tried to find a similar Dayton that is smaller and has about half the flow, but no luck. Someone else may make one.
Thank you Gary!
Thank you for testing. I m planning to keep all A/C unit inside – Will it work ok if I just cut a hall in van wall and cover it with some type of grill for airflow???
I think you mean to have the window AC mounted inside the van — ie not with most of it sticking outside the van as it would if mounted in a window? That is, you will have the back of the AC unit flush with the side of the van?
If so, then bear in mind that the condenser cooling air comes into the louvers on the SIDE of the AC unit and is expelled out the grill on the back of the AC unit. You have to allow sufficient open space around the sides of the AC unit so that you don’t restrict airflow into the louvers on the side of the unit. This probably means a space around the side of the AC that is (I’d guess) 3 or 4 inches. So, your grill on the side of the van would have to be substantially larger than the AC casing.
You would also probably need to provide some means to keep the outlet (hot) flow from the back of the AC unit from being short circuited into the condenser inlet louvers on the side of the AC unit. You want the flow into the side louvers to be outside air, not the air exiting from the back of the AC unit.
Hope that makes sense?
My question is in a completely different direction. Could a inexpensive window air conditioner be reasonably modified to replicate a ClimateRight free standing air conditioner? Since a window air conditioner is designed so that most of the assembly is outside anyway then could the front section be modified for weather proofing and include a duct for cool air out and return room air back. This way the condenser air flow issues are normal and operating noise is reduced because the unit is completely outside like a ClimateRight A/C.
Thanks Kevin
Hi Kevin, People have mounted a window AC through a wall or window in vans, so they work just the way they were intended to. There are some Youtube videos on this. They work well, but look a bit odd.
I think that you could convert a window AC to work like the ClimateRight unit. You would have to duct the evaporator inlet and outlet air to the place you want to cool. I would guess that unless these ducts were quite large and very direct that you would need to add a blower to get enough evaporator airflow for the unit to work efficiently. But, since it appears that there is less evaporator airflow than condenser airflow, it might be easier to do what you want to do than redirecting the condenser airflow as described above on this page.
I suspect that the ClimateRight units are not that efficient. If you take the 5000 BTU output and divide by the 700 watt power consumption it comes out to a rough EER of 7.1, which is not very good. It may be that some of this inefficiency is due to ducting the evaporator air through those fairly small ducts?
How would you mount the window AC on the outside of your van?
I’d like to hear how this comes out if you give it a try.
Hi: Fantastic information Thank you!
I have been thinking of this also. Mounting a (custom made) rear door swing away box (like Aluminess sells), and putting both portable generator and window ac inside. Box could be designed and made to look nice, with louvered ventilation, and keep both sound and moisture outside. I don’t know the best way to duct for appearance and efficiency. I would be very interested to know if others have discussed or pursued this further.
Hi Alan, I don’t know of anyone who has done it just that way, but it does seem like it could work.
I guess if the window AC unit could sit outside the van door with the inside side facing (and sealed to) an opening in the van door that was about the same size as the inside grill on the AC, and then covered with a box that louver openings about the same size as the condenser inlet and outlet vents, that should work pretty well.
Not sure how you would close up the opening in the van door when when not in use.
The front of the AC unit has the evaporator inlet on the bottom and outlet on the top, so you probably have to provide an opening in the door that is about as large as the front of the AC unit to get good performance.
Gary: Brilliant idea, and your testing is worth a ton of theory. Thanks!
Coupla questions. In the original version, William Bullivant appears to have a) used a fan with only a quarter of the thru-put of yours; b) provided nominal separation (using the foam baffle) between condenser intake and exhaust, while as far as I can tell you provide no such separation.
It had not occurred to me before reading your article that the condenser intake and exhaust might not need to be completely separated. Is it true that you don’t separate them at all? And do you have any comments on William’s ability to get away with 150 cfm?
Hi EJ, I separated the condenser input and output, and it seems to me you should separate them.
I think hat William was going to do some more testing with temperature measurements, and I’d like to see these.
It seems to me that providing good ventilation openings or the condenser flow is important for both efficiency (low power consumption), cooling output, and life of the AC. I’d try as hard as you can to provide good condenser cooling flow.
Gary: Thank you for your speedy reply.
However, I think I may have inadvertently said something ambiguous. I understand that the box input and output are separated on the condenser side of the window unit. What I meant to say is that I thought – until I saw your pix and William’s pix – that the *box’s* access to the *unit’s* condenser vents had to be isolated completely from the *unit’s* condenser grille output to the *box’s* output. In other words, I had assumed that intake air into the box had to be forced *in its entirety* through the unit’s condenser side.
From your (and William’s) descriptions, as far as I can tell, it doesn’t matter that the air coming into the box isn’t *made* to pass through the unit. You are merely concerned that the air in the box is constantly refreshed, and you allow the unit’s own fan to draw that air through the condenser side of the unit.
As to the cfm of the fan, I am looking at continuous duty fans and their thru-put because I’d like to make any holes in the van as small as possible. But it’s clear from your measurements that getting plenty of air into that box is critical to its working well.
Regards, EJB
I’m also curious about the relative impact for reductions in inlet area vs discharge area. Reductions in discharge area seem to have a larger impact based on your data above, although it is hard to tell exactly how much larger. I assume that this is partly due to hotter (less dense) air at the discharge, and also possibly due to the fact that the discharge is more “uniform” in the unrestricted configuration? I’m also curious whether a booster fan on the outlet would have a similar benefit if some reduction in outlet area is necessary. Guess I’m going to have to order my air conditioner and start running a few tests!
Thanks again, Andy
Hi Andy, I’ve also wondered about placing the fan on the output side as it could reduce the size of the output grill on the side of the van and would allow the AC to sit closer to the floor without the fan under it. I don’t see why this would not work. The fan characteristics might change some for “pulling” the air rather than “pushing” it.
Hi Andy, That’s a good point.
Config 2 on the original test has the four 4 inch ducts and no back. The four 4 inch ducts have just about the same area as the net area of the 9 inch fan (that is the 9 inches minus the 3.5 inch hub).
But, it would be good to know how it would do with just a 9 inch open hole — 63.5 sqi inches compared to the 50.2 sq inches for the four 4 inch ducts. Or, stated another way, how much inlet vent area would it take to give nearly the same performance as the base AC unit. I’ll see if I can run that.
As always, you have done an amazing job analyzing the situation and collecting data. I’m curious if you ran a similar test to the last set, with the fan install, but not operating in order to quantify the benefit of the fan itself. Since the inlet area doesn’t match any of your previous tests, we don’t know for sure what the performance would be with a roughly 9″ diameter opening.
Keep up the great work. I am looking at installing a window AC in my Promaster and your testing has really helped to inform my decision.
Just curious what could or would happen if the inlet (sides/top) brought in air from inside of the RV. I understand that it will pull conditioned air from inside and push it out of the back. However, I’m not sure, is it a bad thing?
Hi Steve, I think the downside of that arrangement would be that if you blow air from the inside of the RV to outside (via the condenser), that air has to be replaced, and the replacement air is going to be coming in from outside, so its going to be hot. Or, if the RV is closed up so tight that not much air can be pulled in, that will drop the airflow through the condenser and reduce its performance?
Leave a Reply Cancel reply
Your email address will not be published. Required fields are marked *
Notify me of followup comments via e-mail. You can also subscribe without commenting.
IMAGES
VIDEO
COMMENTS
RV window AC units are beneficial because of their lower install costs, removability, and functionality. Many times these small units perform better and are more efficient than rooftop RV AC units. The cost of an RV window AC unit can be as little as $200, whereas rooftop models can be $1000-$3,500 plus installation costs. ...
How To Install A Window AC Unit In A Travel Trailer, so it can still travel.Sharron our neighbor asked me to install a window AC unit into her Wilderness Tra...
Noria Air Conditioner. Instead of the awkward size and weight of regular window AC units, Noria was designed to be low profile and lighter. Noria weighs approximately 30 lbs and is sized at 5.8″H x 18.25"W x 15"D, compared to standard window units with the same cooling capacity that weigh 45 lbs and are 12″H x 15″W x 14″D.
In today's video, Jim, from the Solar Boondocker channel shows us how to install a Window Air Conditioner in an RV. While this is specific to an RV, it can e...
Installation Insights For Window Ac In Rvs. When installing a window AC unit in your RV, follow these steps to ensure a smooth setup: Choose a suitable location for the AC unit and measure the window opening to ensure compatibility. Secure the AC unit in place using brackets or a mounting kit that is specifically designed for RV installations.
How to install a window A/C inside a fiberglass travel trailer; more specifically a 1984 Uhaul CT-13. If you are trying to decide whether to install a roofto...
Window room air conditioners cool, dehumidify, and filter inside air. Heat pump and electric heat models offer both heating and cooling. Window units can be installed through the wall as well as double-hung windows. Room air conditioners are 100% Full Factory Run tested for reliability and dependability.
An RV AC unit needs a relatively large amount of electricity, measured in amps, to start up. Most RV AC units will need 16-18 amps to get kick started. This is about the same as a smaller air conditioning unit but less than a large one that can take 30 amps. Inside of your RV breaker box, check the capacity of the breaker where you want to plug ...
To install a window AC unit in a travel trailer, first choose a suitable location that can support the weight of the AC unit. Measure the dimensions of your AC unit and mark the area on the trailer wall. Cut a hole in the wall according to the marked dimensions. Depending on the weight of your unit, install support brackets or a frame.
Ultimate Cooling Solution: The Fogatti RV Window Air Conditioner is designed to maximize cooling with its impressive 6500 BTU capacity, perfect for up to 180 sq.ft of RV space or a similarly sized room. Experience a peaceful and comfortable rest with noise levels as low as 50dB during your camping journey.
Photo by Camping World. It wasn't until the Coleman Lantern LT series that I really noticed the emergence of window or wall-mounted units inside RVs.. One issue with using an overhead unit on a small camper is the potential to freeze you out. Most manufacturers consider a small RV air conditioner to be 13,500 BTU, which is too much for a small RV, even on the lowest setting.
Air intake. 2. Hot air exhaust. 3. Condensation. 4. Electric. To assure your air conditioner works properly, you must remember to have a plan for outside air intake, heat exhaust as well as condensation. First, you will need a hole cut on the side of the trailer (or we have seen some people install vents in the floor to pull air from underneath ...
FOGATTI RV Window Air Conditioner, 6500 BTU Cools up to 180Sq.ft, 4-in-1 AC Unit and Lower Noise, Suitable For RV and House-workshop, included Window Installation Kits (Matte Grey) Recommendations Windmill Air Conditioner Smart Home AC Unit - Easy to Install, Quiet, and Energy Efficient - Side Insulation - Auto-Dimming LED Display - App and ...
This Midea window AC unit utilizes 3-in-1 technology, combining air conditioning, dehumidification, and fan-only modes that work together to increase the comfort of RVs. This 10,000 BTU model provides fast and efficient cooling power and dehumidification, ideal for rooms up to 450 square feet.
Posts. 493. Location. NM. I use two 6000BTU GE window air conditioners (from Sam's Club) in my 40ft bus. It was built in so it doesn't look like an air conditioner from outside. We had to build ductworks in the 4" deep bulkheads to funnel exterior air to the side vents on the "compressor" side of the air conditioner.
A window air conditioner for your pop up camper isn't just one of the best options. It's one of the only options. Outside of a window AC, you really only have two other options: a portable air conditioner or a rooftop unit. Portable air conditioners are the easiest air conditioners to install, and they
We bought an LG 6000BTU air conditioner for the RV. It uses 1/5 as much power as the roof mounted RV AC. The roof mount unit is rated for 12000 BTU but I'll ...
We carry top brands such as: LG, Midea, Cooper and Hunter, Alice, Sophia, OLMO, Victoria, Frigidaire, Midea , Samsung, Soleus, Amana, Arctic King, General Electric, Friedrich, Emerson Quiet Kool and so many more... RVWindowAirConditioner.com. 15041 Calvert Street • Van Nuys, CA 91411. (818) 785.4151. We Cover Thousands Of Cities Throughout ...
If you have chosen to make the two-part fitting, please slot the bottom fitting (with the slightly raised lip) onto the bottom of the RV window. Then take the top fitting and wedge this into the top of the window, this may require two people, one person to hold this in place whilst the other person slides the AC unit into the empty space until ...
Hi all, I have a 2021 Braxton Creek Bushwhacker Plus 17BH (large teardrop/small travel trailer). It has a 5,000 BTU Frigidaire window AC unit. To avoid having the unit stick way out to the side, the AC is mounted with most of the bulk of the unit inside the trailer, and only about 1/2 - 5/8 of an inch sticking out.
This video shows the step by step project tasks I used to build a window mount for a mini window ac for my 2020 Scamp 13' travel trailer. There is a detaile...
Window Air Conditioner to Cool an RV. There is has been an interesting discussion on the ProMaster forum on using a window air conditioning unit to cool camper van conversions. These window AC units are compact, cheap and fairly efficient, so they could be a good solution for cooling camper vans which are typically less than 100 sqft.