How-To Geek
How to view and clear safari download history on a mac.
Dust away the breadcrumbs of your download history.
While using the Safari browser on Mac, it's easy to see a list of files you've downloaded in the past and to clear that download history if necessary. Here's how to do it.
First, open the Safari application on your Mac. In any Safari window, look to the right of the address bar for an icon that looks like a downward-pointing arrow in a circle. If you see it, click it or press Option+Command+L. (If you don't see the arrow icon, Safari does not have any download history to display.)
When the download list opens, you'll see a list of files you've downloaded recently. Somewhat confusingly, when you save certain media files such as images, songs, and videos in Safari on Mac, Safari does not include them in the download history list, so you won't see them there.
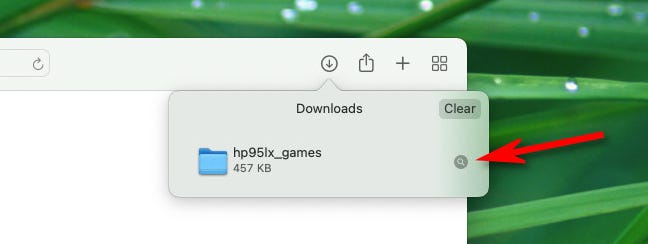
To reveal the location of a downloaded file in Finder , right-click the file in the list and choose "Show in Finder." Or simply click the small magnifying glass icon beside the file.
After that, a Finder window will pop up over your Safari window. In it, you'll see the downloaded file highlighted.
By default, Safari automatically unzips downloaded files and removes the original ZIP files. To turn this off, open Safari Preferences, click "General," and uncheck "Open 'safe' files after downloading."
To remove a particular file from the list, right-click it and choose "Remove From List." To clear the entire list of downloads, click the "Clear" button in the upper-right corner of the Downloads pop-up window.
Safari will wipe the Downloads list and the downloads (arrow) icon in the toolbar will disappear. Any time you need to see the downloads list again---if it hasn't been recently cleared---click the downloads icon or press Option+Command+L on your keyboard. Happy downloading!
Related: What Is Finder on a Mac?
- a. Send us an email
- b. Anonymous form
- Buyer's Guide
- Upcoming Products
- Tips / Contact Us
- Podcast Instagram Facebook Twitter Mastodon YouTube Notifications RSS Newsletter

How to Access the Download Manager in Safari for iOS
With iOS 13, Apple has brought a similar feature to the mobile version of its Safari browser in the form of the Download Manager. Now, when you choose to download a file, such as an image or document, a little download icon is displayed in the top right corner of the screen.
You can tap the icon to check the status of your downloads, and tapping the magnifying glass next to a file will open its folder location, whether that's on your device or in the cloud.

Get weekly top MacRumors stories in your inbox.
Popular Stories

iPhone 16 Plus Rumored to Come in These 7 Colors

When to Expect a New Apple TV to Launch

Macs to Get AI-Focused M4 Chips Starting in Late 2024

iOS 18 May Feature All-New 'Safari Browsing Assistant'

Review: Six Months With the iPhone 15 Pro

iOS 18 Will Add These New Features to Your iPhone
Next article.

Our comprehensive guide highlighting every major new addition in iOS 17, plus how-tos that walk you through using the new features.

App Store changes for the EU, new emoji, Podcasts transcripts, and more.

Get the most out your iPhone 15 with our complete guide to all the new features.
A deep dive into new features in macOS Sonoma, big and small.

Revamped models with OLED displays, M3 chip, and redesigned Magic Keyboard accessory.

Updated 10.9-inch model and new 12.9-inch model, M2 chip expected.

Apple's annual Worldwide Developers Conference will kick off with a keynote on June 10.

Expected to see new AI-focused features and more. Preview coming at WWDC in June with public release in September.
Other Stories

23 hours ago by MacRumors Staff

1 day ago by Joe Rossignol

1 day ago by Tim Hardwick

2 days ago by MacRumors Staff

2 days ago by Tim Hardwick
Where to Find Downloaded Files in Safari on a Mac and How to Manage Them
After downloading a file, it's not always easy to find where it saved. Here's how to find and manage Safari downloads on your Mac.
While browsing the web in Safari, it’s common to need to download files from different websites. But sometimes it can be a challenge to find where these Safari downloads are saved.
Below are several ways to find and manage Safari downloads on your Mac.
How to Download Files Using Safari
There are different ways to save items from Safari to your Mac , depending on the type of item you want to save. While some items in webpages can’t be downloaded, files, images, software, and apps often come with a dedicated download button. Otherwise, Control-click or two-finger tap an item to save or download it.
It’s best not to download software or apps if they aren’t from a trusted source.
Where to Find Safari Downloads on a Mac
Unless you’ve chosen otherwise, items that you’ve downloaded from Safari automatically go to your Downloads folder. To find this, open Finder and click Downloads from the sidebar or press Cmd + Option + L .
You can change where your downloaded files save, if you want:
- Head to Safari > Preferences .
- Click the General tab. Go to File download location , then choose from the popup. Select Ask for each download if you want to be in more control of each download.
- If you want to select a specific destination, click Other and select your desired folder.
Use the Downloads Button in Safari
Quickly access your downloads in Safari by clicking the Downloads button, a downward arrow enclosed in a circle icon on the top-right of the Safari window. Note that this won’t appear unless you’ve recently downloaded an item.
Open the Downloads Stack in the Dock
Another way to immediately access your downloaded files is through the Dock. Your recent downloads are often found on the right side of the Dock in a stack. Hover over it to preview the contents or click to expand it.
Open the Downloads Folder in Finder
As we already mentioned, you can also find your Safari downloads using Finder. This is a valuable utility to locate items on our Mac. Simply click the magnifying button on your menu bar and type "downloads," or go to your Dock and click Finder to open the Finder window.
You can usually find the Downloads folder in the sidebar, under Favorites.
How to Manage Your Safari Downloads
There are several ways to manage your in-progress or completed downloads in Safari. To perform these actions, open the Downloads menu in Safari itself. Here’s what you can do:
- Pause Downloads: If you’re currently downloading, click the stop button beside the file name to pause the download, then click the resume button to resume it again.
- Remove a downloaded item: If you want to remove a single item from the list, Control-click the item and select Remove from List . You can also remove all your recently downloaded items by clicking Clear in the top right of the popup.
By default, Safari automatically deletes downloaded items after a day. If you want to change this:
- Go to Safari > Preferences .
- Click General , then go to Remove download list items . Choose from After one day , When Safari quits , Upon successful download , or Manually .
Manage Your Safari Downloads
There is a lot of content you can download on the web, and simply knowing how to download it is usually half the battle. But once you’ve done that, you can use the tips in this guide to find and manage your Safari downloads with ease, even customizing your download preferences to get fuller control over where your files save and when they get deleted.
We explain and teach technology, solve tech problems and help you make gadget buying decisions.
How to view and Manage Safari downloads on iPhone and iPad
Safari is usually easygoing, whether using Safari Tabs , Private browsing , or even changing the default search engine . However, finding and managing Safari downloads may not be immediately apparent to most users. But why fear, when you have this guide by your side?

Now, effectively managing Safari downloads on iPhone or iPad is crucial for organizing files and optimizing storage space. It’s wiser to understand where the downloads are saved, how to change the download location, how to clear the download history and more. So, just read along.
How to Download Files On iPhone From Safari
While the process might differ slightly depending on the website’s UI, the overall premise is the same. Browse to the file you want to download → tap the download icon → tap Download to confirm the action.

A downloading icon will appear next to the address bar as the download starts. You can click on it to see the download status.
Although if you don’t have to have an actual download link or button to initiate a download in the first place. For instance, you came across a link to a PDF that you can open in the browser. Instead of downloading using the Share Sheet, you can simply hold and press the link or image and then select Download Linked File.

Pause or Resume the download
Downloading a big file can make a severe dent in cellular data. However, the great news is that you can pause the download and resume it once you have a Wi-Fi connection, saving your precious mobile data .
To pause a download, tap the Download button → select Downloads → tap the X icon next to the downloading file. And to resume, simply tap the refresh icon.

Note : Do not close the original Safari window as then you’ll have trouble resuming the download.
Where Do Safari Downloads Go On iPhone
The first order of business after downloading a file from Safari is to check where your files are downloaded. To do so, tap the download icon or AA icon from the status bar → select download → tap the search icon next to the downloaded file.

By default, Safari download manager on iPhone stores the files in the Download folder in the Files app. So, to see your downloaded files, go to Files → Browse → Downloads.
Alternatively, to confirm or to customize the Safari download location , you can go to Settings → Safari → Downloads. Notably, if you prefer saving downloaded files to a different location, simply select a preferred option.

View Safari Download History on iPhone
Whether to find a previously downloaded item or to keep track of your downloaded files, here’s how you can access Safari downloader history on iPhone or iPad.
Open the Safari browser, tap the AA icon or the download icon → select Downloads → here, you’ll see a complete list of files downloaded recently.

Clear Download History
There are multiple ways to remove all or individual files from your Safari download history.
- Delete individual files – Launch Safari → AA icon → Downloads → Slide left the file you want to delete → Delete.
- Clear all your download history – Launch Safari → AA icon → Downloads → Clear.

Note : This is just deleting the download history, not the actual files from your iPhone. So, don’t expect much space saving after the history is cleared.
Auto-Delete Safari Download List
If you don’t want the hassle of manually deleting the Safari Download list, you can automate the process. To do so, go to Settings → Safari → Downloads → select ‘Remove Download list items’ → select a preferred option.

FAQs For Safari Download Manager on iPhone and iPad
Yes, you can download various types of files in Safari on your iPhone, including documents, images, videos, audio files, and more. Safari supports a wide range of file formats for downloading.
In most cases, you can download files from any website using Safari on your iPhone. However, some websites may have restrictions or prevent file downloads for security or copyright reasons.
Safari displays the download progress in the address bar as a circular icon that fills up as the download completes. You can monitor the progress of your download by keeping an eye on this icon.
Yes, Safari supports simultaneous downloads. You can initiate multiple file downloads and monitor their progress individually.
See, Find, and View Downloads on iPhone
Here, now that we have made it easier to manage Safari downloads on iPhone and iPad, we hope it’s a smooth sailing experience ahead. In case you have any other questions regarding Safari and any of its features, feel free to connect with us via the comments section.
Was this helpful?
Last updated on 01 July, 2023
The above article may contain affiliate links which help support Guiding Tech. However, it does not affect our editorial integrity. The content remains unbiased and authentic.

The article above may contain affiliate links which help support Guiding Tech. The content remains unbiased and authentic and will never affect our editorial integrity.
DID YOU KNOW

Dilum Senevirathne
Dilum Senevirathne is a freelance tech writer specializing in topics related to iOS, iPadOS, macOS, Microsoft Windows, and Google web apps. Besides Guiding Tech, you can read his work at iPhone Hacks, Online Tech Tips, Help Desk Geek, MakeUseOf, and Switching to Mac.
More in iOS

4 Ways to Track the Rightful Owner of a Lost iPhone

Top 6 Ways to Fix Device Is Unreachable Error for iPhone on Windows 10
Join the newsletter.
Get Guiding Tech articles delivered to your inbox.
- PRO Courses Guides New Tech Help Pro Expert Videos About wikiHow Pro Upgrade Sign In
- EDIT Edit this Article
- EXPLORE Tech Help Pro About Us Random Article Quizzes Request a New Article Community Dashboard This Or That Game Popular Categories Arts and Entertainment Artwork Books Movies Computers and Electronics Computers Phone Skills Technology Hacks Health Men's Health Mental Health Women's Health Relationships Dating Love Relationship Issues Hobbies and Crafts Crafts Drawing Games Education & Communication Communication Skills Personal Development Studying Personal Care and Style Fashion Hair Care Personal Hygiene Youth Personal Care School Stuff Dating All Categories Arts and Entertainment Finance and Business Home and Garden Relationship Quizzes Cars & Other Vehicles Food and Entertaining Personal Care and Style Sports and Fitness Computers and Electronics Health Pets and Animals Travel Education & Communication Hobbies and Crafts Philosophy and Religion Work World Family Life Holidays and Traditions Relationships Youth
- Browse Articles
- Learn Something New
- Quizzes Hot
- This Or That Game New
- Train Your Brain
- Explore More
- Support wikiHow
- About wikiHow
- Log in / Sign up
- Computers and Electronics
- Internet Browsers
- Safari Browser
2 Easy Ways to Check Your Safari Search History
Last Updated: January 17, 2024 Fact Checked
This article was co-authored by wikiHow staff writer, Rain Kengly . Rain Kengly is a wikiHow Technology Writer. As a storytelling enthusiast with a penchant for technology, they hope to create long-lasting connections with readers from all around the globe. Rain graduated from San Francisco State University with a BA in Cinema. This article has been fact-checked, ensuring the accuracy of any cited facts and confirming the authority of its sources. This article has been viewed 154,348 times. Learn more...
Do you need to check your Safari browser history? In a few simple steps, you can easily view all the websites you accessed in the past. You can also search for specific websites in your history and clear any website data you don't want. This wikiHow will teach you how to view and delete your Safari history on iPhone, iPad, and macOS.
Things You Should Know
- On iPhone and iPad, you can click the book icon, then the clock icon to find your Safari history.
- On macOS, you can click the "History" tab, then "Show History".
- You can search for specific websites and clear your history data.
Using iPhone and iPad

- If needed, you can change your General Settings .

- If you're signed in with the same Apple ID to you use to log into your Mac, your Mac's Safari history will appear in this list as well.

- You may have to swipe down on the History page to find it.
- The results will load as you type.

- Tap a time period to delete the history from just that time period. To delete the entire log, select All time .
- You can also swipe left on individual websites in your history, then click Delete .
Using macOS

- Be sure to update Safari.

- If you're logged into the computer with the same Apple ID you use on your iPhone or iPad, you'll also see sites you've visited on those devices.

- A list of matching results from your history will appear. Click a site to load it in Safari.

- Select a time frame from the drop-down menu, then click Clear History .
- You can also delete cookies from Safari .
Expert Q&A
You Might Also Like

- ↑ https://support.apple.com/guide/safari/search-your-browsing-history-ibrw1114/mac
- ↑ https://support.apple.com/en-us/HT201265
About This Article

iPhone/iPad: 1. Open Safari . 2. Tap the book icon. 3. Tap the clock button. macOS: 1. Open Safari . 2. Click History . 3. Click Show All History . Did this summary help you? Yes No
- Send fan mail to authors
Is this article up to date?

Featured Articles

Trending Articles

Watch Articles

- Terms of Use
- Privacy Policy
- Do Not Sell or Share My Info
- Not Selling Info
wikiHow Tech Help Pro:
Level up your tech skills and stay ahead of the curve
How to View and Delete Safari Download History on a Mac

Introduction
When using the Safari browser on a Mac, it’s simple to examine a list of things you’ve downloaded in the past and, if required, clean that download history. Here’s how to go about it.
To begin, launch the Safari program on your Mac. Look to the right of the address bar in any Safari window for an icon that looks like a downward-pointing arrow in a circle. If you see it, click it or press Option+Command+L to activate it. (If you don’t see the arrow symbol, Safari has no download history to show.)

When the download list appears, you’ll see a list of files you’ve recently downloaded. When you store some media items in Safari on Mac, such as photographs, music, and videos, Safari does not put them in the download history list, so you won’t see them there.
To view the location of a downloaded file in Finder, right-click it in the list and select “Show in Finder.” Alternatively, click the little magnifying glass icon next to the file.
Following that, a Finder window will appear above your Safari window. The downloaded file will be marked in it.
By default, Safari unzips downloaded files and deletes the original ZIP files. To disable this, open Safari Preferences, go to “General,” and uncheck “Open’safe’ files after downloading.”

To delete a file from the list, right-click on it and choose “Remove From List.” Click the “Delete” button in the upper-right corner of the Downloads pop-up window to clear the complete list of downloads.

Safari will clear the Downloads list and remove the downloads (arrow) symbol from the toolbar. Click the downloads icon or press Option+Command+L on your keyboard to return to the downloads list if it hasn’t been cleared lately. Have fun downloading!
- How to Restore the Windows 10 Taskbar Weather Widget
- How to Change the Name of Your Google Account
- How to Disable the Windows 10 or Windows 11 Lock Screen
- How to Develop a Positive Mental Attitude
- How Online Attackers “Hack Accounts” and How to Protect Yourself
- How to Turn Off Shared Albums on iPhone

Hi, I'm Frank, a self-taught programmer and the founder of Navhow. My coding journey began in 2008, and since then I've become proficient in a variety of programming languages, including PHP, Java, JS, and Objective-C. With a degree in marketing from Northeastern University, I bring a unique blend of technical expertise and business acumen to my work. I've had the pleasure of launching a website that grew to over one million monthly visitors, and I'm always looking for new ways to innovate and create solutions that improve people's lives. Thanks for visiting my website, and feel free to get in touch!
You may also like
How to soften hard water naturally, how to protect a text file with a..., how to reinstall windows 11’s microsoft store, how to use iphone and android to view..., how to change and adjust discord fonts, how to change the icons in windows 11.
Navhow is dedicated to teaching people all over the world how to do anything.
- Entertainment
- Privacy Policy
- Terms of Use
- GDPR Policy
The Best How-To Newsletter Anywhere
©2022 Navhow , All Right Reserved
Your Mac Remembers Everything You Download. Here’s How to Clear Download History.

Your Mac has a history of everything you’ve ever downloaded, but it’s possible to clear it out. Viewing your Mac download history requires using the Terminal, so it’s unlikely most users would know how to do this. Here’s how to view and clear it.
Viewing Mac Download History
Here is a command that you can simply copy and paste into your Terminal to view your Mac download history:
This isn’t just Safari downloads. Any app that lets you download files will show up here. This can include torrents, cat photos, porn—anything. This happens because your Mac has used a Quarantine Manager since OS X Snow Leopard. It means that your Mac checks each download for safety issues, so you don’t unknowingly download a virus (although it could still happen.)

Clear Mac Download History
Here’s how to delete the history. Again, this is command you can copy and paste into your Terminal:
However, your Mac will continue to keep a history, so you’ll need to run these commands every now and then if you want to clear it out.

Automated Cleaning
As power users, we all like to automate things, so in order to have your Mac automatically clear its history, we can create a Calendar Alarm using Automator. In the sidebar, you can search for “Run AppleScript” and drag it into the work area.
Copy and paste the above command into the window. Basically, you’ll just be replacing the default text that says (* Your script goes here *).

When you save the file, it will automatically create a separate Automator calendar in the Calendar app. This will of course be in the On My Mac section, and not an iCloud calendar. Saving the file will have it run immediately, and only once. But you can edit the event in Calendar to have it run on a specific schedule. I have mine run every Saturday at 11PM.
18 thoughts on “ Your Mac Remembers Everything You Download. Here’s How to Clear Download History. ”
Unfortunately the listed commands don’t quite have the desired effect. I was suspicious that the file size hadn’t changed, so opened it up in a text editor and the raw data was still present despite a zero result from count(*).
The additional command that is required is ‘vacuum’ to tell sqlite to rebuild the database file:
sqlite3 ~/Library/Preferences/com.apple.LaunchServices.QuarantineEventsV2 ‘vacuum LSQuarantineEvent’
Fantastic find! I wouldn’t have thought to check this. Thanks for sharing the info and solution!
vacuum doesn’t seem to benefit me, but after reading this post/comments again years later I realize there are 3 named databases, of which only 2 apply. From terminal: ls -l ~/Library/Preferences/com.apple.LaunchServices.QuarantineEvents* and querying against all three, only the non-V and V2 have table LSQuarantineEvent So by following the code provided you never hit the non-V table, which also appears to contain download history. I updated my script to delete records from both com.apple.LaunchServices.QuarantineEventsV2 and com.apple.LaunchServices.QuarantineEvents
Thanks for the info, but It appears that this may not work with High Sierra (public beta). I’ve tried… sudo sqlite3 ~/Library/Preferences/com.apple.LaunchServices.QuarantineEventsV* ‘select LSQuarantineDataURLString from LSQuarantineEvent’, both with the V* and the V2 and, in both cases, nothing is returned. I haven’t been using any other means to clear my download history, so I’m sure that the data is there, somewhere.
You have an error. There is a file com.apple.LaunchServices.QuarantineEventsV* (with the asterisk) that is empty. People need to replace the splat (asterisk) with a 2 so that it looks for the file com.apple.LaunchServices.QuarantineEventsV2.
It is not a good style to rely on wildcards for system-related services. You should ALWAYS use exact file names. If the name has an asterisk I highly recommend that you should quote or escape it to make sure there is no ambiguity. After a little Google-fu, which I suggest when you write something like this, it appears that if there ever was a problem with the Quarantine services that it will create the V2 file.
Second, if you want to see the list of URLs, you need to change the select statement to:
select LSQuarantineDataURLString from LSQuarantineEvent where LSQuarantineDataURLString != ”;
(those are two single quotes with nothing between them) This will get rid of blanks in the file.
Third, if you are going to do this, I would recommend deleting the file in its entirety. Even though you delete the records in the database, space is not released back to the filesystem. It is still the same file. You can still crawl through the file using other tools and look for the various URLs. Go find an sqlite recovery tool and see what I mean. By deleting the file you release the blocks back to the filesystem where they could be reused. (I also do infosec for a living and have used forensic tools to crawl through sqlite databases looking for incriminating evidence)
If you are using Yosemite, you cannot do a secure delete from the command line because Apple removed the command. If you are using El Capitan, you can use the “srm” command to securely remove the file. There are utilities you can buy to do this or you can use “diskutil” and ask it to do a “secureErase” on “freespace” only and hope that doesn’t destroy things!
The secure delete has other issues, such as its writing over files with zeros and/or a pattern. You cannot do this on an SSD or even a Fusion drive. Aside from burning out the memory, on a Fusion drive, you do not know if data was cached at one point on the SSD portion of the drive. Therefore, a secure delete is not recommended. However, removing the file is a far better option than just deleting database records!
Hi Scott, thanks for the information. I’ll do more testing with those modified commands, as well as the SQLite database and its deletion/impact.
I would not recommend deleting the database files as there is more than just the download data table there.
Andrew, thanks for the tip, but perhaps you could try actually following your own instructions ?
Maybe my brain isn’t plugged in this morning ? But the steps for creating a a Calendars event that runs the clear history script is missing steps / details ?
launch automator, create a calendar event, then on the left pane choose from library / utilities / run AppleScript – drag it to the calendar event pane you created on the right and then you’ll see the code box for his instructions above.
Fascinating. I didn’t find as much there as I would have expected. Does it maybe get cleared out after an upgrade (even a point upgrade)?
There is a timestamp column in the table that contains numbers that look like 452529740.633129. They don’t appear to be large enough to be Unix epoch’s, plus their is a decimal component which epochs usually don’t have. I can’t get strftime to return anything but NULL, no matter what options I try. Anyone know what that is and how to coerce a readable date/time out of it?
Grrrr; “…plus there is a decimal component…”.
It’s possible that upgrades might clear it out; I don’t know for certain though. Also, if I understood your comment correctly, you could try this command in order to see timestamps of each download entry:
sqlite3 ~/Library/Preferences/com.apple.LaunchServices.QuarantineEventsV* ‘select LSQuarantineTimeStamp, LSQuarantineDataURLString from LSQuarantineEvent’ | php -r ‘date_default_timezone_set(“America/Montreal”); foreach (explode(“\n”, file_get_contents(“php://stdin”)) as $l) { preg_match(“/([0-9\.]+)\|(.*)\$/”, $l, $re); echo date(“Y-m-d H:i:s”,strtotime(“2000-01-01 19:00″)+$re[1]).”\t$re[2]\n”; }’
Answering my own question: after a bit more searching, it appears that they are # of days, but they start at 2001-01-01 (initial date of OSX) instead of Unix’s epoch. Adding the # of days in-between allows datetime() to return a valid value. (I still don’t know what the decimal is all about, but it returns a date close enough to reality for my current purposes.)
I’m getting the error in the terminal.
Try this command to see if it will work:
sqlite3 ~/Library/Preferences/com.apple.LaunchServices.QuarantineEventsV* ‘select LSQuarantineDataURLString from LSQuarantineEvent’ > ~/Desktop/QuarantineEventList.txt
This will create a text file on your desktop with the download history.
There we go, thank you. 🙂 Very cool tip. I knew about the file quarantine, I didn’t know it was so accessible. Really enjoying the more power user-oriented articles.
Excellent, Andrew, but I keep getting a ‘too many options’ error. Any idea why that might be the case?
Hi Jamie, at which point are you seeing that error? In the terminal or in Automator?
Leave a Reply Cancel reply
You must be logged in to post a comment.
This site uses Akismet to reduce spam. Learn how your comment data is processed .
How to manage Safari downloads on iPhone and iPad

While surfing the web or accessing our email, we tend to download files on our iPhone and iPad. Initially, it all looks good. Eventually, with the files piling one after another, you start feeling the need to manage Safari downloads.
But wait… don’t rush to a third-party download manager. Managing your download, that too in a separate file manager app, is a tricky and daunting business. So, here’s good news, with iOS 13 and the changes made to Safari, you can manage your chaos (or should I say Downloads?) easily!
Here are some quick ways to manage your Safari downloads on your iPhone and iPad effortlessly. Let’s begin!
How to download files in Safari on iPhone
- Pause/Resume/Cancel your downloads in Safari
Change default Safari downloads location on iPhone
Delete downloaded files in safari, auto-delete safari downloads on your iphone.
- Locate the file/item you want to download and tap it.
- Confirm download when prompted through the popup window.

Note : There’s also an alternate way to access your downloads. You can go to the Files application and select Downloads .
How to manage your downloads in Safari on the iPhone
Pause/resume/cancel your downloads in safari.
- Tap the download icon at the top right corner of Safari.
- Tap the ‘X’ symbol to pause or cancel your download.

Note : You can directly reach the downloaded location of a file by tapping the ‘ Search ‘ icon next to the file name.
- In the Settings app, tap Safari and select Downloads .

Note : iCloud Drive will let your downloads be available across all connected devices, whereas the iPhone/iPad option will only save the file to the respective device.
However, if you want to delete the file permanently, there are two ways to do it.
- Tap the arrow icon and swipe left the file you want to delete.

You can also choose to auto-delete files.
- Open the Settings app and tap Safari .

- Here, you have three options : After one day, Upon Successful Download, or Manually.

I hope the steps were quick, easy, and helpful. In case you have any other trouble, feel free to connect with me in the comments below. For further help related to the Safari browser, consider reading Dhvanesh’s guide on How to troubleshoot common Safari problems .
Read more:
- How to install Safari extensions on Mac in just 4 easy steps
- Safari Not Opening t.co Short Links from Twitter? Quick Fixes
- Restore Deleted Safari Bookmarks on Mac
- How to disable Safari tab previews on Mac (Quick guide)
🗣️ Our site is supported by our readers like you. When you purchase through our links, we earn a small commission. Read Disclaimer .

Leave a Reply Cancel reply
Your email address will not be published. Required fields are marked *
Save my name, email, and website in this browser for the next time I comment.
- Entertainment
- Beebom Gadgets
How to Find Downloads on iPad [2024 Guide]
- Generally, you can find most downloads on the iPad in the Downloads folder located within the Files app .
- Open Files -> iCloud Drive -> Downloads to find saved files and PDFs on your iPad.
- You can also find the downloaded files within their corresponding app.
Find Downloads in Files app
- On My [Device] folder has files stored locally on the Apple device you’re using.
- iCloud Drive folder has all the files and folders that are synced to iCloud Drive. This includes Numbers, Pages, Keynote documents, and more.
- The Files app also stores files in other cloud services and apps that you’re using, such as Google Drive, Dropbox, One Drive, and more.
Now that you know the basics, follow the below steps to find saved PDFs on your iPad:
- Open the Files app on your iPad.
- In case you don’t find it on the home screen, swipe down from the middle to open Spotlight Search. Then, type “files” in the search bar and select “ Files “.
- Now, tap on the small icon present in the leftmost corner to reveal the left sidebar.

- Next, tap on iCloud Drive.

- Here, tap on the Downloads folder to see your saved files on your iPad.

Find Downloaded Apps on iPad
- On your iPad’s home screen, keep swiping left until you see the App Library . It has all the apps, automatically sorted in helpful categories.

- If you feel the categories are too cluttered, tap on the “App Library” to see the alphabetized list of your iPad apps.

- You can also search for a specific app using the search bar at the top.

Find Downloaded Photos on iPad
You can also use the top search bar to find specific photos on your iPad. This is one of the most useful hidden iOS tricks that can make your life easier. Here’s how to search for a specific image in the Photos app:
- In the Photos app , tap on the Menu icon from the left-most corner to see the left sidebar, and tap on the Search option.
- If you wish to find a photo that was taken from your friend’s iPhone 15, start typing iPhone and tap the iPhone model from the drop-down menu.

- This will reveal all the pictures from that particular iPhone model.
- You can also use this method to find photos downloaded from Safari on your iPhone.
Find Downloads in Safari
- Open the Safari app on your iPad.
- Tap on the download icon present on the right of the search field.
- This will bring up your recent downloads.

- On your iPad, go to Settings -> Safari -> Downloads .

- Here, tap on Remove Downloaded List Items and choose a suitable option from After one day, Upon successful download, or Manually.

Kanika Gogia
Kanika has been a loyal iPhone user since 2014 and loves everything Apple. With a Master’s in Computer Applications, passion for technology, and over five years of experience in writing, she landed at Beebom as an Apple Ecosystem Writer. She specializes in writing How To’s, troubleshooting guides, App features, and roundups for Apple users to help them make the best use of their gadgets. When not writing, she loves to try out new recipes and enjoy some family time.
Add new comment

Safari User Guide
- Change your home page
- Import bookmarks, history and passwords
- Make Safari your default web browser
- Go to websites
- Find what you’re looking for
- Bookmark web pages that you want to revisit
- See your favourite websites
- Use tabs for web pages
- Pin frequently visited websites
- Play web videos
- Mute audio in tabs
- Pay with Apple Pay
- Autofill credit card info
- Autofill contact info
- Keep a Reading List
- Hide ads when reading articles
- Translate a web page
- Download items from the web
- Share or post web pages
- Add passes to Wallet
- Save part or all of a web page
- Print or create a PDF of a web page
- Customise a start page
- Customise the Safari window
- Customise settings per website
- Zoom in on web pages
- Get extensions
- Manage cookies and website data
- Block pop-ups
- Clear your browsing history
- Browse privately
- Autofill username and password info
- Prevent cross-site tracking
- View a Privacy Report
- Change Safari preferences
- Keyboard and other shortcuts
- Troubleshooting
Search your web browsing history in Safari on Mac
You can search your browsing history to quickly find web pages you visited.
Open Safari for me
Type in the Search field at the top-right corner of the window.
Safari uses iCloud to keep your browsing history the same on your iPhone, iPad, iPod touch and Mac computers that have Safari turned on in iCloud preferences . On your iPhone, iPad or iPod touch, go to Settings > [ your name ] > iCloud, then make sure Safari is turned on. Your Mac can keep your browsing history for as long as a year, while some iPhone, iPad and iPod touch models keep browsing history for a month. To change how often your Mac removes history items, see Change General preferences in Safari .
- PC & Mobile
How To View History in Safari on a PC, Tablet, or Mobile Device
Lee Stanton Lee Stanton is a versatile writer with a concentration on the software landscape, covering both mobile and desktop applications as well as online technologies. Read more July 19, 2022
Device Links
- Device Missing?
Safari for iOS provides a convenient way to keep track of your browsing history. You can use it to call up web pages quickly you’ve visited. You can easily go down the rabbit hole when performing searches online. This makes it difficult to remember exactly where you found a valuable piece of information. Reviewing your browsing history can retrace your steps, saving you the arduous task of finding the data from scratch. This article covers how to see your history in Safari. Check out how to do that below.

How to View History in Safari on an iPhone
Safari stores your browser activity, making it possible to revisit sites at a later date. You could either view your most recent history or check out the entire list of previously visited websites. This is how to do that.

You have now accessed your recent history on Safari.
If you would like to view your complete Safari browsing history, here’s how to do that.

You’ve now accessed your Safari browsing history.
How to View History in Safari on an iPad
Safari allows users to keep track of their browsing history. This feature can then be used to revisit sites that might be of interest. You could either view recent history or peruse all your browsing data. The steps listed here detail how to do that.

You have now viewed the recent history on your iPad.
To view your complete browsing data, follow the steps outlined here.

How to View History in Safari on a Mac
Your Safari browsing history allows you to revisit sites you viewed in the past. You can even use the search tool so that you don’t have to scroll through the entire list of results to find what you are looking for. Here’s how to view your browsing history on an iPhone.

- Click on it to open the page in your browser.
You can now see your history in Safari. If you signed in to your device using the same Apple ID that you use on your other Apple devices, that history would also be displayed on your Mac.
Can You View History From Private Browsing?
Private Browsing is a feature that prevents Safari from storing information on sites you have visited. It ensures there’s no record of your online activity, including passwords or autofill information. It also prevents iCloud from storing data on any tabs that you open. To provide an additional layer of privacy, Safari prevents sites and content providers from tracking you. Any cookies you might have picked up are deleted once you close the tab.
This means that Safari doesn’t store your browsing history when you activate Private Browsing. You will therefore be unable to view it in the future.
How to Clear History in Safari
If your Apple device is lagging or otherwise misbehaving, you might consider clearing your browsing data. This is how to do that.

Your browsing data will now be removed from your device.
Retracing Your Steps
Like many web browsers, Safari stores information on websites you’ve visited. This data can come in handy when you want to go back to a particular site. This guide shows you how to retrieve the browsing history stored on your Apple devices.
Have you viewed your browsing history on Safari? What did you think of the process? Let us know in the comments below.
Related Posts

Disclaimer: Some pages on this site may include an affiliate link. This does not effect our editorial in any way.

Parth Shah February 29, 2024

Lee Stanton February 23, 2024

Lee Stanton February 19, 2024
Send To Someone
Missing device.
Please enable JavaScript to submit this form.
- iPhone Data Recovery
- Android Data Recovery
- iPhone Passcode Unlocker
- iOS System Recovery
- iOS Location Changer
- Free iOS Backup & Restore
- Excel Password Recovery
- Data Recovery iPhone Data Recovery Android Data Recovery
- Unlock & Repair iPhone Passcode Unlocker iOS System Recovery
- Utilities iOS Location Changer Free iOS Backup & Restore Excel Password Recovery PDF Editor

5 Ways to View & Recover Deleted Safari History on iPhone/iPad
“I've cleared my Safari history recently but now I need find back one website I visited previously. I was just wondering whether there's any chance to recover deleted Safar history so I can access these sites again?”
Safari is the built-in web browser for iOS devices and Mac computers, which is widely used among Apple users. While searching the internet with Safari, it usually keeps the browsing history and bookmarks for picking up what has been read.
The Safari history is very important and helpful. What if you have accidentally deleted your browsing history or it is suddenly gone without a record?
Don't worry. You still have chances to get back the deleted Safari history. Keep reading to find out how you can recover deleted Safari history on iPhone without or without backup.
Can You Recover Deleted Safari History on iPhone?
Are you wondering if it's possible to recover deleted Safari history on your iPhone? The good news is that it's YES. Even if you've deleted your browsing history on Safari, it's not permanently gone from your iPhone. It may still be stored on your phone for a limited period and inaccessible. And with the right steps, you can recover the deleted Safari history on iPhone.
Check iPhone Settings for Deleted Safari History
Before you try any other methods listed below, first check your iPhone itself. The most accessible and simple way of recovering your browsing history is to find them in Safari Website Data under Settings. Here's how to do it:
- On your iPhone, open the Settings app. Scroll down to find Safari and tap on it.
- On the next screen, scroll to the bottom and tap on the " Advanced " option.
- Choose the " Website Data " and you'll view the domain of the deleted browsing history.

Drawback of this method:
This method will only show you the root domain of your visited sites. You won't be able to find a specific page you've viewed before. Also, this method only works as long as you don't clear cookies and history from Safari.
Recover Safari History on iPhone without Backup (Recommend)
If there is no backup of your deleted Safari history, FoneGeek iPhone Data Recovery is highly recommended to you. As the World's 1st iPhone and iPad data recovery software, it has helped tens of thousands iOS users find the deleted or lost data. What makes it become so popular? The answer is its reliability and function.
It provides 3 recovery modes for users: Recover from iOS Device, Recover from iTunes Backup, Recover from iCloud Backup, which means that it is powerful enough to scan deleted iOS data, preview almost all the content of iTunes/iCloud backup and download them on computer.
And the data types this tool supports to recover include messages, contacts, photos , videos, Safari history, notes , WhatsApp messages, Viber, etc. This tool works well on the latest iPhone 15/14/13 and iOS 17/16.

Follow the steps below to recover deleted safari history on iPhone without backup :
Step 1. Connect iPhone to Computer
To start with, install the program on your Windows PC or Mac and launch it. Choose " Recover from iOS Device " and then connect your iPhone to the computer using USB cable.

Step 2. Select Safari History to Scan
Once yoru iPhone is detected by the program, choose " Safari History " of any other type of files you would like to recover and then click " Scan " to begin scanning.

Step 2. Recover Deleted Safari History
After the scan, click " Safari History " from the category list to preview the recoverable safari history. Then select the ones you need and click " Recover " button to save the deleted safari history to your computer.

Recover Deleted Safari History on iPhone from Backup
Recover safari history from icloud web.
You are allowed to recover only Safari history from iCloud official site as long as you have turned on iCloud Auto Syncing on your iPhone. Follow these simple steps:
- Sign into iCloud official site from any browser using your iCloud account.
- Navigate to the " Advanced " option and scroll down to click " Restore Bookmarks " .
- Choose an archive of bookmarks you want and click on " Restore ".

Only the deleted Safari hisoty within the last 30 days can be retrieved. Also, the existing Safari bookmarks on your iPhone will be replaced and erased, which might cause new data loss.
Restore iPhone Safari History from iCloud Backup
If you have backed up your iPhone to iCloud, restoring iPhone from the iCloud backup is also one of the feasible choice you can try. Doing this will get back all the app data, including the deleted Safari history. But you need to factory reset the iPhone before performing the restore.
- Open Settings and click on " General ", scroll down to tap on " Reset " and select " Erase All Content and Settings ".
- Follow the instructions to set up your iPhone until you reach the page of " Apps & Data ". Then choose " Restore from iCloud Backup ".
- Sign in to iCloud and choose a backup to restore the device. All data in the backup file including the deleted Safari history will come back.

You're not allowed to preview the deleted files and selectively recover what you need only. What's worse, all the existing data on your iPhone will be erased and you'll lose your latest data that are not included in the iCloud backup.
Selectively Recover Deleted Safari History on iPhone from iCloud Backup
With FoneGeek iPhone Data Recovery, you're able to preview and selectively recover deleted Safari history from iCloud backup.
- Run FoneGeek iPhone Data Recovery and switch to " Recover from iCloud ".
- Sign in to iCloud with your Apple ID and password. Then select the data types you want to restore and click on " Scan ".
- After you've downloaded the iCloud data, preview and select the data you need, then click on " Recover ".

Recover Deleted Safari History from iTunes Backup
If you have made an iTunes/Finder backup before you deleted the Safari history, you can also recover the deleted browsing history by restoring iPhone from iTunes backup. However, to restore the backed-up data, you will have to erase the existing data on your iPhone.
- Connect your iPhone to computer and launch iTunes or Finder.
- Click on the iPhone icon when it shows up and then choose " Restore Backup ".
- Select the backup file that contains your deleted Safari history and click on " Restore ".

Same as iCloud, preview and selectively recovery is not supported. Restoring from iTunes backup might also lead to data loss since any new files added to your iPhone since the backup will be replaced and overwritten.
Selectively Recover Deleted Safari History on iPhone from iTunes Backup
And again, we recommend you using FoneGeek iPhone Data Recovery to recover deleted Safari history from iTunes backup without erasing any data.
- Launch FoneGeek iPhone Data Recovery and choose the option of " Recover from iTunes Backup ".
- Select the iTunes backup file you want and click " Next ". Then select " Safari history " and click on " Scan ".
- After the scan, you can preview the Safari history and selectively recover those you need by clicking on " Recover ".

FAQs about iPhone Safari History Recovery
Q1. How long does Safari keep your browsing history?
This question has confused a lot of iPhone users. Actually, there is a definite answer of this question: your Mac can keep your browsing history for as long as a year, while some iPhone, iPad and iPod touch models keep browsing history for a month. This is what demonstrated on Apple’s official site.
Q2. How to recover deleted Safari history on iPad?
There are different methods for recovering deleted Safari history on your iPhone, most of which apply to iPads. You can try using FoneGeek iPhone Data Recovery, which is compatible with major iOS devices, including iPhone, iPad, and iPod touch.
Q3. Where is Safari history stored on your Mac?
All the Safari history you can see on your Mac is stored in the ~/Library/Safari/ folder.
- Just click on Finder > Go > Go to Folder .
- Then enter the path in the textbox and click on OK to open the History.db file.
Q4. How to avoid losing Safari history?
To avoid the possible loss of Safari history, we can enable Safari in iCloud preferences. In this way, the Safari data will be backed up to cloud automatically.
Besides that, we can also use some tools such as FoneGeek iOS Backup & Restore to back up iPhone data to computer selectively or fully.
This article has outlined all feasible solutions to recover deleted Safari history on your iPhone. You can pick the one that works best for you. We strongly recommended FoneGeek iPhone Data Recovery for its easy-to-use interface and allowing us to recover Safari history without data loss.
Joan J. Mims is interested in researching all tips about iPhone, iPad and Android. He loves to share useful ideas with all users.
Leave a Reply
Your email address will not be published. Required fields are marked *
Table of Content
- 1 Can You Recover Deleted Safari History on iPhone?
- 2 Check iPhone Settings for Deleted Safari History
- 3 Recover Safari History on iPhone without Backup (Recommend) Hot
- 4 Recover Deleted Safari History on iPhone from Backup
- 5 FAQs about iPhone Safari History Recovery
- Company About us Contact us Privacy Policy Refund Policy Terms of Use EULA Cookie Policy
- Star Products iPhone Data Recovery Android Data Recovery iPhone Passcode Unlocker iOS System Recovery iOS Location Changer Free iOS Backup & Restore Excel Password Recovery PDF Editor
- Support Support Store How-to Tutorials Sitemap

- Privacy Policy
- Refund Policy
- Terms of Use
- Cookie Policy
- How-to Tutorials
Copyright © 2024 FoneGeek Software Co., Ltd. All Rights Reserved
Free Download
How to View iCloud Safari History
How to access and view your Safari browsing history without restoring your iPhone/iPad/iPod touch? Try these two solutions in this post to easily make it.

iCloud Backup Tips & Tricks
Basic icloud backup tips.
- What Does iCloud Backup
- iCloud Backup Time
- Speed Up iCloud Backup
- Does iCloud Back Up Deleted Messages
- Back Up Mac to iCloud
- Back Up PC Files to iCloud
View iCloud Backup Data
- View iCloud Backups
- View Photos on iCloud
- View Text Messages on iCloud
- View Safari History on iCloud
- View Contacts from iCloud
Delete iCloud Backup Data
- Delete iCloud Backups
- Delete Photos from iCloud
- Delete Contacts from iCloud
- Delete Notes from iCloud
Fix iCloud Backup Problems
- Fix iCloud Photos Download Failed
- Fix Contacts Not Syncing to iCloud
- Fix Messages in iCloud Disabled
- Fix Photos Missing from iCloud
- Fix iPhone Won’t Back Up to iCloud
- Fix iCloud Backup Prevented
With iCloud Safari history, you can search your browsing history to quickly find web pages you visited on another device. However, you can’t easily access and view the Safari history on iCloud backup, except you restore your iPhone/iPad via iCloud. Because safari history is stored in iCloud together with other data like messages, as one part of the whole backup.
In this post, we are talking about how to view iCloud Safari history without restoring iOS devices and erasing data on your iPhone/iPad. And here is a way you can view safari history or bookmarks on Windows PC or Mac with ease.
Here are some more tips you may like:
- How to Download iCloud Backup >
- Fix Safari Cannot Find Server on iPhone >
How to View iCloud Safari History on Mac
Safari can use iCloud to keep browsing history the same on your iPhone, iPad, iPod touch, and Mac that have Safari turned on in iCloud preferences. However, your Mac can keep your browsing history for as long as a year, while some iPhone, iPad, and iPod touch models keep browsing history for a month. But you can still use this function to find some safari history on another device. And here are the steps to view web pages you visited:
Set up iCloud Safari on iPhone/iPad
Go to Settings > [your name] > Tap iCloud > Turn Safari on.
Set up iCloud Safari on Mac
On your Mac, choose Apple menu > System Preferences, click Apple ID, then select iCloud in the sidebar > Select and check Safari.
Then in the Safari app on your Mac, you can choose History and click Show All History. All browsing history is synced on your Mac. Also, you can type in the Search field at the top-right corner of the window to view what you need.
How to View your Safari Browsing History on Mac/Windows PC
Besides iCloud Safari history, here is a powerful tool, AnyTrans , which allows you to access and manage your iPhone/iPad Safari history easily. With Device Manager of it, you can easily view Safari browsing history on your iPhone, extract them out to your Mac/PC. And the newly refined AnyTrans supports merging data between two iCloud accounts with iCloud Manager. It can also help you delete unwanted iCloud data to get more free iCloud storage.
What’s more, AnyTrans can work as an amazing iOS content management tool to transfer data (like photos, music, videos, messages, contacts, etc.) from iPhone/iPad to computer/iTunes library/other iDevices, and vice versa. And you can follow the steps below to view and transfer your Safari browsing history to Mac/Windows PC:
Step 1: Download AnyTrans on your PC/Mac computer, install and run it. Connect your iPhone/iPad to the computer via USB cable. The homepage will be displayed as below. Then tap on Device Manager and choose More to continue.
* 100% Clean & Safe
Free Download * 100% Clean & Safe

Tap on Device Manager and Choose More
Step 2: Find the Safari button and tap on Safari History. Here you can view all browsing history on your iPhone/iPad. Then you can select some/all and click Send to PC button to transfer them to the computer. And you can view those histories on a computer.

View Safari History on Computer
Further Reading: How to Find & Recover Safari History on iPhone/iPad >
The Bottom Line
Besides viewing iCloud Safari history on Mac, you can also use AnyTrans to manage the history on your iPhone. And this tool can also help you transfer other iPhone/iCloud/iTunes data like photos, text messages, contacts, music without restoring your iOS devices. Why not download this tool and have a free try >>
More Related Articles
- What Does iCloud Backup >
- How Long Does iCloud Backup Take >
- How to Fix Safari Not Working on iPhone iPad After iOS Update >
- How to Backup Safari Bookmarks on iPhone iPad >
Senior writer of the iMobie team as well as an Apple fan, love to help more users solve various types of iOS & Android-related issues.
Product-related questions? Contact Our Support Team to Get Quick Solution >

How to View Your History in the iPhone 14 Safari Browser: A Step-by-Step Guide
So, you’ve got an iPhone 14 and you’re wondering how to check out your Safari browsing history? Don’t worry, it’s a piece of cake! In less than a minute, you’ll be navigating through your past searches and visited pages like a pro. Let’s get you started!
Step by Step Tutorial: Viewing Your History in the iPhone 14 Safari Browser
Before diving into the steps, it’s essential to understand the purpose of viewing your history. It helps you revisit a previously visited site, track your digital footprint, or clear any traces for privacy concerns.
Step 1: Open Safari
Launch Safari from your iPhone’s home screen by tapping on the Safari icon.
When you open Safari, you’ll see your default homepage or the last page you visited if you haven’t closed the app completely.
Step 2: Tap the Bookmarks icon
The Bookmarks icon looks like an open book and is located at the bottom of the screen.
After tapping the Bookmarks icon, you’ll see a list of options, including your bookmarks, reading list, and history.
Step 3: Select the History tab
The History tab is represented by a clock icon and located at the top of the Bookmarks menu.
In the History tab, you’ll find a chronological list of all the websites you’ve visited over the past few days or weeks.
Step 4: Scroll through your history
Browse through the list to find the website you want to revisit, or simply review your past activity.
You can also search for specific pages by using the search bar at the top of the History section.
Step 5: Clear your history (optional)
To clear your history, scroll to the bottom of the History list and tap on ‘Clear’. You can choose to clear the history of the last hour, today, today and yesterday, or all history.
Clearing your history can be beneficial if you’re using a shared device or if you want to keep your browsing information private.
After completing these steps, you’ll have successfully viewed your history on the iPhone 14 Safari browser. You can now revisit old sites, track your browsing habits, or clear your history for privacy.
Tips for Viewing Your History in the iPhone 14 Safari Browser
- Regularly check your history to keep tabs on your online activity.
- Clearing your history can help protect your privacy, especially when using public or shared devices.
- Use the search function in the History tab to quickly find specific pages you’ve visited.
- Remember that clearing your history does not remove cookies or other data stored by websites on your device.
- If you can’t find the history tab, make sure you’re not in Private Browsing mode, which doesn’t save your history.
Frequently Asked Questions
How do i access private browsing history on my iphone 14.
Private browsing history is not saved in Safari, so there’s no way to access it once you’ve closed the private browsing tabs.
Can I recover my Safari history if I accidentally clear it?
Once cleared, your Safari history cannot be recovered. It’s always a good idea to bookmark pages you might need in the future before clearing your history.
Can other devices see my iPhone 14 Safari history?
If you use iCloud Safari syncing, your history can be accessed from any device logged into your iCloud account.
Is there a way to view history from a specific date on my iPhone 14?
Safari’s History tab only shows a chronological list. For a history from a specific date, you might need to scroll through the list or use a third-party app.
Does clearing my history also clear my cookies and website data?
No, clearing your history does not clear your cookies or website data. You must do that separately in Safari’s settings.
- Open Safari.
- Tap the Bookmarks icon.
- Select the History tab.
- Scroll through your history.
- Clear your history (optional).
Navigating your Safari browsing history on the iPhone 14 is a simple and straightforward process. Whether you’re looking to revisit a favorite website, check your browsing habits, or maintain privacy by clearing your history, you now have the know-how to do it all. Remember to use the history feature responsibly, as it is a record of your digital activity.
If privacy is a concern, familiarize yourself with the Private Browsing mode and consider regularly clearing your history and website data. Happy browsing, and enjoy exploring the depths of your digital footprint on your iPhone 14 Safari browser!

Matt Jacobs has been working as an IT consultant for small businesses since receiving his Master’s degree in 2003. While he still does some consulting work, his primary focus now is on creating technology support content for SupportYourTech.com.
His work can be found on many websites and focuses on topics such as Microsoft Office, Apple devices, Android devices, Photoshop, and more.
Share this:
- Click to share on Twitter (Opens in new window)
- Click to share on Facebook (Opens in new window)
Related Posts
- How to Clear Browsing History on iPhone 14
- How to View Safari History on iPhone
- iPhone 15: How to Clear Safari History in Just a Few Steps
- How to Clear Your History in the iPhone 5 Safari Browser: A Step-by-Step Guide
- How to Clear Safari History on iPhone 14: A Step-by-Step Guide
- How to Remove Frequently Visited on iPhone: A Step-by-Step Guide
- How to Use Private Browsing on the iPhone 5: A Step-by-Step Guide
- How to Clear History in Chrome on iPhone: A Step-by-Step Guide
- How to Create Safari Bookmarks on iPhone 14
- How to Turn Off Private Browsing on the iPhone 5: A Step-by-Step Guide
- How to See Safari History on iPhone 11: A Step-by-Step Guide
- How to Delete History on iPhone 14: Step-by-Step Guide
- How to Clear History on iPhone 14
- How to Remove Safari Frequently Visited on iPhone 13
- Why Can’t I Create a Private Browsing Tab in Safari on iPhone?
- How to See the Safari History on an iPhone: A Step-by-Step Guide
- How Can I Tell If I Am In Private Browsing Mode on iPhone?
- How to Clear the Download History in Google Chrome: A Step-by-Step Guide
- How to Clear History in Firefox on iPhone: A Step-by-Step Guide
- How to Close All Private Tabs on iPhone: A Step-by-Step Guide
Get Our Free Newsletter
How-to guides and tech deals
You may opt out at any time. Read our Privacy Policy
Watch CBS News
See the full list of past total solar eclipses in the U.S. since 1778
By Kerry Breen
Updated on: April 9, 2024 / 4:36 AM EDT / CBS News
A rare total solar eclipse was visible in parts of the United States Monday. Those in the path of totality had the opportunity to see the sun be fully covered by the moon for several minutes.
Total solar eclipses are rare , and aren't often visible from the U.S. The last time one occurred here was in 2017 , and the U.S. won't see another until 2044 .
Here's a list of all the times a total solar eclipse has been recorded in the United States.
Total solar eclipse in the U.S. during the 18th century
The first recorded total solar eclipse was in 1778, according to NASA , just a few short years after the United States became an independent country. The eclipse was visible from the Carolinas to New England, and was noted by historical figures like Thomas Jefferson, according to Mount Vernon , the museum established in former President George Washington's estate. Troops in Washington's army also noted the event.

List of total solar eclipses in the U.S. during the 19th century
1806: The first total solar eclipse of the 1800s occurred in 1806, according to the National Parks Service . The path of that eclipse would have crossed from Arizona, through the Midwest and into New England, according to NASA .
1869: The next total solar eclipse was recorded in 1869. The path of totality stretched from Alaska to the Carolinas, according to NASA . Photos of the event were published in Harper's Magazine, the service said, the first mass publication to do so.
1878: The next total solar eclipse occurred in 1878, and the path of totality arced from Alaska through Louisiana, according to NASA . It was studied by an all-woman team of astronomers, according to the parks service, and Thomas Edison himself traveled to see the event, bringing scientific equipment to study the sun's corona during the eclipse.
List of total solar eclipses in the U.S. during the 20th century
1900: The first eclipse of the 20th century was in 1900, according to the parks service. The path of totality of that eclipse brought it over Wadesboro, North Carolina.
1918: In June 1918, a total solar eclipse was visible from Washington to Florida, according to the parks service. It was the last time a total solar eclipse would be visible across the entire continent for nearly 100 years.
1925: This was followed by another total solar eclipse in January 1925, which was visible from Minnesota through New England, according to NASA .
1932: In August 1932, another total solar eclipse was visible in North America. The path of totality for this eclipse was mostly in Canada, according to NASA , but was visible in northern New England including parts of Vermont, Maine, New Hampshire and Massachusetts.
1963: The next total solar eclipse in the U.S. wasn't until July 1963. This eclipse was visible in Alaska and parts of northern New England, according to NASA .
1970: In March 1970, another total solar eclipse was visible from the coast of the Southwest United States. Watch CBS News coverage of that event in the video below:
1979: The last eclipse that NASA recorded in the 20th century took place in 1979. This eclipse was visible in the Pacific Northwest and parts of Idaho and the Dakotas, but the path of totality mostly arced through Canada.

Total solar eclipses in the U.S. during the 21st century so far
Only two total solar eclipses have been visible from the United States during the 21st century. The first was the total solar eclipse of 2017 , which was visible across the country . This was the first time such an event had occurred since 1918, and millions gathered to watch .
The April 8, 2024, eclipse was the next total solar eclipse visible in the U.S. The path of totality for this eclipse stretched from Texas to the Northeast. The eclipse started on Mexico's Pacific coast at just after 11 a.m. PDT before traveling across the U.S. and into Canada. The eclipse left North America around 5:19 p.m. EDT.

The eclipse attracted millions of spectators. Some areas where the event was most visible declared local states of emergency to account for the number of expected visitors.
When will the next total solar eclipse be visible in the U.S.?
After the April 8 eclipse, the U.S. won't see another total solar eclipse for decades. The next total solar eclipse visible from the United States will occur in August 2044.
Total solar eclipses typically happen every one to three years somewhere around the globe, but the events are often only visible from Earth's poles or from the middle of the ocean.

Kerry Breen is a reporter and news editor at CBSNews.com. A graduate of New York University's Arthur L. Carter School of Journalism, she previously worked at NBC News' TODAY Digital. She covers current events, breaking news and issues including substance use.
More from CBS News

Passengers on flights during total solar eclipse share rare experiences

Blue Angels return to North Texas for first time since 2021

Texas officials report dramatic drop in illegal border crossings at Eagle Pass park

Police end search for suspect in hammer attacks across North Texas
How To See Safari History On IPhone

- Software & Applications
- Browsers & Extensions

Introduction
Safari, the default web browser on iPhones, is a gateway to a world of information, entertainment, and connectivity. Whether you're researching a school project, catching up on the latest news, or simply browsing for leisure, Safari keeps a record of the websites you visit, forming a trail of your digital journey. This history can be a valuable resource, allowing you to revisit previously viewed sites with ease. Understanding how to access and manage your Safari history on your iPhone empowers you to navigate the web efficiently and maintain your browsing privacy.
In this guide, we will delve into the intricacies of accessing, viewing, and managing your Safari history on your iPhone. You will learn how to effortlessly retrace your steps through the digital landscape, gain insights into your browsing patterns, and take control of your browsing history. Additionally, we will explore the process of clearing your Safari history, providing you with the knowledge to safeguard your privacy and maintain a clutter-free browsing experience.
By the end of this comprehensive exploration, you will be equipped with the knowledge and skills to harness the full potential of your Safari browsing history on your iPhone. Let's embark on this enlightening journey to uncover the hidden gems of your digital footprints and master the art of navigating Safari history on your iPhone.
Accessing Safari History on iPhone
Accessing your Safari history on your iPhone is a straightforward process that allows you to revisit previously viewed websites and gain insights into your browsing habits. To access your Safari history, follow these simple steps:
Open Safari : Begin by tapping the Safari icon on your iPhone's home screen. This action launches the Safari web browser , providing you with access to a world of information and entertainment.
Navigate to History : Once Safari is open, tap the book icon located at the bottom of the screen. This icon represents the "Bookmarks" feature, which encompasses your browsing history.
View History : Upon tapping the book icon, a menu will appear, presenting various options such as Bookmarks, Reading List, and History. Select the "History" option to access a chronological list of websites you have previously visited.
Explore Your History : Within the History section, you will find a comprehensive list of websites you have visited, organized by date and time. Scroll through this list to revisit specific websites and retrace your digital footsteps.
Search Your History : To expedite the process of finding a specific website within your history, utilize the search bar located at the top of the History section. By entering keywords or website names, you can quickly locate and revisit specific webpages from your browsing history.
By following these steps, you can effortlessly access your Safari history on your iPhone, gaining the ability to revisit past websites and delve into your browsing patterns with ease. This access to your browsing history empowers you to make the most of your digital journey and harness the wealth of information at your fingertips.
Viewing and Managing Safari History
Viewing and managing your Safari history on your iPhone provides valuable insights into your browsing habits and allows you to maintain a clutter-free browsing experience. Once you have accessed your Safari history, you can delve into the details of each visited website, gaining a deeper understanding of your digital journey. Additionally, the ability to manage your browsing history empowers you to maintain privacy and optimize your browsing experience.
Viewing Safari History
Upon accessing your Safari history, you will be presented with a chronological list of websites you have visited, organized by date and time. Each entry in the history provides a glimpse into your browsing patterns, offering a snapshot of your digital exploration. By scrolling through this list, you can revisit specific websites, retrace your steps, and gain insights into your browsing habits.
Managing Safari History
In addition to viewing your Safari history, you have the ability to manage this record of your digital journey. Safari on iPhone offers options to clear individual website entries from your history, providing a tailored approach to managing your browsing trail. By swiping left on a specific history entry, you can reveal the option to delete that individual entry, allowing you to maintain a refined and organized browsing history.
Furthermore, Safari provides the option to clear your entire browsing history with a single action. By navigating to the History section and tapping the "Clear" button, you can remove all recorded websites from your browsing history, ensuring a clean slate for your future digital explorations.
Utilizing Bookmarks
In addition to managing your browsing history, Safari offers the functionality of bookmarks, allowing you to save and organize websites for future reference. By bookmarking specific websites, you can create a personalized collection of online resources, enabling quick and convenient access to your favorite webpages. This feature complements your browsing history, providing a seamless way to revisit and organize websites that hold significance to you.
By viewing and managing your Safari history on your iPhone, you gain a deeper understanding of your digital footprint and the tools to maintain a streamlined browsing experience. This insight into your browsing habits empowers you to make the most of your digital journey while safeguarding your privacy and optimizing your browsing efficiency.
Clearing Safari History on iPhone
Clearing your Safari history on your iPhone is a simple yet powerful way to maintain your browsing privacy and ensure a clutter-free digital experience. By removing traces of your digital footsteps, you can safeguard your personal information and streamline your browsing history. The process of clearing your Safari history offers a fresh start for your digital explorations, allowing you to maintain a clean slate and optimize your browsing efficiency.
To clear your Safari history on iPhone, follow these straightforward steps:
Open Safari Settings : Begin by launching the "Settings" app on your iPhone. This app serves as the control center for various aspects of your device's functionality and configurations.
Navigate to Safari Settings : Within the "Settings" app, scroll down and locate the "Safari" option. Tap on "Safari" to access the browser's specific settings and preferences.
Access Clear History Option : Within the Safari settings, scroll down to find the "Clear History and Website Data" option. This feature allows you to remove your entire browsing history, along with website data stored on your device.
Confirm Clearing : Upon selecting the "Clear History and Website Data" option, a confirmation prompt will appear, asking if you want to proceed with clearing your browsing history. Confirm the action by tapping "Clear History and Data."
By following these steps, you can effectively clear your Safari history on your iPhone, ensuring that your digital footprint remains private and your browsing experience remains uncluttered. This proactive approach to managing your browsing history empowers you to maintain control over your digital privacy and optimize your device's performance.
In addition to clearing your browsing history, Safari on iPhone offers the option to selectively remove individual website entries from your history. By swiping left on a specific history entry, you can reveal the option to delete that individual entry, providing a tailored approach to managing your browsing trail.
By mastering the art of clearing your Safari history on your iPhone, you gain the ability to maintain a refined and organized browsing history, ensuring that your digital journey remains secure and efficient. This proactive approach to managing your browsing history empowers you to maintain control over your digital privacy and optimize your device's performance.
In conclusion, mastering the art of navigating and managing your Safari history on your iPhone empowers you to harness the full potential of your digital journey. By accessing your browsing history, you gain the ability to revisit previously viewed websites, delve into your browsing patterns, and extract valuable insights from your digital footprint. This access to your browsing history serves as a gateway to a wealth of information, entertainment, and personalization, allowing you to make the most of your online experiences.
Furthermore, the capability to manage your Safari history provides a tailored approach to maintaining a clutter-free browsing experience. By selectively clearing individual website entries or removing your entire browsing history, you can safeguard your privacy, optimize your device's performance, and ensure a streamlined digital exploration. This proactive approach to managing your browsing history empowers you to maintain control over your digital privacy and optimize your browsing efficiency.
Moreover, the integration of bookmarks within Safari complements your browsing history, offering a seamless way to save and organize websites for future reference. This feature allows you to curate a personalized collection of online resources, providing quick and convenient access to your favorite webpages. The synergy between browsing history and bookmarks enhances your ability to navigate the digital landscape with ease and efficiency.
In essence, the knowledge and skills acquired through this comprehensive exploration enable you to navigate Safari history on your iPhone with confidence and proficiency. By understanding the nuances of accessing, viewing, managing, and clearing your Safari history, you are equipped to make informed decisions about your digital footprint, privacy, and browsing efficiency. Embrace the power of your Safari history, and embark on a seamless and enriching digital journey with your iPhone.
Leave a Reply Cancel reply
Your email address will not be published. Required fields are marked *
Save my name, email, and website in this browser for the next time I comment.
- Crowdfunding
- Cryptocurrency
- Digital Banking
- Digital Payments
- Investments
- Console Gaming
- Mobile Gaming
- VR/AR Gaming
- Gadget Usage
- Gaming Tips
- Online Safety
- Software Tutorials
- Tech Setup & Troubleshooting
- Buyer’s Guides
- Comparative Analysis
- Gadget Reviews
- Service Reviews
- Software Reviews
- Mobile Devices
- PCs & Laptops
- Smart Home Gadgets
- Content Creation Tools
- Digital Photography
- Video & Music Streaming
- Online Security
- Online Services
- Web Hosting
- WiFi & Ethernet
- Browsers & Extensions
- Communication Platforms
- Operating Systems
- Productivity Tools
- AI & Machine Learning
- Cybersecurity
- Emerging Tech
- IoT & Smart Devices
- Virtual & Augmented Reality
- Latest News
- AI Developments
- Fintech Updates
- Gaming News
- New Product Launches
- AI Writing How Its Changing the Way We Create Content
- How to Find the Best Midjourney Alternative in 2024 A Guide to AI Anime Generators
Related Post
Ai writing: how it’s changing the way we create content, unleashing young geniuses: how lingokids makes learning a blast, 10 best ai math solvers for instant homework solutions, 10 best ai homework helper tools to get instant homework help, 10 best ai humanizers to humanize ai text with ease, sla network: benefits, advantages, satisfaction of both parties to the contract, related posts.

How To Clear iPhone Browser Cache

How To Open Private Browser On Safari iPhone

How To Clear Cache On Tablet

Why Can’t I Clear Safari Search History

How To View Private Browsing History On Safari IPhone

Why Is My Safari Not Working On IPhone

How To Delete Browser History On iPhone

How To Clear Browser History On Safari
Recent stories.

How to Find the Best Midjourney Alternative in 2024: A Guide to AI Anime Generators

How to Know When it’s the Right Time to Buy Bitcoin

How to Sell Counter-Strike 2 Skins Instantly? A Comprehensive Guide

10 Proven Ways For Online Gamers To Avoid Cyber Attacks And Scams

- Privacy Overview
- Strictly Necessary Cookies
This website uses cookies so that we can provide you with the best user experience possible. Cookie information is stored in your browser and performs functions such as recognising you when you return to our website and helping our team to understand which sections of the website you find most interesting and useful.
Strictly Necessary Cookie should be enabled at all times so that we can save your preferences for cookie settings.
If you disable this cookie, we will not be able to save your preferences. This means that every time you visit this website you will need to enable or disable cookies again.

Update your iPhone, iPad and Mac! New patch fixes nasty Safari issue
- Click to share on Twitter (Opens in new window)
- Click to share on Facebook (Opens in new window)
- Click to share on Pinterest (Opens in new window)
You’d like to think your browser prioritizes privacy. Unfortunately, sometimes our search providers let us down. Tap or click here to take a free, fast test that reveals how much private data our browser is leaking .
Last week, security researchers discovered that Apple’s Safari browser could leak your data to websites you visit. It all comes down to an implementation bug in IndexedDB, designed to hold user data.
Put simply, the bug lets websites see databases they shouldn’t. It also lets them search those databases for information like your browsing history, personal data and even your Google avatar. Luckily, Apple released a new update that fixes this privacy-endangering bug.
Patch the bug ASAP
Don’t wait to update. There’s a lot of personal information at risk. Not only is this bug an invasion of your privacy, but it also lets hackers see your browsing activity in real-time .
If you want to go into the weeds and get a technical understanding of how this works, check out this short video from FingerprintJS , the folks who blew the whistle on Jan. 14.
Fun fact: Someone reported the issue to the WebKit Bug Tracker on Nov. 28, 2021. Apple didn’t take action until Jan. 16 — after FingerprintJS shone a spotlight on the issue. (How curious.)
You can even run a quick test to see the problem in action
Head to Safari Leaks and see if the site can grab your Google User ID. You can even check out one of its test websites in a new tab. Return to the site and you’ll see that browsing history. It can be creepy to see the surveillance in real-time.
RELATED : Is someone spying on your cellphone?
Typically, this shouldn’t be possible. When Safari is working correctly, Safari Leaks would have no way to find this information. That’s because sites are only supposed to access data from their databases. (Or to be super technical, databases its domain created.)
How to fix the bug
To protect yourself, update your Apple devices. Apple released a few updates:
- iPhone: iOS 15.3
- iPad: iPadOS 15.3
- Mac: macOS 12.2
- Apple Watch: watchOS 8.4
Install the latest OS onto whichever Apple device you’re using. To do this, follow these steps:
How to update iPhone, iPad or iPad touch
- Open Settings .
- Tap General .
- Select Software Update .
- Tap Install Now .
Instead of Install Now, you might see Download and Install . If so, select that option to download the update. Then, enter your passcode and select Install Now .
How to update macOS
- Click on the Apple menu in the corner of your screen.
- Select System Preferences .
- Click Software Update .
- Select Update Now .
How to update Apple Watch
- Open Settings on your Apple Watch .
- Tap Software Update .
- Tap Install .
- Open the Watch app on your iPhone and agree to the Terms & Conditions.
- On your Apple Watch , tap Download & Install .
Good news: You’re doing a lot of good when you download the update. Not only are you fixing this bug, but you’re also downloading security updates for iCloud, Crash Reporter, ColorSync and more. Here’s the complete list of updates you’re getting when you download iOS 15.3 .
Ranked: Best browsers for privacy
Browser security settings you need to check now

Join the Komando Community
Get even more know-how in the Komando Community! Here, you can enjoy The Kim Komando Show on your schedule, read Kim's eBooks for free, ask your tech questions in the Forum — and so much more.
- Generative AI
- Office Suites
- Collaboration Software
- Productivity Software
- Augmented Reality
- Emerging Technology
- Remote Work
- Artificial Intelligence
- Operating Systems
- IT Leadership
- IT Management
- IT Operations
- Cloud Computing
- Computers and Peripherals
- Data Center
- Enterprise Applications
- Vendors and Providers
- Enterprise Buyer’s Guides
- United States
- Netherlands
- United Kingdom
- New Zealand
- Newsletters
- Foundry Careers
- Terms of Service
- Privacy Policy
- Cookie Policy
- Copyright Notice
- Member Preferences
- About AdChoices
- E-commerce Affiliate Relationships
- Your California Privacy Rights
Our Network
- Network World

How to use File History in Windows 10 and 11
You can back up and restore files with windows’ built-in file history tool — but there are key limitations you should know..

When Windows 8 made its public debut in October 2012, one of the new features it introduced to users was called File History. Still available in both Windows 10 and 11, it can help you make sure you never lose an important file.
Simply put, File History is a snapshot mechanism for all files that users store in the primary folders or directories associated with their user accounts. Formerly known as Libraries, these folders include Documents, Music, Pictures, Videos, and Desktop. Also included are offline files associated with the user’s OneDrive account.
How File History works
You’ll see some references refer to File History as a backup and restore tool. To some extent, this description is justified. But it’s important to understand that File History backs up only certain files. It cannot, for example, back up entire drives. Nor can File History restore an entire Windows installation. Such coverage comes from whole-system backup and restore tools; see “ How to make a Windows 10 or 11 image backup ” for details.
What File History does is take a snapshot of all files in the aforementioned folders and local OneDrive contents at regular intervals. It provides an interface to review and retrieve previous versions of files from such snapshots. In the sections that follow I explain how to:
- Turn File History on, and where to target its snapshots
- Exclude folders from the snapshot process
- Retrieve files from a snapshot
To conclude, I’ll also explain differences in coverage and capability between Windows 10 and Windows 11 versions of File History. The good news here is that File History looks and behaves mostly the same across both versions. (For consistency, all screen captures here come from Windows 11, but their Windows 10 counterparts are nearly identical, saving rounded corners on display windows.) The bad news is that Windows 10 offers more snapshot coverage than Windows 11, as I’ll explain at the end of this piece.
Read on for the important details involved in turning File History on, so you can put it to work.
Turning File History on and targeting snapshots
By default, File History is turned off in both Windows 10 and 11. It can be accessed via either Control Panel or the Settings app. To set up and configure File History, use Control Panel; the Settings entry point is best reserved for snapshot file retrieval and is covered later on.
Microsoft recommends, and I concur, that File History works best when it targets an external storage device (such as a USB drive, preferably an SSD or hard disk of 100GB or greater capacity). It’s best to attach the target drive before turning on File History for the first time.
Note that if BitLocker is enabled for the primary Windows drive (usually C:), you must also enable BitLocker To Go on external drives upon which you wish to capture encrypted library folders using File History. It’s best to do this before enabling File History as well. In Windows 10, right-click the target drive in File Explorer and click Turn on BitLocker ; in Windows 11, right-click the target drive in File Explorer and choose More options > Turn on BitLocker . If BitLocker is not turned on for the C: drive, you can skip this step.
To configure File History via Control Panel, either type control panel into Windows search and click the item named File History , or simply type file history in Windows search. A Control Panel item named “Keep a history of your files” appears, as shown in Figure 1.

Figure 1: To turn File History on, click the Turn on button at the lower right.
In Figure 1, File History shows a warning for external drives that lack BitLocker protection, because my C: drive uses BitLocker. Turning on BitLocker for the target drive removes the warning in File History.
The target drive is shown in the lower pane. In this case, it’s drive E:, a nominal 5TB external hard disk.
Once you click the Turn on button at the lower right of the window, File History will be turned on for the target drive. If you want to choose a different target drive, you can first click the Select drive option shown at the middle left in Figure 1, and see a list of eligible target drives, as shown in Figure 2.

Figure 2: You can select any option that appears in the select list as a File History target drive.
Select the drive you want to use for File History backups. Because the default selection is the largest available drive, I’ll stick with that for my File History target.
Note: If you wish network drives to appear in the listing shown in Figure 2, you must first map them to the local system. You can click Add network location at the lower right to add such a drive. If network drive mappings are already defined, click Show all network locations .
Back on the main File History screen, click Turn on to enable File History for the target drive.
Taming File History’s storage appetite
Using File History’s advanced settings can have profound impacts on the storage that File History consumes. In the main File History window (see Figure 1), click Advanced settings in the left column. Figure 3 shows File History’s backup defaults, which I routinely change when I use this built-in Windows facility.

Figure 3: By default, File History makes a snapshot every hour and keeps them forever.
As it turns out, the total contents of the folders that fall within the “snapshot coverage” of File History on my PCs run between 13.5GB and 40GB in size (lots of pictures and music are involved). If a snapshot is made every hour, that means 24 snapshots a day. In turn, that means 324GB on the low end, and 960GB (nearly a terabyte) on the high end. Every day!
My first moves when changing File History defaults appear in Figure 4.

Figure 4: To prevent rapid disk consumption, snapshot at 12-hour intervals and limit space consumption.
By limiting snapshot frequency and instructing File History not to permit complete drive consumption, you can avoid potential future issues.
That’s it for File History setup. In the next section, I’ll describe how to exclude folders from your snapshot contents.
Excluding folders from Snapshots
In addition to ratcheting down the frequency and duration of snapshots, you can limit snapshot size by excluding certain folders from snapshot coverage. Click Exclude folders in the left column of the main File History window (see Figure 1) to drive this process.
A File Explorer interface pops up where you can select certain folders that you don’t want included in daily snapshots. Figure 5 shows the folders I typically exclude. I discuss these choices — and their implications — in a bulleted list after Figure 5.

Figure 5: I exclude folders that I back up in other ways or don’t care about snapshotting. You should do likewise.
Here’s an explanation of the folders I exclude, listed by name in order of appearance top-down:
- Downloads: these can (and often should be) downloaded from the source again anyway, to get most current versions.
- Music: I have more than 200GB of music total, so I don’t want it snapshotted. I keep a backup copy of all my music on a detached drive, and can restore anything damaged or lost as needed.
- Videos: same as Music (appears twice in the screenshot because of File Explorer structures).
- Camera Roll: same as Music.
- Temp: I choose not to snapshot temporary files (and I’ve never needed to restore any, either).
- OneDrive: I have remote copies of everything in OneDrive in the cloud, so there’s no need to save OneDrive files that are available to me offline.
My trimming method cuts the size of each snapshot from over 300GB to a much more manageable 1.5GB on my target disk. That leaves a LOT more room on the target drive for saving snapshots, too.
Restoring items from a snapshot
If at some point a file (in one of the folders that File History backs up) becomes damaged or goes missing, you can restore it via the Settings app. Click Start > Settings , then type file history into the Settings search box. From the options that appear, select Restore your files with File History .

Figure 6: Clicking “Restore your files with File History” is the first step to recovering your files. (Click image to enlarge it.)
Figure 7 shows a File History snapshot from which folders or files can be retrieved, which appears when you select the Restore your files… item shown in the preceding figure. This list of elements represents a trimmed-down snapshot after I excluded the folders mentioned above.

Figure 7: Select an item and click the green “back-circle” arrow to restore it.
The folder level retrieval tool at the bottom of Figure 7 (the green “back-circle” arrow) is the key to restoring files and folders. If you select any item in the main pane, then mouse over the arrow, it reads “Restore to original location.” Click the green arrow, and the selected item will be restored to your PC in the state it was when the snapshot was made, replacing the version of the item that’s currently on your PC. (To highlight multiple items for restoration, hold the Ctrl key down while you click the items you want.)
That’s the basic restore technique for File History. There are two more wrinkles:
- You can navigate into any of the icons shown above by double-clicking. Then you can select a sub-item and restore on a file or sub-folder basis.
- By default, the restore operation starts with the most recent snapshot. You can navigate snapshots to get to a specific date/time by clicking the left or right arrows: left takes you back in time, right moves you forward. Figure 7 shows “4 of 4” at top right because I chose the oldest snapshot available to make the screenshot.
It’s really quite simple, as long as you’re careful about what you select and replace.
The File History difference between Windows 10 and 11
There is one asterisk to File History’s “covered folders” limitation: In Windows 10, you can copy other folders into the covered folders that File History backs up, and they’ll be backed up too. (TenForums.com has an excellent tutorial detailing how to do so.)
In Windows 11, even if you copy other folders into those containers, they won’t be backed up. This turns a general-purpose backup tool (for user folders, anyway) in Windows 10 into something more focused and specific in Windows 11.
File History: To use or not to use?
File History is there for those who wish to use it in Windows 10 or 11. It can cover the contents of your user files, and is particularly helpful for snapshotting the Documents folder.
Personally, I tend to store my work files on a pair of separate drives where I keep all “work in progress.” That image backup also includes my D: and F: drives (where I keep “work in progress” and key personal files). I also keep music, videos and pictures on separate drives (and folders). Thus, I prefer making a daily image backup to using File History on my production PC (still running Windows 10, BTW).
For those who use Windows’ default library files (Documents, Pictures, Video, Music, and so forth) to store their important stuff and work in progress, File History can be a useful and valuable source of backup snapshots. It’s up to you to decide whether or not it makes sense, as long as you make use of it along with a complete backup and restore software tool that can replace your Windows image as well as the files it uses. As they say on the internet, YMMV (Your Mileage May Vary), but more protection is always better than less!
Related content
This month’s patch tuesday release is a big one, after cloud providers, uk antitrust regulator takes aim at ai, will ai end apple's existential crisis, usb-c explained: how to get the most from it (and why it keeps on getting better), from our editors straight to your inbox.

Ed Tittel has been working in and around IT for over 30 years and has been a Windows Insider MVP since 2018. The author of more than 100 computing books, Ed is perhaps best known for his Exam Cram series of certification prep books. These days, Ed blogs weekly for GoCertify.com and more often than that at Win10.Guru . To learn more about Ed, visit his website at edtittel.com .
More from this author
How to fix windows 10 with an in-place upgrade install, how to reduce windows driver bloat, enter the brave new world of windows 10 license activation, 8 noteworthy improvements in the windows 10 anniversary update, most popular authors.

- Howard Wen Contributing Writer
Show me more
The desktop processor market is suddenly hot again.

How Intel's 'AI everywhere' strategy could challenge Nvidia's dominance

5 advanced tricks for Google’s Circle to Search on Android

Is AR/VR set for another growth spurt? | Ep. 143

Voice cloning, song creation via AI gets even scarier

The link between smartphones and social media addiction

Is AR/VR set for another growth spurt?

IMAGES
VIDEO
COMMENTS
Here's how to do it. First, open the Safari application on your Mac. In any Safari window, look to the right of the address bar for an icon that looks like a downward-pointing arrow in a circle. If you see it, click it or press Option+Command+L. (If you don't see the arrow icon, Safari does not have any download history to display.)
Another way to quickly see your downloads is to click directly on the downwards arrow in the top right corner of Safari browser menu.; The Download page will appear with all the downloads sorted by date.; How to find a specific item you've downloaded. To find an item you've downloaded, go to Downloads and click the magnifying glass next to a file in your downloads list and type the possible ...
The Downloads screen in Safari settings also includes an option to Remove Download List Items automatically After one day (the default), Upon successful download, or Manually. Tag: Safari Related ...
To perform these actions, open the Downloads menu in Safari itself. Here's what you can do: Here's what you can do: Pause Downloads: If you're currently downloading, click the stop button beside the file name to pause the download, then click the resume button to resume it again.
To do so, tap the download icon or AA icon from the status bar → select download → tap the search icon next to the downloaded file. By default, Safari download manager on iPhone stores the ...
Use the search bar to find specific websites. Enter your text in the Search bar. A list of matching results from your history will appear. Click a site to load it in Safari. 5. To clear your history, click the "History" menu. Click Clear History…. [2] Select a time frame from the drop-down menu, then click Clear History.
If you just downloaded a file from Safari. Next to the search field in Safari, tap the Page Settings button. Tap the Downloads button. Published Date: October 13, 2023. If you download a file onto your iPhone or iPad from the internet, you can find it in your Downloads folder in the Files app.
Yes, macOS does keep a history of everything users download, although users can prevent items from being recorded in that history if they're using their browser's private browsing function or other software designed to ensure your privacy (e.g. the Tor browser, etc). So, downloading anything in a typical browser (even right-clicking on an image and saving it) is recorded.
Look to the right of the address bar in any Safari window for an icon that looks like a downward-pointing arrow in a circle. If you see it, click it or press Option+Command+L to activate it. (If you don't see the arrow symbol, Safari has no download history to show.) When the download list appears, you'll see a list of files you've ...
Pause a download: Click the Stop button to the right of the filename in the downloads list. To resume, click the Resume button . Find a downloaded item on your Mac: Click the magnifying glass next to the filename in the downloads list. If you move a file or change the download location after downloading it, Safari can't find the file.
It means that your Mac checks each download for safety issues, so you don't unknowingly download a virus (although it could still happen.) Viewing the download history in Terminal. Clear Mac ...
#Solvetic_eng show you How to View and Clear Download History Safari on Mac ️ 𝗠𝗢𝗥𝗘 𝗩𝗜𝗗𝗘𝗢-𝗧𝗨𝗧𝗢𝗥𝗜𝗔𝗟𝗦 𝗔𝗡𝗗 𝗠𝗔𝗖 ...
Auto-delete Safari downloads on your iPhone. Open the Settings app and tap Safari. Now select Downloads, followed by Remove Download List Items. Here, you have three options: After one day, Upon Successful Download, or Manually. On selecting either of the first two options, the system will auto-delete the download files.
Here's how to see downloads in Safari on iPad: Open the Safari app on your iPad. Tap on the download icon present on the right of the search field. This will bring up your recent downloads. If you don't see the downloads button, there are chances that Safari has already removed your downloads. To verify, you must check the Removed ...
In the Safari app on your Mac, choose History > Show All History. Type in the Search field at the top-right corner of the window. Safari uses iCloud to keep your browsing history the same on your iPhone, iPad, iPod touch and Mac computers that have Safari turned on in iCloud preferences. On your iPhone, iPad or iPod touch, go to Settings ...
Tap "History" then "Show All History" to reveal the list of websites you have visited. To find a particular website, search for it in the search bar at the top of the screen. Click on it ...
Follow the steps below to recover deleted safari history on iPhone without backup: Step 1. Connect iPhone to Computer. To start with, install the program on your Windows PC or Mac and launch it. Choose " Recover from iOS Device " and then connect your iPhone to the computer using USB cable. Step 2.
Seeing the Safari history on an iPhone is a straightforward process. Just open the Safari app, tap the book icon at the bottom of the screen, and then tap the clock icon to view your browsing history. You'll be able to see a list of all the websites you've visited, sorted by date. After completing this action, you'll have access to the ...
Here's how: Open the "Settings" app on your iPhone. Scroll down and tap on "Safari" (for clearing Safari download history) or tap on the app name (for clearing app-specific download history). Look for an option called "Clear History and Website Data" or a similar setting. Tap on the option and configure it to clear history and ...
Open Safari: Begin by tapping the Safari icon on your iPad's home screen. This will launch the Safari browser, providing you with access to the web. View History: Once Safari is open, you can access your browsing history by tapping the book icon located at the top of the screen. This icon represents the "Bookmarks" feature, which encompasses ...
Set up iCloud Safari on Mac. On your Mac, choose Apple menu > System Preferences, click Apple ID, then select iCloud in the sidebar > Select and check Safari. Then in the Safari app on your Mac, you can choose History and click Show All History. All browsing history is synced on your Mac. Also, you can type in the Search field at the top-right ...
When you open Safari, you'll see your default homepage or the last page you visited if you haven't closed the app completely. Step 2: Tap the Bookmarks icon The Bookmarks icon looks like an open book and is located at the bottom of the screen.
Open Safari: Tap on the Safari app. Head to the Menu Bar: This is at the top of the page. Tap 'History' then 'Show All History': This reveals all the sites you've visited. Search for a Specific Site: Use the search bar at the top if you're looking for something particular.
The last time one occurred here was in 2017, and the U.S. won't see another until 2044. Here's a list of all the times a total solar eclipse has been recorded in the United States.
To access your Safari history, follow these simple steps: Open Safari: Begin by tapping the Safari icon on your iPhone's home screen. This action launches the Safari web browser, providing you with access to a world of information and entertainment. Navigate to History: Once Safari is open, tap the book icon located at the bottom of the screen.
Head to Safari Leaks and see if the site can grab your Google User ID. You can even check out one of its test websites in a new tab. Return to the site and you'll see that browsing history.
In the main File History window (see Figure 1), click Advanced settings in the left column. Figure 3 shows File History's backup defaults, which I routinely change when I use this built-in ...