- PlayStation 3
- PlayStation 4
- PlayStation 5
- Xbox Series
- More Systems
Safari Zone
Pokemon yellow version: special pikachu edition — guide and walkthrough (gb).

Guide and Walkthrough (GB) by zerokid
Version: 2.8 | Updated: 03/21/2023
- Previous: Fuchsia Gym
Table of Contents
- Next: Power Plant
- Introduction
- Gameplay hints and tips
Walkthrough
- Pallet Town
- Viridian City
- Viridian Forest
- Pewter City
- Cerulean City
- Sea Cottage
- Cerulean Gym
- Underground Path (Routes 5–6)
Vermilion City
- Diglett's Cave
- Vermilion Gym
- Rock Tunnel
- Lavender Town
- Underground Path (Routes 7–8)
Celadon City
- Saffron City
- Celadon Game Corner
- Rocket Hideout
- Celadon Gym
- Pokémon Tower
Fuchsia City
- Fuchsia Gym
- Power Plant
- Fighting Dojo
- Saffron Gym
- Sea Route 19
- Sea Route 20
- Seafoam Islands
- Sea Route 21
- Cinnabar Island
- Pokémon Mansion
- Cinnabar Gym
- Viridian Gym
- Victory Road
- Indigo Plateau
- Cerulean Cave
- About the games
- Version differences
- Title screen
- Overworld menu
- Stat modifiers
- Status conditions
- Catching Pokémon
- Pikachu's Beach
- In-game trades
- Connectivity
- Pokémon evaluations
- General items
- TMs and HMs
- Battle items
- Pokémon list
- Pokémon #001–#010
- Pokémon #011–#020
- Pokémon #021–#030
- Pokémon #031–#040
- Pokémon #041–#050
- Pokémon #051–#060
- Pokémon #061–#070
- Pokémon #071–#080
- Pokémon #081–#090
- Pokémon #091–#100
- Pokémon #101–#110
- Pokémon #111–#120
- Pokémon #121–#130
- Pokémon #131–#140
- Pokémon #141–#151
- Stat determination
- Evade and accuracy
- Critical hits
- Damage calculation
- Encounter tables
- Catching mechanics
- Safari Zone mechanics
- Pikachu's friendship
- HP bar colour
- Dual-type effectiveness message
- Obedience mechanics
- Hidden items
- Bugs and glitches
- Cinnabar Island wild Pokémon glitch
- Old Man glitch
- Trainer-Fly glitch
- Experience underflow glitch
- Stat modification glitch
- Stoneless Evolution
- Revisit the S.S. Anne
- Battle Professor Oak
- Version history
Center Area

Center Area (east)

In the entrance gatehouse to the Safari Zone, pay the requisite ₽500 to enter and receive 30 Safari Balls before heading inside the Safari Zone proper.
In Yellow Version, if you bother the attendant here, he will allow you to enter the Safari Zone even if you don't have ₽500. Instead, he will take all your remaining money and give you a number of Safari Balls proportionate to the amount you paid, leaving you with a single Safari Ball if you have no money at all. It seems the developers did this to avoid an uncommon scenario that could prevent you from making any further progress in the game: if you have no money and no method of earning any more, you cannot enter the Safari Zone to obtain HM03 and the Gold Teeth, both necessary items to complete the game. No such check exists in Red and Blue, so it is quite possible, though extremely unlikely, to get yourself into this situation in those games.
Interestingly, there is an out-of-bounds hidden item inside the entry gatehouse. The Itemfinder will ping if you use it, but, unfortunately, there is no way to unearth the hidden Nugget in here.
Safari Zone mechanics You have a 500-step counter while inside the Safari Zone. Running out the counter will automatically return you to the entrance, as will running out of Safari Balls. Turning on the spot does not count as a step, but can still be used to trigger wild Pokémon battles. You are restricted to the 30 Safari Balls you bought when entering, and any unused Safari Balls are lost once the game is over. The Safari Zone also has different battling mechanics to the rest of the game. The Pokémon here do not attack you but have a nasty habit of running away from battle, and those with higher Speed stats are more likely to flee. Instead of sending out a Pokémon to fight, you're restricted to throwing rocks and bait, which affect the capture chance and fleeing chance of the target Pokémon. Each rock you throw at the wild Pokémon doubles the chance of catching it but also makes it angry for 1–5 turns, and an angry Pokémon is twice as likely to flee. Conversely, each thrown bait halves the chance of catching the Pokémon but also lulls it into an eating state for 1–5 turns, during which time it is four times less likely to flee. For all these unexplained mechanics, the strategy that gives you the best chance to capture a Pokémon on any given encounter is simply to throw Balls at it and ignore rocks and bait entirely. The only time you might ever want to consider rocks and bait is if you are running low on Balls, but you will be significantly reducing your capture chances if you do this. A little later on, Red and Blue players can take advantage of a glitch to bypass all these odd mechanics and catch Safari Zone Pokémon using standard battle mechanics. For a full breakdown of these mechanics, take a look at the Safari Zone mechanics section.
Center Area : Besides the tall grass, there isn't much of interest in the Center Area at the moment.
Pokémon evaluations Exeggcute ( evaluation ) — Rating: C . Though it will be underlevelled and belongs to the Slow experience group, Exeggcute has a nice Grass/Psychic typing and can evolve immediately into the powerful Exeggutor. It wants the Psychic TM to be truly effective, however. Rhyhorn ( evaluation ) — Rating: D . Another underlevelled Pokémon in the Slow experience group, Rhyhorn won't evolve until level 42. While its physical stats are incredible and its movepool is great, it requires a long grind to become powerful, and still has low Speed and Special. Chansey ( evaluation ) — Rating: D . Chansey isn't a bad Pokémon, but it is extremely difficult to catch. Its abysmally low Attack means it can't effectively use any STAB moves, but it does at least have a strong Special and a wide special movepool. Tangela ( evaluation ) — Rating: D . A rare Safari Zone encounter, Tangela has a terrible movepool consisting entirely of Grass- and Normal-type attacks. It lacks SolarBeam or even Petal Dance , and its Attack stat is too low to use Normal-type moves effectively. Dratini ( evaluation ) — Rating: D . Available for the first time in Yellow Version, though at the low level of 15, Dratini only evolves into its powerful final form at level 55. This is a long grind due to Dratini's low stats and Slow experience group.
In-game trade preparation To complete all in-game trades, Red and Blue players should catch a Nidorino to trade for a Nidorina on Route 11, while Yellow players should catch an extra Tangela to trade for a Parasect on Route 18. You'll be reminded shortly when to trade these in, although none of these trades is worth it for anything except completion purposes.
Head north-east and take the narrow eastern path into Center Area (east).
Center Area (east) : In this area, a few new Pokémon are available, though Kangaskhan is found in Area 2 in Yellow, while Tauros is found in Areas 2 and 3 in Red and Blue, being most common (though still very rare) in Area 3.
Pokémon evaluations Kangaskhan ( evaluation ) — Rating: D . Kangaskhan is a tough Normal-type Pokémon with good stats and an excellent movepool. However, it is also a rare Safari Zone-exclusive encounter that is likely to run away, making it extremely difficult to catch. Tauros ( evaluation ) — Rating: D . Tauros doesn't fair too well in-game largely because it's so rare and hard to catch, and then will be a little underlevelled. If you do get one, it's a strong Normal-type Pokémon with great Attack and Speed and a fantastic movepool.
Head east and climb the rocky plateau to the north. At the northern edge is a Carbos . Take the westernmost stairs down off this plateau and head north. A patch of land jutting into the central body of water has TM37 ( Egg Bomb ) on it.
TM37 can be bought infinitely at the Celadon Department Store and contains Egg Bomb, a mediocre Normal-type move with 100 power and 75% accuracy. It can only be learned by Exeggcute, Exeggutor, Chansey and Mew, which all have much better options.
To the north-west, you can pick up a Max Potion . Proceed east from there, using the small rocky plateau here to bypass the tree, and pick up the Full Restore on the other side. Finally, go up around the plateau to the west and take the western exit to Area 2.
Area 2 : Check if you have any new Pokémon available to you in Area 2 before continuing.
In-game trade preparation (Yellow) This is the only area in the game where Kangaskhan can be caught in Yellow Version, and you can catch a spare one to trade away for a Muk much later on. This isn't worth it for anything other than completion purposes.
Head west, ignoring the first staircase to the north and the path exiting south, and instead pass through the patch of tall grass to the north and take the set of stairs here. Come down off this rocky plateau using the stairs to the south-west, and then go as far north as you can. To the east from here is TM40 ( Skull Bash ).
TM40 is a one-time TM which teaches Skull Bash, a 130-power Normal-type move with the massive drawback of requiring a charge turn to execute. Pass.
Loop around the bushes to the north to find a Protein and continue west. Head all the way south and exit south into Area 3.
Area 3 : Pick up the Gold Teeth to the south, then head west and pick up TM32 ( Double Team ) in plain sight.
Using Double Team to ramp up your evade stat can be very useful if luck is on your side. After enough uses, it can feel almost impossible for your opponent to hit you, and with enough luck, it can be so good that it earned itself a ban from competitive matches. Still, it takes time to use it repeatedly over a few turns, and in-game you can often one-hit KO an opponent with supereffective hits. If you want game-breaking strategies, X Accuracy and one-hit KO moves are quicker and far superior. TM32 is also infinitely available to buy from the Celadon Department Store, so you can at least try it out without having to worry too much.
There is also a hidden Revive which is inside the nearby statue. Enter the Secret House by this statue and speak to the man inside to receive HM03 ( Surf ).
As well as being an HM move which allows you to travel over bodies of water on the overworld, Surf is an excellent Water-type move in its own right, being a little less powerful than its closest competition, Hydro Pump, in exchange for near-perfect accuracy and higher PP. It should be a staple move on any Water-type Pokémon for a strong and reliable STAB attack, though a handful of other Pokémon can learn it too. Its only downside is that once it is learned, it can't be forgotten short of trading the Pokémon to Gold, Silver or Crystal, so think carefully before teaching it.
If you have defeated the Fuchsia Gym Leader, you can now use Surf outside of battle after teaching it to a compatible Pokémon. Exit the Secret House and surf south over the small body of water here. Head south into the patch of tall grass and pick up the Max Potion a little to the east before climbing on to the rocky plateau. Head east and descend the other set of stairs here to pick up a Max Revive before exiting to the east.
Center Area : You'll emerge back into the west side of the Center Area. Head east and surf across the water to pick up the final item, a Nugget . That's all for the Safari Zone unless you want to catch any more Pokémon, so either exit to the south or, more likely, have the step counter run out to return to the entrance.
Link to area overview
Back in Fuchsia City, head for the Warden's house, which is the building directly east of the Pokémon Center. Now that you have the Gold Teeth, you can return them to the Warden to receive HM04 ( Strength ).
Strength is used on the field to push large boulders around, which will be needed to solve a few puzzles later on. In battle, it's an unremarkable 80-power Normal-type move that's outclassed by moves such as Body Slam. However, because it is an HM move, it can be taught infinitely, so if the TM for Body Slam has already been used up on a Pokémon, Strength is a reasonable alternative.
You can put Strength to work immediately and push the nearby boulder to one side so you can claim the Rare Candy .
Surf round-up With Surf now available to use outside of battle, a large portion of the game opens up to you. There are also some areas you have previously visited where you can now pick up new items and Pokémon. This guide will first take care of some in-game trades before continuing to the surf round-up.
Red/Blue in-game trade 6/9 : Nidorino ↔ Nidorina Red and Blue players should withdraw their Nidorino for this in-game trade before flying to Vermilion City and heading east on to Route 11. Proceed all the way east into the gatehouse, then head upstairs and talk to the young man by the window to trade your Nidorino away for a Nidorina.
Yellow in-game trade 3/7 : Tangela ↔ Parasect Yellow players can instead withdraw their Tangela for another rather pointless in-game trade. From Fuchsia City, take the western exit into the Route 18 gatehouse, then head upstairs and talk to the man here to trade Tangela away for a Parasect.
Surf on to the water directly south of the Pokémon Center. You'll spot two houses to the south. Surf in between them and examine the west side of the eastern house, on the tile closest to land, to find a hidden Max Ether .
Yellow players should now head to Route 6, just north of Vermilion City.
Pokémon evaluations Psyduck ( evaluation ) — Rating: D . This is the only place that Yellow players can catch a Psyduck or, rarely, its evolved form, Golduck. It'll be very underlevelled compared to the rest of your team but is otherwise a decent, if somewhat bland, Water-type Pokémon.
In-game trade preparation (Yellow) Catch a spare Golduck here if you can, even if it is rather rare, to trade away for a Rhydon later on. If you don't want to hunt for the rare Golduck, then alternatively you can get one by evolving a Psyduck, though you will have to train it from level 15 to level 33 to get it to evolve.
Make your way west from the Pokémon Center to the small pond in the centre of the city. Surf across and talk to the elderly lady on the other side to receive TM41 ( Softboiled ).
Softboiled can only be taught to Chansey and Mew. If you're using one of these two Pokémon, Softboiled has some utility for its out-of-battle effect, which transfers 20% of the user's HP to a chosen party Pokémon. Given Chansey's gargantuan HP, this can save you a few trips to the Pokémon Center. In battle, it's also useful for simply healing the user for 50% of its maximum HP, though using items is still superior without taking up a moveslot. TM41 is unique, but this isn't much of an issue as there is hardly any demand for it.
Fly to Lavender Town so you can head south into Route 12. Continue south, passing through the gatehouse, until you come to the first Fisherman. Just south from him on a small isolated section of land sits TM16 ( Pay Day ), which you can reach with Surf.
Pay Day is a weak 40-power Normal-type move without much battling use and generates money equal to twice the user's level whenever it hits the opponent. This isn't much, so it is not worth using up a moveslot for this. TM16 is unique, so use it carefully.
Pokémon evaluations Slowpoke ( evaluation ) — Rating: C . This marks the first opportunity for Yellow players to catch a Slowpoke, though higher-level ones are available later on at the Seafoam Islands. Water/Psychic typing is fantastic, but Slowpoke takes a lot of hits due to its abysmal Speed.
Now that you have Surf and have tidied up any previous areas, you can take a detour to pick up Zapdos, a level 50 dual-type Electric/Flying Legendary Pokémon. It's an excellent Pokémon, particularly if you don't have an Electric-type Pokémon on your team and have saved the Thunderbolt TM for it.
Purchase a handful of Ultra Balls and bring along a Pokémon that can put opponents to sleep, because Zapdos has a very low catch chance if it isn't inflicted with any status conditions. Freeze is equally good but far harder to inflict, while poison, burn and paralysis aren't quite as good but are still better than using no status condition at all. Also, make sure you have enough room in your PC Box for Zapdos and a handful of other wild Pokémon that you might be interested in.
Fly to Cerulean City and withdraw Pokémon that can use Surf and Cut. Head toward the eastern exit of the city by passing through the burgled house and using Cut on the bush before Route 9. Head all the way east through Route 9 on to Route 10, recognisable by a large patch of tall grass bordered by water on the north and east sides.
It might be worth healing up at the Pokémon Center just to the south here, which is the nearest one to the Power Plant but also cannot be accessed via Fly. This means that using Dig or an Escape Rope to leave the Power Plant will return you to this Pokémon Center, saving you the trek through Route 9 from Cerulean City.
Surf on to the water to the north and follow it around to the east and south. As it banks around to the west, you'll spot a PokéManiac (F) above you.
PokéManiac (F) Pokémon Type Lv. Exp. Moves Rhyhorn Ground/Rock 30 867 Horn Attack , Stomp HP: 92 , Attack: 61 , Defense: 66 , Speed: 24 , Special: 27 Lickitung Normal 30 816 Supersonic , Stomp , Disable , Defense Curl HP: 98 , Attack: 43 , Defense: 54 , Speed: 27 , Special: 45 Reward ₽1500
Just to the north-west of him is the entrance to the Power Plant, so head inside.
- Pokémon FRLG
- How To Get HM04 Strength & the Gold Teeth in Pokémon FRLG

In FireRed & LeafGreen, you can get HM04 Strength by returning the Gold Teeth to the Safari Zone Warden in his house in Fuchsia City.
The Gold Teeth are located deep within the Safari Zone, near the Secret House where you get Surf.
You will need to pay 500 Pokédollars every time you enter the Safari Zone, but you can enter as soon as you reach Fuchsia City.
We’ll show you exactly where to find the Gold Teeth, and then how to return them to the Warden so you can get HM04.
Gold Teeth Location (Step-by-Step)
Step 1: To find the Gold Teeth, start in Fuchsia City and head to the Safari Zone. This will be north of the Pokémon Center.

Step 2: Enter the Safari Zone and pay the 500 Pokédollars for entry.

In the Safari Zone, you are only allowed 500 steps until the timer runs out. When the timer runs out, you’ll be returned to the entrance. Our guide here will teach you how to reach the Gold Teeth with plenty of steps to spare.
Step 3: Once you’re inside the Safari Zone, head north-east until you reach the loading zone going to the next area.

It’s worth noting that you can use Repels while inside the Safari Zone. This can help you reach the Gold Teeth faster by avoiding wild Pokémon.
Step 4: In the next area, keep heading east past the bushes.

Step 5: Once you reach some grass and a set of stairs, go up the stairs and head west to descend the staircase on the other side.

Step 6: Go down the stairs here and then turn to north.

Step 7: Keep moving north and eventually you’ll see another set of stairs. Go up this set, and then turn east to go down the stairs on the other side.

Step 8: Go down the other set of stairs, then circle around so you’re behind the large rock platform.
Then start running west through the tall grass.

Step 9: Continue moving west until you enter the next area.

Step 10: Keep heading west past the 1st set of stairs (you’ll enter some tall grass here).

Step 11: Go through the grass and you’ll see a 2nd set of stairs. Go up these 2nd stairs onto the rocky platform.

Step 12: From here, go down the other stairs to your left, then start going north past the rocky platform.

Step 13: Eventually you’ll reach some bushes and trees. Turn east to follow this dirt path.

Step 14: Then turn up and go around the corner, now going towards the western side of this area.

Step 15: Eventually you’ll see another large patch of tall grass. At this point, turn south and run through the grass (past the trees and pools of water).

Step 16: Keep heading south until you find the exit to the next area.

Step 17: In this new area, walk a few paces south and you should see an item on the ground. These are the Gold Teeth.

Step 18: Collect the Gold Teeth on the ground.

Now you can leave the Safari Zone any way you want, but the simplest way is to choose to leave from the menu.
But if there’s more you want to do here then you can run around a bit longer!
Also the Surf HM can be acquired in a house directly west of the Gold Teeth. So if you haven’t picked that up then now would be a great time to snag that as well.
Getting HM04 Strength (Step-by-Step)
To exit the Safari Zone quickly, you can open the menu and choose the retire option to return to the entrance immediately.
You can also use Fly or Teleport while inside the Safari Zone to travel to the Fuchsia City Pokémon Center for a faster exit.
Once you’re back out in Fuchsia City, you’ll need to deliver the Warden’s Gold Teeth back to him and he’ll give you HM04 as a reward.
Step 1: Exit the Safari Zone.

Step 2: Head south from the Safari Zone gate.

Step 3: Directly to the right of the Pokémon Center will be a couple houses.
Enter the first house you see (with the mailbox).

Step 4: Talk to the Safari Zone Warden inside this house and you’ll automatically give him back his Gold Teeth.
He will then give you HM04 Strength as a reward.

Note: To use HM04 Strength outside of battle, you must have beaten the Celadon City Gym Leader Erika and received the Rainbow Badge.

Angelo is a writer and artist who grew up watching and playing Pokemon mainly. He enjoys browsing through wikis and guides for any interesting Pokemon facts and tidbits he can find. In his free time, he relaxes at home with his pets and draws art of them on his personal IG account.
Related Posts:

Fuchsia City

Now that you have thwarted Team Rocket's clumsy efforts to corrupt Saffron City, it's time to concentrate on your Pokémon training skills once again. This small town outside the famed Safari Zone is home to yet another Pokémon Gym -- but you may want to explore the streets of Fuchsia City first.
Pokémon Mart
Here's a listing of items available for purchase:
Another Rod
If you go to the house in the southeast of town, you'll be able to get yet another fishing rod. Sadly, this so-called "Good Rod" isn't nearly as good as the Super Rod you already own -- so don't pick it up, or simply dump it into your PC as soon as possible. You do, however, may want to do some fishing in the pond behind this guy's house.
The Toothless Warden

The Safari Zone's Warden lives in the house next door. Don't try too much to decipher what he's saying -- you can't. Well, until you fix his speech impediment, which is accomplished by finding his Gold Teeth. So head into the Safari Zone, pay the 500 entrance fee and look for the teeth. Here's how you find them:
From the entrance, head north and east to find the exit to Area 1. Head east until you come to a grassy area, then go up the steps to the north. Go west, then down the steps and continue on north where you will see another short stairway. Go up the stairs, go east, and then down the next stairway you see. The exit to Area 2 is to the west, so go north until you can turn left and continue on west until you find the exit.
Now that you're in Area 2, go west until you're in the tall grass, then continue on north and go up the steps (not the ones by the sign), then take the next flight of stairs down again. Go west until you bump into a pond, then continue on north. Go east until you find yourself in tall grass again, then go north. When you can't go any further, turn to the left and continue on west (pick up the Protein power-up on the way). You'll come to another patch of tall grass. You're almost there. Just go all the way to the south and exit this map to go to Area 3. There, finally -- a few squares to the south -- you will find the Gold Teeth.
Get HM 03 - Surf and TM 32 - Egg Bomb
Since you're already here, why not get the most useful HM at the same time as the teeth? Just go to the west from where you entered into Area 3 and you'll see a small hut (you will also see TM 32 lying outside on the ground, so grab it). Inside the hut, you will receive Surf. Teach this to your Pokémon to get a powerful Water attack that almost always hits its target -- and the ability to cross rivers, ponds, lakes and even oceans. To go for a swim anywhere, just walk up to a shore and select the Pokémon that knows Surf in the Pokémon menu. Select Surf and you're on your way.
Get HM 04 - Strength and Rare Candy
With the Gold Teeth in hand, go back to the Warden's house in Fuchsia City (it's the house in the southeast, below the pond). As a reward for bringing back his teeth, he will give you HM 04 - Strength. This power lets your Pokémon push around large boulders (you have to manually activate the Strength power every time you enter a new area). Use Strength in the Warden's house and push the boulder to the right. You can now grab the Rare Candy.
Fuchsia City Gym

Fuchsia City's gym is led by Koga, a friend of Poison type Pokémon. Bring a team that contains Psychic, Fire, Ground, Water and Bug Pokémon and you will breeze right through this gym. There are a couple of invisible walls in this gym that prevent you from directly walking up to the respective trainers, but it's pretty easy to figure out this maze.
First battle the Juggler on the left side of the room, then walk over to the guy on the right. From there, just continue on up (fight 3 and 4) until you hit the wall. Now go to the left side of the room and head down. You'll bump into another wall. Just go to the right and down and you'll fight trainer #5. Go back to the left side of the room and head down (fight 6 on the way). About four squares below #6, go to the right and face Koga.
- Juggler: Drowzee (34), Kadabra (34)
- Juggler: Hypno (38)
- Juggler: Drowzee (31), Drowzee (31), Drowzee (31), Kadabra (31)
- Tamer: Arbok (33), Arbok (33), Sandslash (33)
- Tamer: Sandslash (34), Arbok (34)
- Juggler: Drowzee (34), Hypno (34)
- Koga (Red and Blue): Koffing (37), Koffing (37), Weezing (43), Muk (39)
- Koga (Yellow): Venonat (44), Venonat (46), Venonat (48), Venomoth (50)
You'll get the Soul Badge as a prize for your victory as well as TM 06 - Toxic, the best Poison attack in the game.
Safari Zone

The Safari Zone is home to some rare Pokémon, as well as a number of interesting items. We've already covered how you can find the Gold Teeth, HM 03 and TM 32 above, but there is certainly some more stuff to be found here:
- Nugget: In the entrance area. You need Surf.
- Carbos: Area 1
- Max Potion: Area 1
- TM 37: Area 1
- Full Restore: Area 1
- TM 40: Area 2
- Protein: Area 2
- Max Revive: Area 3
- Max Potion: Area 3

In case you're confused about how to catch Pokémon in the Safari Zone, here are the basic rules:
- You can take 500 steps before you're automatically recalled to the entrance.
- You can only use the 30 Safari Balls provided by the park.
- You cannot attack or use items or status altering moves.
- You can throw stones to make the Pokémon you are trying to catch angry. This will make it more likely that you will catch the Pokémon, but it will also make the Pokémon more likely to run away. You should throw multiple stones to increase your chances.
- You can toss out bait to make the Pokémon stay around longer. On the downside, this makes them harder to catch.
- Catching some of the rare Pokémon, like Chansey can be tough. It's not unusual to throw all 30 Safari Balls without catching a Pokémon, so don't get discouraged. Just save your game before you enter the Safari Zone. If you don't catch anything good, just restart.
Here are the Pokémon that can be caught in the Safari Zone, by area:
Entrance Area Nidoran Female (Blue only), Nindorina, Nidoran Male (Red only), Nidorino, Exeggcute, Parasect, Venonat, Rhyhorn, Chansey, Scyther (Red only), Pinsir (Blue only). In the water: Krabby, Psyduck, Slowpoke, Dratini, Dragonair.
Area 1 Nidoran Female (Blue only), Nindorina, Nidoran Male (Red only), Nidorino, Exeggcute, Paras, Parasect, Doduo, Kangaskhan, Scyther (Red only), Pinsir (Blue only). In the water: Krabby, Psyduck, Slowpoke, Dratini (Blue only)
Area 2 Nidoran Female (Blue only), Nindorina (Blue only), Nidoran Male (Red only), Nidorino (Red only), Exeggcute, Paras (Red only), Venomoth, Rhyhorn, Chansey, Tauros. In the water: Krabby, Psyduck, Slowpoke, Dratini (Blue only) In the water: Krabby, Psyduck, Slowpoke, Dratini (Blue only)
Area 3 Nidoran Female (Blue only), Nindorina, Nidoran Male (Red only), Nidorino, Exeggcute, Paras (Red only), Venonat (Blue only), Venomoth, Rhyhorn (Red only), Chansey (Red only), Kangaskhan (Blue only), Tauros. In the water: Krabby, Psyduck, Slowpoke, Dratini (Blue only)
When you're done with Fuchsia City and the Safari Zone, exit to the west to get to Route 18 .
Up Next: Route 18
Top guide sections.
- Walkthrough
- Pokemon Listings
Was this guide helpful?
In this guide.


- Remember me Not recommended on shared computers
Forgot your password?
- Guide Tavern
[Hunt Guide] Safari Zone Guide

By CaptainGrey February 21, 2015 in Guide Tavern
Recommended Posts
Captaingrey.
This guide is made to help you know which Pokemon are available in the Safari Zone in Kanto & Hoenn ; What their encounter rates are ( Very Common / Common / Average / Rare / Very rare ) , what items they can hold, and what items you can find inside.
- Bestfriendss , GBush , Magnet and 3 others

Link to comment
The Safari Zone in Kanto is located at Fuchsia City
Entry fees : 500 $$
Safari balls : 30
Steps : 600
>>> ENTRANCE <<<
Nidoran m -> common
Nidoran f -> common
Rhyhorn -> common
Exeggcute -> common
Venonat -> average
Nidorino -> average
Nidorina -> average
Parasect -> rare (Can hold Big & Tiny Mushroom)
Pinsir / Scyther -> rare
Chansey -> very rare (Can hold Lucky Egg)
Slowpoke/Psyduck -> very commons (day and night)
Magikarp -> 100%
Goldeen -> common
Poliwag -> average
Magikarp -> average
Seaking -> common
Dratini ->average (Can hold Dragon Fang & Dragon Scale)
Psyduck -> rare
Slowpoke -> rare
Dragonair -> very rare (Can hold Dragon Fang & Dragon Scale)
Nugget : On the island (requires Surf )
Leaf Stone : on the island (requires Surf ) (hidden)
>>> AREA 1 <<<
Nidoran m -> common
Nidoran f --> common
Doduo -> common
Paras -> average (Can hold Tiny & Big Mushroom)
Parasect -> rare (Can hold Tiny & Big Mushroom)
Kangaskhan -> rare
Scyther / Pinsir -> very rare
Psyduck / Slowpoke -> very common
Magikarp -> very commons
Poliwag -> common
Magikarp -> common
Dratini -> average (Can hold Dragon Fang & Dragon Scale)
Leaf Stone : On the upper pathway near the rest house
TM 11 (Sunny Day) : On the ledge beside the pond
Max Potion : Far west of the small mountain
Full Restore : Near the rest house
>>> AREA 2 <<<
Nidoran f -> common
Paras -> average (Can hold Tiny & Big mushroom)
Lickitung -> average
Venomoth -> rare
Nidorina -> rare
Chansey -> rare (Can Hold Lucky Egg)
Tauros -> very rare
Psyduck / Slowpoke -> very commons
Protein : On the upper pathway near the rest house
TM 47 (Steel Wing) : Beside a tree west of the rest house
Quick Claw : On a grassless patch in the middle of the area
>>> AREA 3 <<<
Exeggcute -> average
Nidorin f -> rare
Tauros -> rare
Kangaskhan -> very rare
Max revive : in a corner at the southeast base of the mountain
Max potion : in the grass at the southwest base of the mountain
Gold Teeth : south of the sign asking to find them (obligatory for obtain HM 04 Strength)
TM 32 (Double team) : southeast of the Secret House
Revive : on the southeast statue near the Secret House (hidden)
HM 03 (SURF) : from the man in the Secret House
- Bestfriends , Bilburt and Bestfriendss
The Safari Zone in Hoenn is located Route 121 before Lilycove City
>>> AREA 1 / ENTRANCE <<<
Oddish -> common
Kakuna -> common
Girafarig -> common
Wobbuffet -> average
Doduo -> average
Natu -> average
Pikachu -> rare (can hold Light Ball)
Gloom -> rare
Gloom-> rare
Psyduck -> 100%
Magikarp -> very common
Goldeen -> commmon
Goldeen -> very common
Max revive : Far southwest of the Area, beyond the pond (requires Surf )
Gloom -> average
Pinsir -> rare
Dodrio -> rare
Psyduck -> very common
Golduck -> rare
TM 22 (Solar Beam) : Far northeast of the area, beyond the pond (requires Surf and Mach Bike )
>>> AREA 4 <<<
Geodude (Rock Smash) -> 100% (can hold e verstone)
Phanpy / Donphan -> common
Heracross -> rare
Xatu -> rare
Calcium : In the far northwest part of the area (requires Acro Bike )
>>> AREA 5 <<<
Mareep -> common
Sunkern -> common
Spinarak -> average
Aipom -> average
HootHoot -> rare
Snubull -> rare
Gligar -> rare
Stantler -> rare
Chikorita -> very rare
Wooper -> common
Marill -> common
Totodile -> very rare
Quagsire -> very rare
Remoraid -> common
Octillery -> very rare
PP up : Three squares south of the southernmost Pokéblock stand (hidden)
Full Restore : In the furthest southeast patch of grass (hidden)
Big Pearl : East in a patch of grass beyond the top of the waterfall
>>> AREA 6 <<<
Shuckle (Rock Smash) -> 100% (can hold Root or Claw Fossils)
Aipom -> common
Teddiursa -> common
Sunkern -> average
Ledyba -> average
Houndour -> rare
Miltank -> rare
Pineco -> rare
Cyndaquil -> very rare
Rare Candy : In the southeast portion of the area there is a 2×3 patch of light green grass in the lower right portion of it (hidden)
Zinc : In a small nook among the wall in the rocky path to the north (hidden)
Nugget : Between two ledges at the end of the rocky path to the west
- Bestfriends , Bilburt , Bestfriendss and 3 others
will u include something about catchrate and best way to catch diffrents pokes?
- Angeluksdarkrose

Well done! Don't forget to include that you can find Claw & Root fossils on Shuckle in the Hoenn SZ when you add that to the guide, also a neat little trick for mass Shuckle hunting; Rock Smash all Rocks in Area -> Switch Channels & you don't have to move. :)
- kevpr , Bestfriendss and CaptainGrey
Moved to that main forum and added to the Guide Tavern Index.
Bestfriendss
I am planning on endorsing your guide when I get the chance to. Stay tuned to the RR News channel!
[spoiler]Keep up the good work! ;) [/spoiler]

less common, more %'s pls
its hard to judge percentiles, especially when the developers changed up the safari zones (lotad at night in Kanto, that is evidence of a change...).
means that they have the % as well. Besides, i'm not asking for cpt to put it in half n hour later, whenever they are accurate
I do pose this question to you Malorne, do you understand the fact that CaptainGrey is not a dev? I know that he posted where all the pokes are, but at the same time, he probably ventured out into the safari a couple of times. Captain is just giving his input from a CM's prospective. ( C M = Community Manager not Development Manager). Thus, Captain probably does not have the percentiles on top of his head. The devs have a hard job, but at the same time, they shouldn't be responsible for giving us percentiles, that is just plan silly. My conclusion to the problem, lack the percentiles (in the Emerald Guide Book, I read it and when it was showing pokemon, it didn't say "Whismer 100% " instead it stated "Whismer Very Common ." Percentiles are just plan silly and are not needed to make an effective guide. CaptainGrey made a to the point guide that I am planning to advertise on my YT channel, it is to the point, and no need for silly numbers.
I do pose this question to you Malorne, do you understand the fact that CaptainGrey is not a dev?
CaptainGrey made a to the point guide that I am planning to advertise on my YT channel, it is to the point, and no need for silly numbers.
how is this about your channel again? i prefer numbers of rarity, gives more precise rates.
1. The devs can't give numbers because then that would be like looking into a mathematics guide of PokeMMO rather than a typical guide. Thus, if they did give exact numbers, this would ruin the fun of the game, and this would single-handedly, expose the game too much.
2. Please refrain from insulting my YouTube channel, it is not polite. I am not going to insult you although I do feel like doing it sometimes. Violates Rule 1 clause a
These are two important points I would like to express to you. Please read them. Like I said, I am going to refrain from insulting you for all the distress you are causing here on a simplistic and to the point guide.
1. The devs can't give numbers because then that would be like looking into a mathematics guide of PokeMMO rather than a typical guide. Thus, if they did give exact numbers, this would ruin the fun of the game, and this would single-handedly, expose the game too much. 2. Please refrain from insulting my YouTube channel, it is not polite. I am not going to insult you although I do feel like doing it sometimes. Violates Rule 1 clause a These are two important points I would like to express to you. Please read them. Like I said, I am going to refrain from insulting you for all the distress you are causing here on a simplistic and to the point guide.
i didn't insult your channel lol, was simply asking what was the validity about it with the topic at hand (which is irrelivant btw) also, giving out exact encounter rates doesn't change that much of a thing with the fun of the game, coz it isn't... so i don't see why not actually, why am i even arguing with you lol. Cpt, give enc rates mate
You should play the game itself. You are ruining fun because you are bluntly giving way number information instead of a generic Very Common . Do you want to deface hope for those that want to catch Chansey, but come to find out that there is a 5% chance of encountering it. That would ruin hope for chansey lovers and also discorage people from venturing out into the Safari Zone for that Chansey or Kangaskan. Instead of ruining people's hopes, make a genaric Very Common or Very Rare label, saves the trouble and the more generic you can be, the happier the player base.
More numbers = More stress <---Important formula for an MMO's success
I will not give the % encounter rates, and please stop to debate about it on this topic to keep it clean. Thanks
do i need to remind you that some values are based on encounter rates?
Well done! Don't forget to include that you can find Claw & Root fossils on Shuckle in the Hoenn SZ when you add that to the guide, also a neat little trick for mass Shuckle hunting; Rock Smash all Rocks in Area -> Switch Channels & you don't have to move. :)
I am planning on endorsing your guide when I get the chance to. Stay tuned to the RR News channel! [spoiler]Keep up the good work! ;) [/spoiler]
Safari Zone tips...
I want to make an announcement, I endorsed your safari guide. I hope I helped in making your guide more known throughout the PokeMMO community.
- 2 weeks later...

- 5 months later...

hey quick think I noticed - in Area 4, i'm encountering a lot of Donphan (not phanphy, as the guide suggests). Otherwise this has been super helpful!
Ye I noticed this today too, i'll add it to the thread, thanks :)
Hey I cant seem to bunny hop or wheelie using the acro bike to access area 4 in Hoenn
- 4 weeks later...
DarkDragonborn
Yes! Been looking for this kind of guide.
O.o what tauros more rare then chanseys in area 2 weird cuz i was running into tauros left and right one after another more then other pokes and way more then chanseys!
I'm pretty sure for zone four in hoenn that xatu is a common, I have been encountering it more than donphan
Create an account or sign in to comment
You need to be a member in order to leave a comment
Create an account
Sign up for a new account in our community. It's easy!
Already have an account? Sign in here.
- Existing user? Sign In
- Online Users
- All Activity
- My Activity Streams
- Unread Content
- Content I Started
- Leaderboard
- Create New...
Important Information
By using this site, you agree to our Terms of Use and Privacy Policy .
Pokémon Wiki
- View history
Generation I, FireRed, and LeafGreen [ ]
The player can return the Gold Teeth to their owner, the Safari Zone Warden, in exchange for HM04 (Strength) .
Let's Go, Pikachu! and Let's Go! Eevee [ ]
The player can return the Gold Teeth to their owner, the Safari Zone Warden, to have him teach the Secret Technique Strong Push to their partner Pokémon.
- 2 Legendary Pokémon
- 3 Ash Ketchum
Kanto Safari Zone

The Kanto Safari Zone (Japanese: サファリゾーン Safari Zone ) is a special Pokémon preserve in Kanto that Trainers can enter to catch wild Pokémon. It is owned by Baoba .
For $ 500, the player can play the Safari Game (Japanese: サファリゲーム Safari Game ) and receive 30 Safari Balls . Trainers are limited to 500 R B Y /600 FR LG steps in the Safari Zone before the Game is over. A Safari Zone Exploration Campaign is also taking place, where the goal is for Trainers to find the Secret House (Japanese: トレジャーハウス Treasure House ), located in the deepest area, Area 3. The prize for finding the house is HM03 ( Surf ).
In the Safari Zone, when a wild Pokémon appears, Trainers cannot send out Pokémon to battle it. Instead, Trainers must face Pokémon only with simple tools, and catching a Pokémon becomes much more reliant on luck, as Pokémon are able to run away from the Trainer at any time. Trainers may throw Bait to make a Pokémon less likely to run, but this also makes it harder to catch. Conversely, throwing Rocks will make a Pokémon easier to catch but more likely to run.
In Generation II , the Safari Zone has closed down while Baoba takes a vacation. In the contemporaneous Generation IV games, he has opened another one in Johto and Kanto's Pal Park is located here. In Pokémon: Let's Go, Pikachu! and Let's Go, Eevee! , GO Park is located here.
- 2.1 Generation I
- 2.2 Generation III
- 2.3 Bait Strat
- 3 Closing notices
- 5.1.1 Center Area
- 5.1.2 Area 1
- 5.1.3 Area 2
- 5.1.4 Area 3
- 5.2.1 Center Area
- 5.2.2 Area 1
- 5.2.3 Area 2
- 5.2.4 Area 3
- 7.1 Pokémon Pinball
- 8.1.1 Pokémon
- 8.2.1 Pokémon
- 9.1.1 Pokémon
- 9.2.1 Pokémon
- 9.3.1 Pokémon
- 11 In other languages
The Safari Zone is divided into four areas:
- The Center Area: where the player enters the Safari Zone
- Area 1: east from the Center Area
- Area 2: north from the Center Area
- Area 3: west from the Center Area
In the Generation I games, "Center Area" is actually used to refer to both the entrance area that acts as a hub to all the other areas, and the area east from this hub.
Safari Game
As with other Safari Games, Pokémon are made easier or harder to capture by modifying the Pokémon's catch rate . Pokémon can be in any of three states—angry, eating or neutral—with the angry state making them more likely to run but the eating state making them less likely to.
Generation I
At the start of an encounter, two counters—an "angry counter" and an "eating counter"—are set to 0. Whenever Bait is thrown, the angry counter is reset while the eating counter increases by a random value between 1 and 5 (but to no more than 255). The opposite occurs if a Rock is thrown: the eating counter is reset and the angry counter increases on the same basis. The catch rate is doubled (to no more than 255) whenever a Rock is thrown, but halved (rounded down) whenever Bait is thrown.
At the end of each turn, if either the angry or eating counter is nonzero, it is decreased by 1; if the angry counter is decreased to 0, the modified catch rate resets to the Pokémon's initial catch rate. A random value between 0 and 255 inclusive is generated, and if this is less than half of the Pokémon's Speed rounded down (if the Pokémon is eating), double the Speed (if the Pokémon is in a neutral state), or four times the Speed (if the Pokémon is angry), the Pokémon escapes. A Pokémon will also always escape if its Speed is 128 or more, even if it is eating.
Generation III
The Safari Game mechanics were overhauled to more closely resemble the one in the Hoenn Safari Zone . Like it, there is an additional "catch factor" that begins at 100/1275 of the Pokémon's catch rate (rounded down). Each species of Pokémon that appears in the Safari Zone also has its own "escape rate", unlike in the Hoenn Safari Zone , which is never modified. Bait cannot reduce the "catch factor" of a Pokémon below 3 and rocks cannot increase it above 20. Because of this, Chansey becomes easier to catch after being baited as its catch factor increases from 2 to 3, Pokémon with a base catch rate of 45 will not become harder to catch after bait has been thrown as their catch factor remains at 3, and Magikarp cannot become any easier to catch by throwing rocks as its catch factor is already 20.
Like Generation I, a Pokémon will be angry or eating whenever Bait or Rocks are thrown. If Bait is thrown, it will be "eating" for 1-5 turns, during which the catch factor is halved. If Rocks are thrown, it will be "angry" for 1-5 turns, during which the catch factor is doubled. Being "angry" or "eating" is mutually exclusive, though modifications to the catch factors will stack. Whenever a Safari Ball is thrown, the catch factor is converted back to a catch rate by multiplying by 1275/100 and rounding down. The amount of bait or anger a Pokémon has can stack if multiple rocks or bait are thrown. The amount cannot surpass 5 turns worth of either.
At the beginning of each turn a flee check will be completed. A random number from 0 to 99 is generated, and is compared to 5 times its "modified escape factor" if the random value is less, the Pokémon will escape at the end of the turn unless it is captured. During a flee check turn the game will determine a Pokémon's "modified escape factor" 1275/100 of the escape rate (rounded down), which is doubled if the Pokémon is "angry" or quartered (rounded down) if the Pokémon is "eating". This value cannot be reduced below 1 which is equal to a 5% chance to flee. When a Pokémon is first encountered, its flee rate cannot be lower than 2.
A restriction that causes a Pokémon's "Catch Factor" to be a minimum of 3 after bait has been thrown, causes Chansey 's catch rate to be increased from 25 (4.9% per ball) to 38 (8.09% per ball) after throwing bait. This means that throwing bait makes Chansey both easier to catch and less likely to flee. Similarly the Pokémon Kangaskhan , Scyther , Pinsir , Tauros , Dragonair , and Dratini all have catch rates that are unaffected by the use of bait. Due to this oddity players are able to increase their chances of successfully catching some Pokémon through the use of what has been called the "Bait Strat". By throwing two bait and then a sequence switching between a couple balls and then more bait players can keep a Pokémon's flee rate low by maximizing their chances that they will continue eating. Unfortunately, a Pokémon's flee check is preformed at the beginning of the turn, so bait will only come into effect the turn after it has been thrown. This leaves an inherent risk of a Pokémon fleeing before any balls have been thrown. Trainers brave enough to throw bait can find themselves with a 19.08% chance to catch Chansey per encounter as opposed to just 10.28% with balls alone.
Closing notices
In Generation II , the sign outside the Safari Zone contains a notice about it being closed in that reads:
The WARDEN is traveling abroad. Therefore, the SAFARI ZONE is closed.
In HeartGold and SoulSilver , the sign informs that since the Safari Zone is closed, the facility houses Pal Park instead.
There's a notice here... The Safari Zone is closed. Instead, we have Pal Park.
Center Area
In the spin-off games, pokémon pinball.
In Pokémon Pinball , the Safari Zone appears on the Red and Blue tables; catchable Pokémon include Nidoran♀ , Nidoran♂ , Paras , Doduo , Grimer , Rhyhorn , Chansey , Scyther , Pinsir , and Tauros .
In the anime
Main series.

The Safari Zone only appeared in the banned episode EP035 . Due to this episode's international ban outside of Asia, the Safari Zone has never appeared in the English dub , although it was mentioned in the preceding episodes The Flame Pokémon-Athon! and The Kangaskhan Kid .
In the anime, the Safari Zone is run by a gun-toting warden, Kaiser . Like in the games, Trainers are restricted to only thirty Safari Balls per challenge. It is explained that this is the result of an incident decades ago where a rumor of the extremely rare Pokémon Dratini being spotted in the Safari Zone caused countless Trainers to recklessly catch excessive amounts of Pokémon in the area and completely wreck it in the process.
Upon entering the Safari Zone, Ash and his friends encountered Team Rocket , who challenged them to a contest to see who could catch the most Pokémon. However, while Ash was busy catching Pokémon, Team Rocket forced Kaiser to reveal Dratini's location. Ash and his friends managed to stop Team Rocket's plan to detonate a bomb in Dratini's home lagoon and discovered that the Dratini which Kaiser had met decades earlier had evolved into Dragonair and now had its own child Dratini. Before leaving the Safari Zone, Ash sent the Pokémon he had caught, namely a herd of Tauros and nothing else, to Professor Oak's Laboratory .
The Safari Zone is also seen in an early trailer for the second movie , where it is experiencing a harsh blizzard thanks to the unstable weather patterns caused by the fighting between the legendary birds . The scene, like most scenes from initial Pokémon movie trailers, is never actually used in the movie.
Pokémon Origins
The Kanto Safari Zone appeared in File 4: Charizard , when Red was seen confronting Chansey in there. Initially, he had trouble choosing between throwing a rock or a bait, almost causing the Chansey to run away, but eventually, he managed to catch it and add its data to his Pokédex .
In the manga
Pokémon adventures.
The Safari Zone appeared in Long Live the Nidoking! and A Hollow Victreebel , where Red visited it. Like all visitors, Red was forced to leave his Pokémon and Poké Balls to the entrance before starting his tour. Guided by two robotic Pidgey called Pidgebots , Red started a ride on a raft in a river running through the Safari Zone. When he noticed two Nidoking fighting over the love of a Nidoqueen , Red secretly pulled out a Poké Ball he had smuggled in and tried to catch one of the Nidoking with it. However, the ball missed the Nidoking and caught Nidoqueen instead. Enraged by this, the two Nidoking attacked Red's raft, destroying it and one of the Pidgebots.
While on the run, Red ended up getting caught by a group of Victreebel , who intended to eat him as a part of their nightly evolution ritual. However, thanks to his Poké Flute and a Poké Doll , Red managed to escape. Coming across one of the Nidoking from before again, Red caught one of the Victreebel and used it to weaken Nidoking enough for capture. The next morning, when Red was found by the Safari Zone officials, he was revealed to have caught a huge herd of Pokémon.
Pokémon Pocket Monsters

Red and his Pokémon visited the Safari Zone in Rampage At The Safari Zone?! . Like many other places they visit, it ended up getting wrecked by Clefairy .
Pokémon Zensho

The Safari Zone appeared in Fuchsia City , where Satoshi entered it. After saving a Ditto from a Tauros , Satoshi met Shigeru , who showed off all the Pokémon he had managed to catch at the Safari Zone. Soon after, Satoshi came across a Fisherman , who gave him a fishing rod. To the Fisherman's astonishment, Satoshi managed to reel in a rare Dratini , and asked for him to trade it for him. At first, Satoshi was reluctant, but when he noticed the Safari Zone Warden 's missing dentures inside one of the Fisherman's Poké Balls , he accepted the offer.
On his way to return the dentures, Satoshi was ambushed and challenged to a battle by Gym Leader Koga . Satoshi's Ditto transformed into a duplicate of Koga, resulting in his Weezing getting confused and self-destructing , earning Satoshi the Soul Badge .

- The background music is Evolution .
- They are also the only areas where it is not possible to remove tall grass by using Cut . However, tall grass can be removed normally from these areas in Pokémon FireRed and LeafGreen .
- In the Generation II games, there is some data for a beta Safari Zone in Fuchsia City , but it was ultimately unused.
- Another reference to the aforementioned episode in Yellow may be the fact that Dragonair , which also appeared in EP035, is available in the Yellow Version, but not in the Red and Blue Versions.
- In Generation I , a scientist in a house in the top-right corner of Area 2 states, " You can keep any item you find on the ground here. But, you'll run out of time if you try for all of them at once! ". However, so long as the player can use HM03 ( Surf ) as soon as they pick it up, it is actually possible to collect all possible items in the Safari Zone in one visit.
- Although bait makes Pokémon harder to catch, an NPC in Area 4 says it makes them easier to catch.
- In the Western Generation I games, though the player receives 30 Safari Balls, it is only possible to catch 25 Pokémon: 5 to fill the party and 20 to fill a Box . In the Japanese games, however, the Box capacity is 30 Pokémon.
- As this doesn't happen in Red and Blue, the player will be unable to get HM03 (Surf) nor the Gold Teeth if they run out of money.
In other languages
- Candidates for moving
- Articles needing more information
- Articles with accompanying video
- Safari Zones
- Kanto locations
- Red, Blue and Yellow locations
- FireRed and LeafGreen locations
- Pokémon Pinball locations
Navigation menu
Page actions.
- View source
Personal tools
- Create account
- Editor's Hub
- Frequently asked questions
- Bulbawiki forum
- Recent changes
- Random page
Bulbagarden
- Bulbagarden home page
- Bulbagarden Archives
- Bulbagarden Forums
- Bulbagarden Discord server
- What links here
- Related changes
- Upload file
- Special pages
- Printable version
- Permanent link
- Page information
- Cite this page
- This page was last edited on 23 February 2024, at 13:50.
- Content is available under Attribution-NonCommercial-ShareAlike 2.5 . (see Copyrights for details)
- Privacy policy
- About Bulbapedia
- Disclaimers
- Mobile view
9 Things to See in Moscow's Red Square
Sir Francis Canker/Getty Images
In most cases, you'll be entering Red Square from the north, passing landmarks such as the Bolshoi Theatre and Duma parliament building as you make your way southward. Although you don't necessarily have to pass through the Voskresensky (or Resurrection in English) Gates in order to gain access to the square these days, they definitely provide a sense of arrival, to say nothing of the way their left arch frame's St. Basil's Cathedral if you look from just the right angle.
An interesting fact is that while a gate of some kind has stood here since the mid-16th century, the one you currently see wasn't built until 1994, having been destroyed in 1931 so that tanks could enter and exit Red Square during military parades.
St. Basil's Cathedral
TripSavvy / Christopher Larson
Few sights are as iconic not only of Moscow and Red Square but indeed of Russia than St. Basil's Cathedral, whose colorful, onion-shaped domes are a symbol of the country around the world. Officially known as the Cathedral of Vasily the Blessed, this church has stood since 1561, which is quite miraculous when you consider all the turbulent history that has transpired since then.
Among other things, religion was severely prohibited during the Soviet period , which led some to believe that this emblem of the Russian Orthodox church might not withstand the tenure of the USSR.
An interesting fact is that St. Basil's is the so-called "Kilometer Zero" of Russia; all of Moscow's main roads (which can take you anywhere in Russia) begin at the exits to Red Square. In this way, St. Basil's iconic status also has an extremely tangible element.
The Kremlin
TripSavvy / Christopher Larson
When you think of The Kremlin, it's unlikely that positive images enter your mind. The fact that simply saying the word "Kremlin" is too vague a descriptor (most Russian cities have their own Kremlin complexes; you should say "Moscow Kremlin") notwithstanding, this misunderstood place is incredibly beautiful, even if you don't like the policy that comes out of it.
Senate Square
In spite of its name, which refers to the role the building that rises above the square played during Imperial Russia, Senate Square is actually home to Russia's presidential administration, currently helmed by Vladimir Putin. In order to see where Russia's legislature operates from, walk just outside Red Square to the Duma parliament building.
Dormition Cathedral
Dating back to the year 1479, the gold-domed Dormition Cathedral pays homage to an Orthodox religious feast that commemorates the death of the Virgin Mary . As is the case with St. Basil's, it is curious that such a conspicuously religious structure was able to survive through the Soviet period.
Armoury Chamber
Though it takes its name from the fact that it housed Russia's royal arsenal when it was built in the 16th century, the most notable resident of the Kremlin's Armoury Chamber today is the Russian Diamond Fund.
Notable Kremlin Towers
Robert Schrader
The interior of the Moscow Kremlin is more beautiful and inviting than you'd expect, but the walls and towers that rise around it better live up to the intimidation with which the complex is associated.
Borovitskaya Tower
Named to commemorate the dense forest that once stood atop the mount where it's built, this tower is extremely picturesque. Built in the late 15th century, it's visible from most places in the square, and also as you walk along the Moskva River.
Nikolskaya Tower
Also built in the year 1491, this tower currently suffered destruction at the hands of Napoleon's army in the 19th century. What you see now is the result of an 1816 re-design and renovation, though artillery fire during the Russian Revolution also caused superficial damage to the tower, named to honor St. Nikolas of Mozhaysk , so it's difficult to know which elements of it are original.
Spasskaya Tower
Known in English as the "Savior's Tower," this iconic, star-topped tower is perhaps the best-known of all the Kremlin's towers. Built in 1491 like the other two towers on this list, it's certainly the most photographed. As a result of its proximity to St. Basil's, it often makes its way into tourists' pictures.
Mausoleum of Lenin
Just as it's strange to learn how many religious monuments survived through the Soviet period, it's a bit odd to think that Lenin's preserved body still sits in a mausoleum just beneath the walls of the Kremlin on Red Square, given the lack of consensus about the ultimate impact of his Revolution, even in Russia.
It's not guaranteed that you'll be able to see the body (which, believe it or not, seems to be improving with age ) when you go, and if you do you will likely have to wait in line, but even strolling past the outside of the Lenin Mausoleum, flanked by stone-faced guards that almost look like statues, illuminates the gravity of his body still being here.
GUM Shopping Center
You might cringe, at least initially, when you realize that one of the most iconic stops on a tour of Red Square is a department store—until you see said department store, that is. Built in 1893 and known during Soviet times as the State Department Store, GUM ( Glávnyj Universáľnyj Magazín or Main Universal Store in English) hearkens back to the grandeur of the late 19th century, both seen from the outside (especially, when lit up at night) and the interior, which might have you feeling like you're further west in Europe.
A trip inside GUM is a particularly good idea during winter, when frigid temperatures outside will have you savoring the heat, the quality of souvenirs, confections and other goods sold inside notwithstanding. Also, make sure not to confuse GUM with CDM, which sits near the Bolshoi Theatre, even though both are stunning and iconic in their own right.
State Historical Museum
The Russian State Historical Museum is located near Voskresensky Gates, though you should wait until after you've seen the first few attractions of Red Square and the Kremlin to head back there and go inside. To be sure, as you pass by its facade (whose late-19th century grandeur somewhat obscures that fact that it's currently a museum accessible to the public) you might not even think to try and gain entry.
Once inside the museum, you can plan to spend at least a couple of hours, given that artifacts here date back to the very beginning of the Russian state in the ninth century. As is the case with GUM, this will be a particularly alluring prospect if you visit in winter, when Moscow is arguably at its most beautiful, but certainly at its least tolerable.
Minin-Pozharsky Monument
It's somewhat easy to disregard this monument, which pays homage to the two Russian princes who ended the so-called "Time of Troubles" in the mid-16th century, during which Polish-Lithuanian forces occupied Russia, among other awful things including a famine. That's because the statue currently sits just at the base of St. Basil's Cathedral, which makes it very difficult to photograph or even see without being overwhelmed by that much more famous edifice.
Though the statue originally sat at the very center of Red Square, it came to be an obstacle to the movement of tanks during the Soviet period, much like the Voskresensky Gates. As a result, authorities moved it during that time, and it's stayed where you currently find it ever since.
Kazan Cathedral
Taken by itself, the smokey-pink Kazan Cathedral is an architectural marvel; originally built in the 17th century, the church you find here today, located just north of the GUM department store, dates back only to 1993.
Unfortunately, since it sits not only in the shadow of GUM, but also in the shadow St. Basil's and the Towers of the Kremlin, it's easy to miss entirely if you aren't looking. As a result, you might wait until you've seen just about everything else in Red Square before coming here to take photos, and to appreciate the understated beauty of this oft-overlooked cathedral.
Moskva River
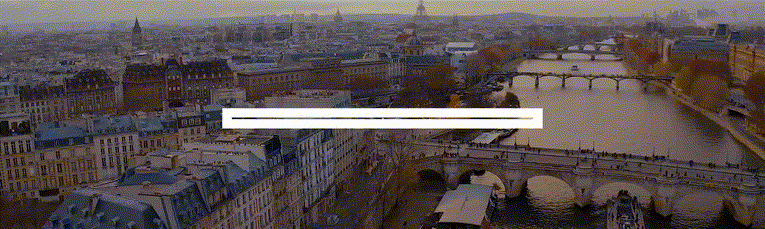
As you head south from St. Basil's Cathedral to exit Red Square, make sure to walk onto Bolshoy Moskvoretskiy Bridge, which crosses the Moskva River. If you look due north, you can get an excellent shot of the church framed, on the left, by the towers of the Kremlin. Directing your gaze a bit to the west allows you to see the skyscrapers of Moscow City as they rise above the Kremlin's walls.
Walking westward along the riverbank is also a worthwhile excursion, for the views it provides of Red Square and the Kremlin, as well as the fact that doing so takes you to other iconic Moscow attractions, including Gorky Park and the Pushkin Museum. The views you enjoy from the river and the bridge are particularly stunning at night, though you should make sure you bring a tripod if you want to get a clear picture, given how strong winds over and near the river can be.
Moscow - Russian Rivers and Waterways Port of Call
Moscow Metro: The Complete Guide
25 Best Things to Do in Moscow
The Impressive Castles of Eastern Europe
St. Basil’s Cathedral in Moscow: Planning Your Visit
St. Petersburg, Russia
10 Must-Visit Palaces and Castles in Russia
Top 12 Things to Do in Kazan, Russia
The Top 12 Things to Do in Nizhny Novgorod, Russia
The Top 12 Things to Do in Novgorod, Russia
Soviet Sights in Moscow – Moscow USSR Sites
The Top 12 Things to Do in Astrakhan
The Top 15 Places to Visit in Russia
A Guide to Moscow: Capital of Russia, City of Domes
The Top 15 Things to Do in Bordeaux, France
A Guide to the 4th Arrondissement in Paris

2018 Primetime Emmy & James Beard Award Winner
In Transit: Notes from the Underground
Jun 06 2018.
Spend some time in one of Moscow’s finest museums.
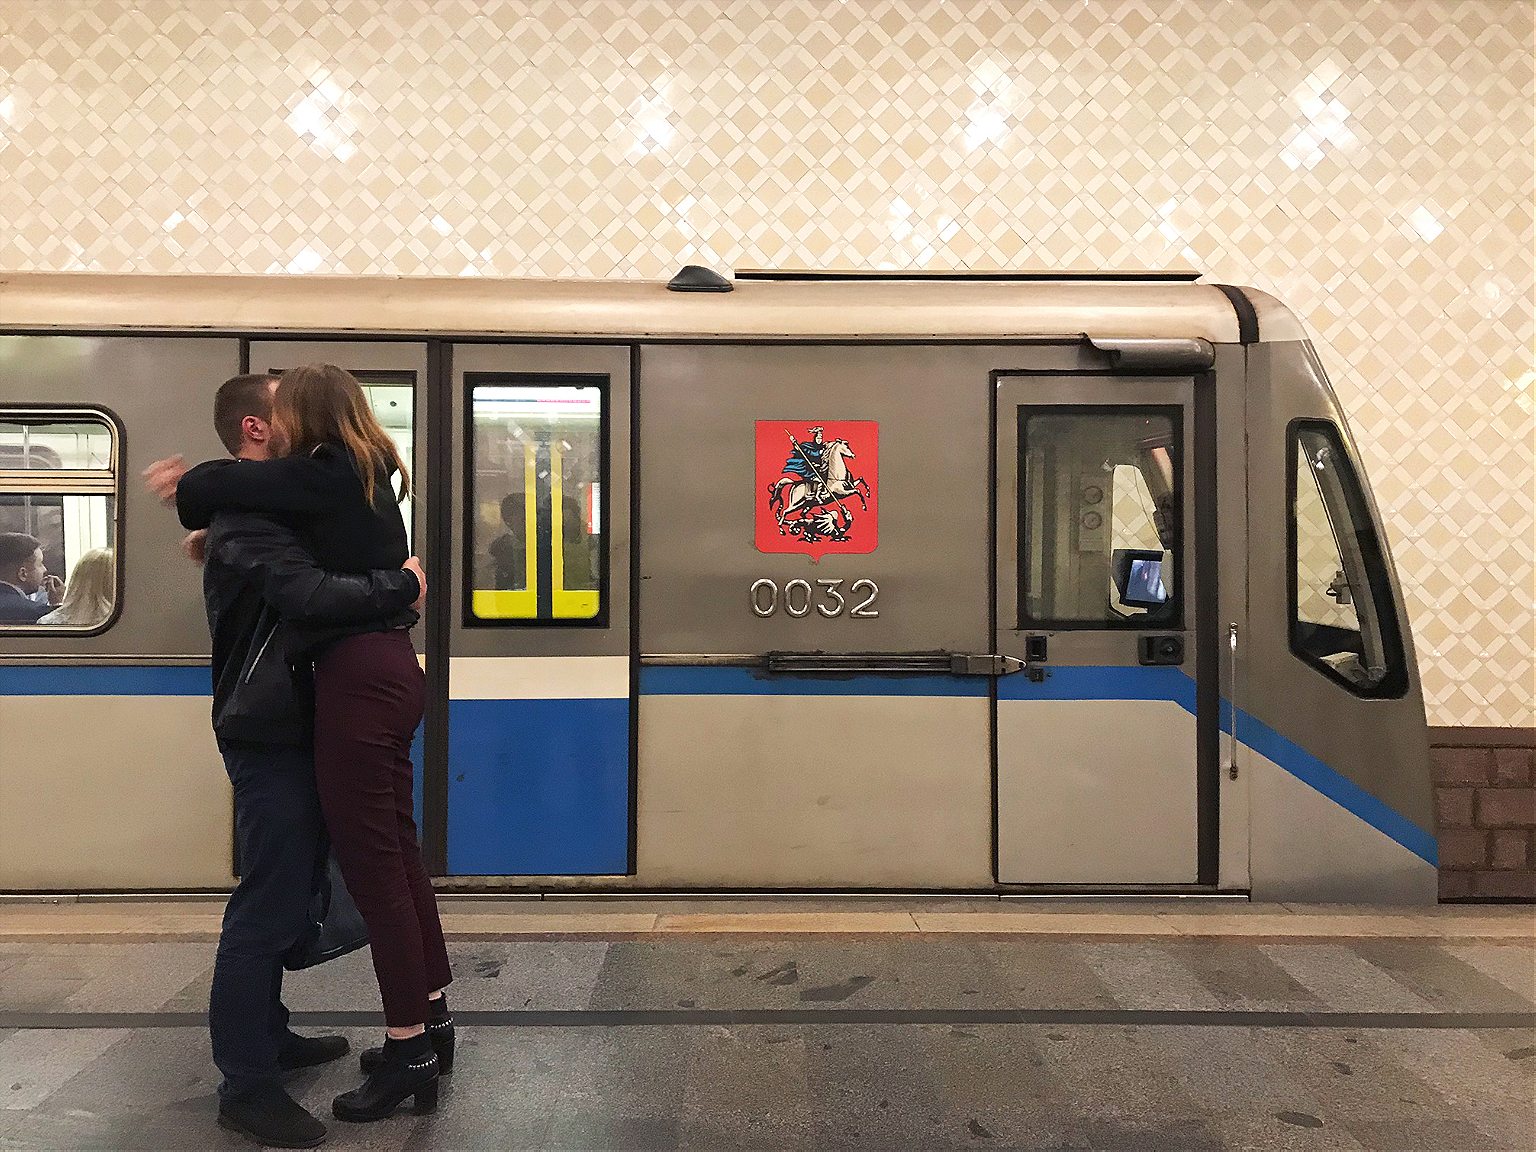
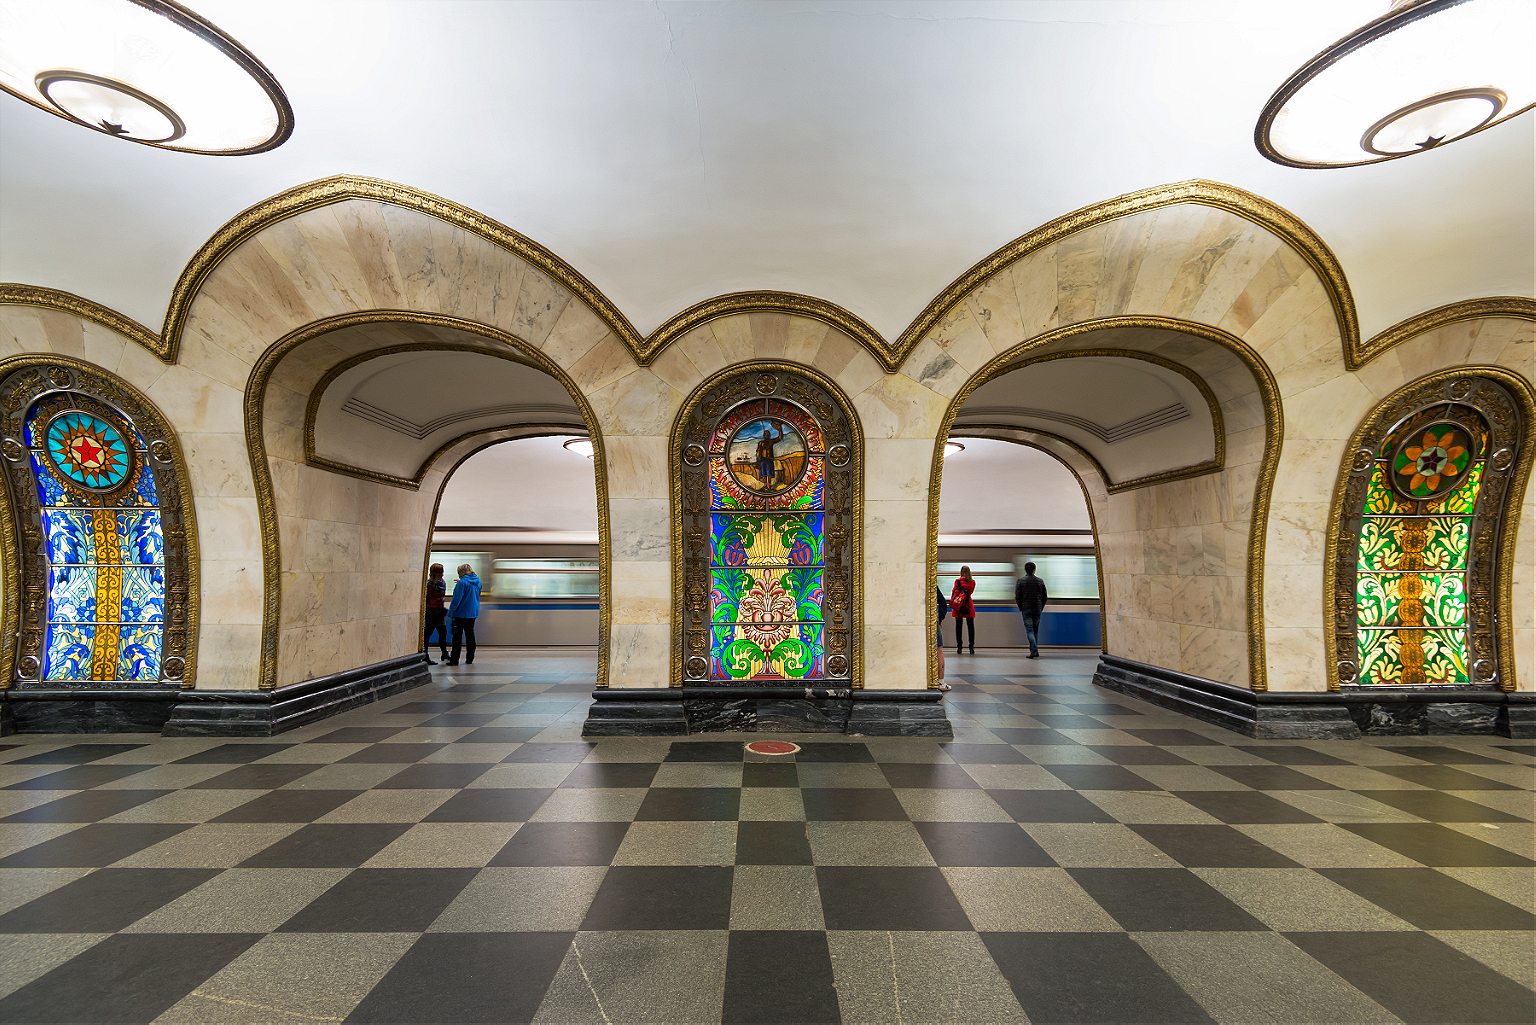
Subterranean commuting might not be anyone’s idea of a good time, but even in a city packing the war-games treasures and priceless bejeweled eggs of the Kremlin Armoury and the colossal Soviet pavilions of the VDNKh , the Metro holds up as one of Moscow’s finest museums. Just avoid rush hour.
The Metro is stunning and provides an unrivaled insight into the city’s psyche, past and present, but it also happens to be the best way to get around. Moscow has Uber, and the Russian version called Yandex Taxi , but also some nasty traffic. Metro trains come around every 90 seconds or so, at a more than 99 percent on-time rate. It’s also reasonably priced, with a single ride at 55 cents (and cheaper in bulk). From history to tickets to rules — official and not — here’s what you need to know to get started.
A Brief Introduction Buying Tickets Know Before You Go (Down) Rules An Easy Tour
A Brief Introduction
Moscow’s Metro was a long time coming. Plans for rapid transit to relieve the city’s beleaguered tram system date back to the Imperial era, but a couple of wars and a revolution held up its development. Stalin revived it as part of his grand plan to modernize the Soviet Union in the 1920s and 30s. The first lines and tunnels were constructed with help from engineers from the London Underground, although Stalin’s secret police decided that they had learned too much about Moscow’s layout and had them arrested on espionage charges and deported.
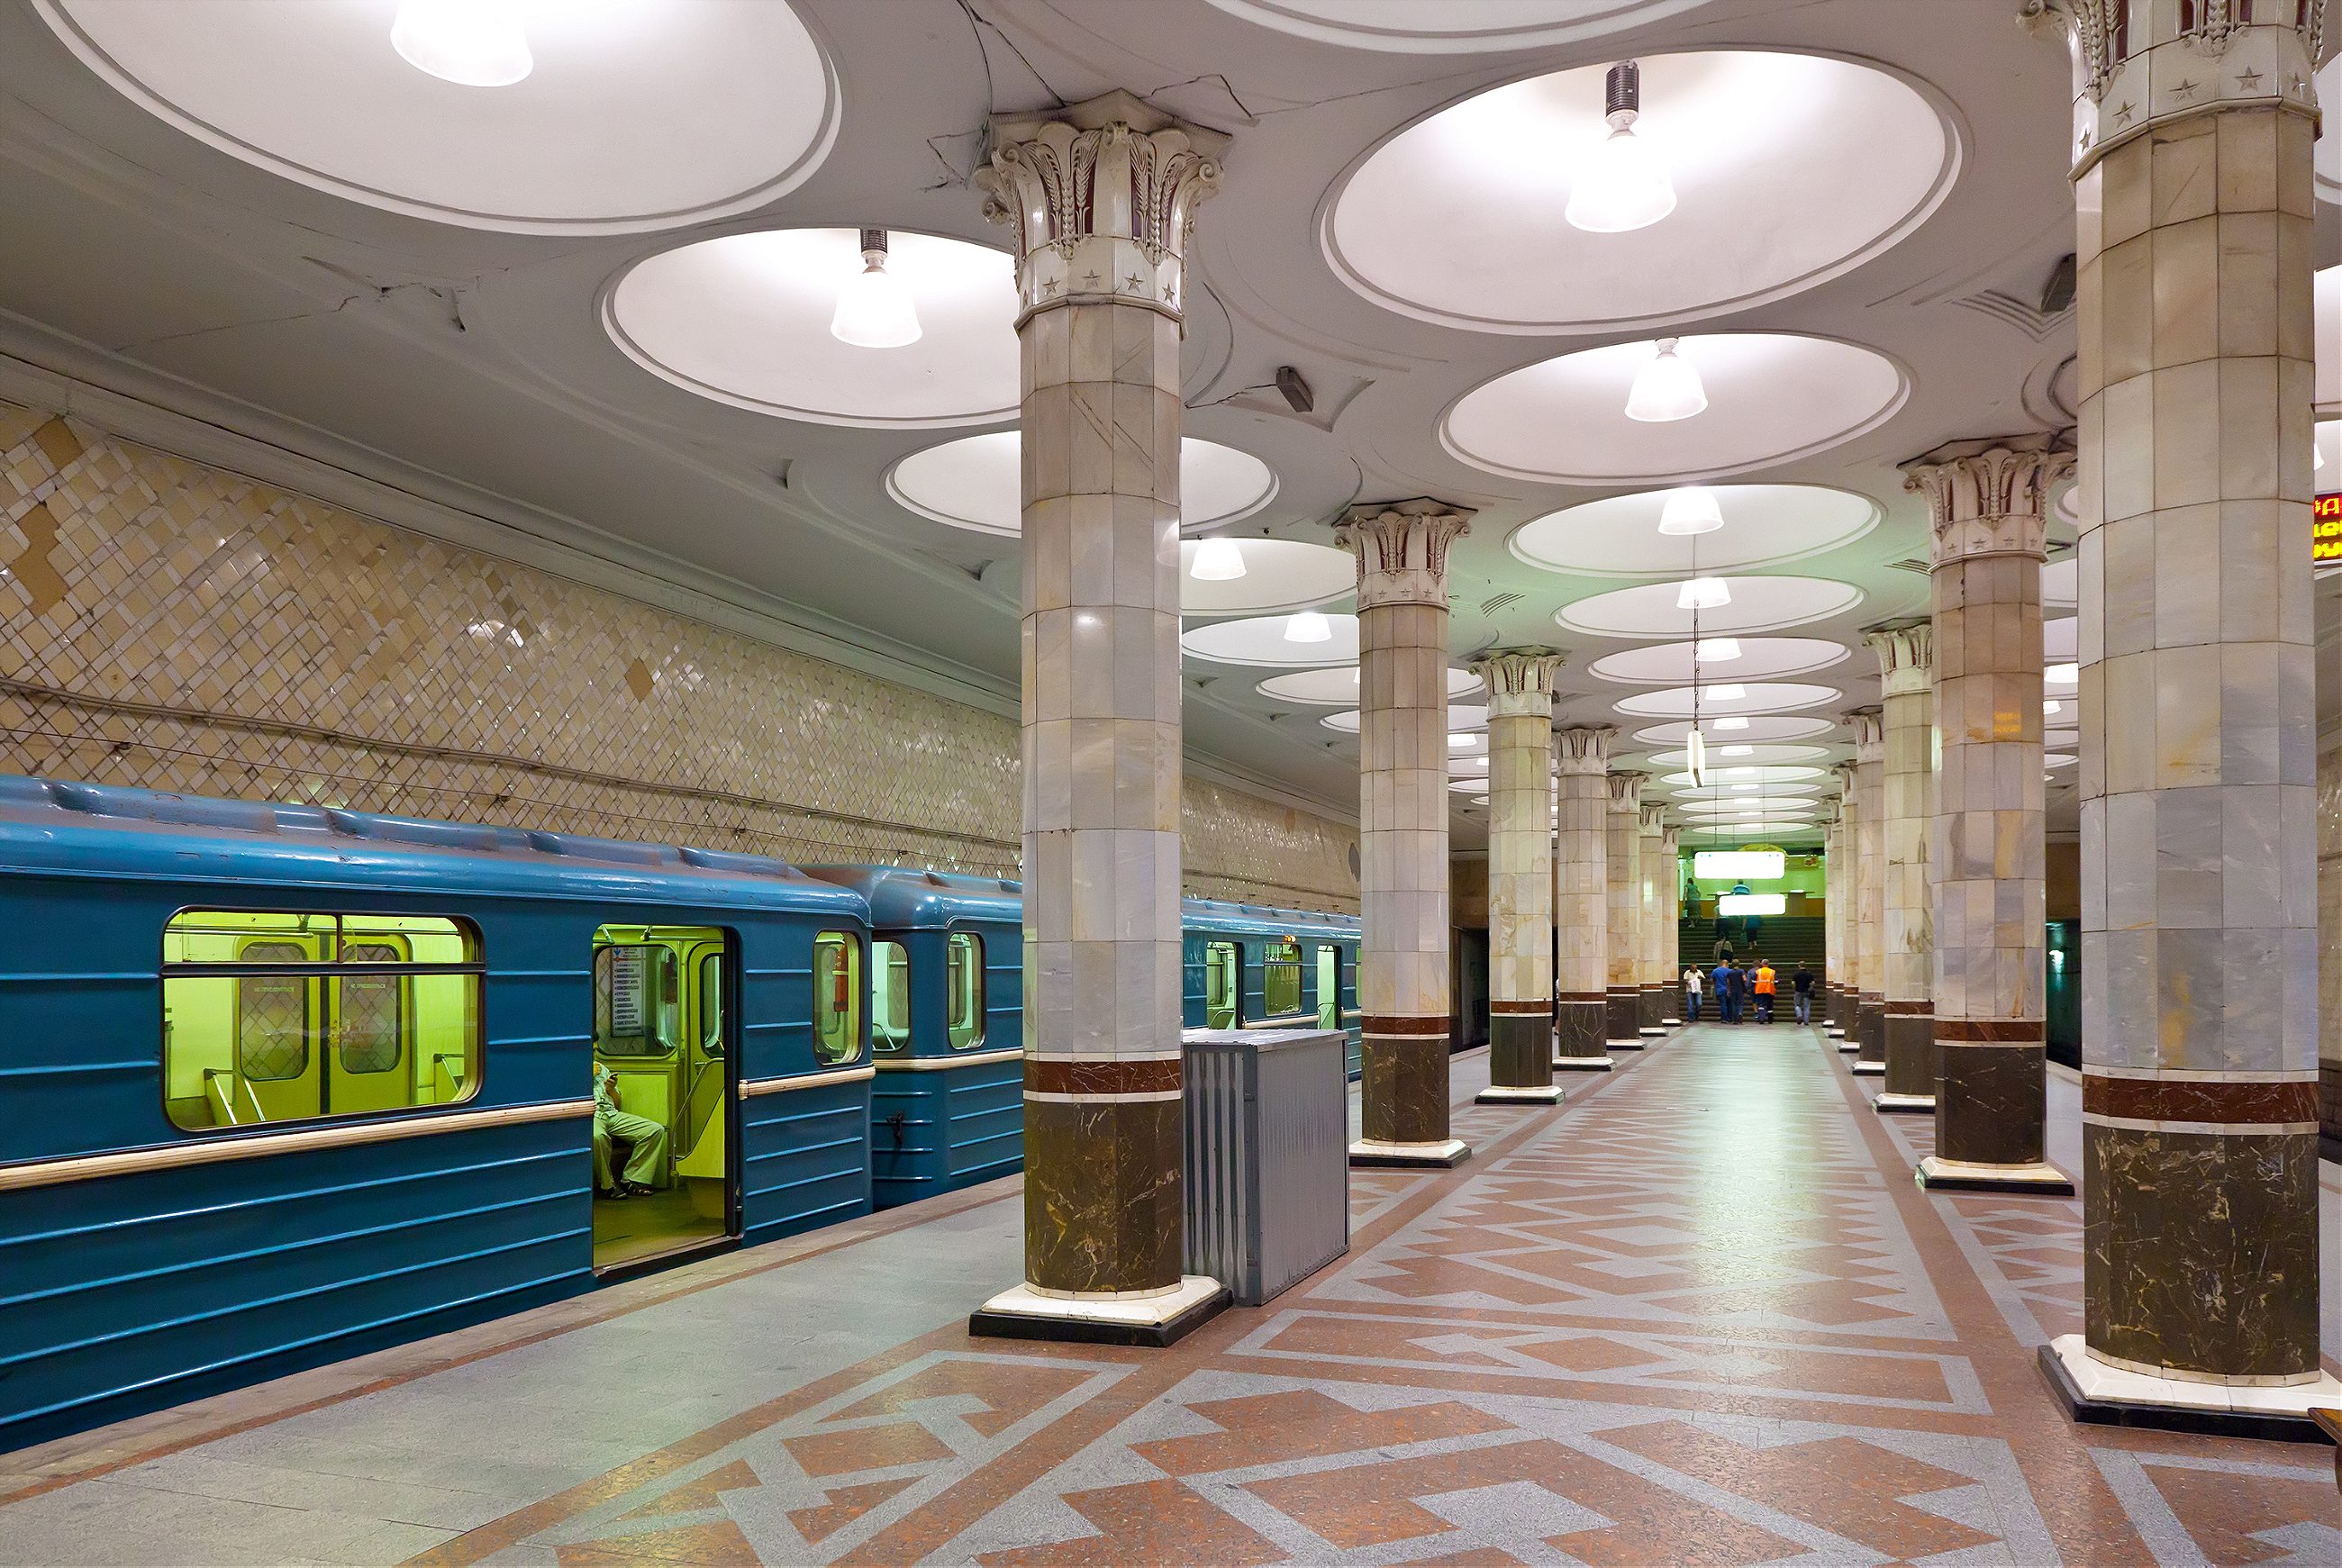
The beauty of its stations (if not its trains) is well-documented, and certainly no accident. In its illustrious first phases and particularly after the Second World War, the greatest architects of Soviet era were recruited to create gleaming temples celebrating the Revolution, the USSR, and the war triumph. No two stations are exactly alike, and each of the classic showpieces has a theme. There are world-famous shrines to Futurist architecture, a celebration of electricity, tributes to individuals and regions of the former Soviet Union. Each marble slab, mosaic tile, or light fixture was placed with intent, all in service to a station’s aesthetic; each element, f rom the smallest brass ear of corn to a large blood-spattered sword on a World War II mural, is an essential part of the whole.
The Metro is a monument to the Soviet propaganda project it was intended to be when it opened in 1935 with the slogan “Building a Palace for the People”. It brought the grand interiors of Imperial Russia to ordinary Muscovites, celebrated the Soviet Union’s past achievements while promising its citizens a bright Soviet future, and of course, it was a show-piece for the world to witness the might and sophistication of life in the Soviet Union.
It may be a museum, but it’s no relic. U p to nine million people use it daily, more than the London Underground and New York Subway combined. (Along with, at one time, about 20 stray dogs that learned to commute on the Metro.)
In its 80+ year history, the Metro has expanded in phases and fits and starts, in step with the fortunes of Moscow and Russia. Now, partly in preparation for the World Cup 2018, it’s also modernizing. New trains allow passengers to walk the entire length of the train without having to change carriages. The system is becoming more visitor-friendly. (There are helpful stickers on the floor marking out the best selfie spots .) But there’s a price to modernity: it’s phasing out one of its beloved institutions, the escalator attendants. Often they are middle-aged or elderly women—“ escalator grandmas ” in news accounts—who have held the post for decades, sitting in their tiny kiosks, scolding commuters for bad escalator etiquette or even bad posture, or telling jokes . They are slated to be replaced, when at all, by members of the escalator maintenance staff.
For all its achievements, the Metro lags behind Moscow’s above-ground growth, as Russia’s capital sprawls ever outwards, generating some of the world’s worst traffic jams . But since 2011, the Metro has been in the middle of an ambitious and long-overdue enlargement; 60 new stations are opening by 2020. If all goes to plan, the 2011-2020 period will have brought 125 miles of new tracks and over 100 new stations — a 40 percent increase — the fastest and largest expansion phase in any period in the Metro’s history.
Facts: 14 lines Opening hours: 5 a.m-1 a.m. Rush hour(s): 8-10 a.m, 4-8 p.m. Single ride: 55₽ (about 85 cents) Wi-Fi network-wide
Buying Tickets
- Ticket machines have a button to switch to English.
- You can buy specific numbers of rides: 1, 2, 5, 11, 20, or 60. Hold up fingers to show how many rides you want to buy.
- There is also a 90-minute ticket , which gets you 1 trip on the metro plus an unlimited number of transfers on other transport (bus, tram, etc) within 90 minutes.
- Or, you can buy day tickets with unlimited rides: one day (218₽/ US$4), three days (415₽/US$7) or seven days (830₽/US$15). Check the rates here to stay up-to-date.
- If you’re going to be using the Metro regularly over a few days, it’s worth getting a Troika card , a contactless, refillable card you can use on all public transport. Using the Metro is cheaper with one of these: a single ride is 36₽, not 55₽. Buy them and refill them in the Metro stations, and they’re valid for 5 years, so you can keep it for next time. Or, if you have a lot of cash left on it when you leave, you can get it refunded at the Metro Service Centers at Ulitsa 1905 Goda, 25 or at Staraya Basmannaya 20, Building 1.
- You can also buy silicone bracelets and keychains with built-in transport chips that you can use as a Troika card. (A Moscow Metro Fitbit!) So far, you can only get these at the Pushkinskaya metro station Live Helpdesk and souvenir shops in the Mayakovskaya and Trubnaya metro stations. The fare is the same as for the Troika card.
- You can also use Apple Pay and Samsung Pay.
Rules, spoken and unspoken
No smoking, no drinking, no filming, no littering. Photography is allowed, although it used to be banned.
Stand to the right on the escalator. Break this rule and you risk the wrath of the legendary escalator attendants. (No shenanigans on the escalators in general.)
Get out of the way. Find an empty corner to hide in when you get off a train and need to stare at your phone. Watch out getting out of the train in general; when your train doors open, people tend to appear from nowhere or from behind ornate marble columns, walking full-speed.
Always offer your seat to elderly ladies (what are you, a monster?).
An Easy Tour
This is no Metro Marathon ( 199 stations in 20 hours ). It’s an easy tour, taking in most—though not all—of the notable stations, the bulk of it going clockwise along the Circle line, with a couple of short detours. These stations are within minutes of one another, and the whole tour should take about 1-2 hours.
Start at Mayakovskaya Metro station , at the corner of Tverskaya and Garden Ring, Triumfalnaya Square, Moskva, Russia, 125047.
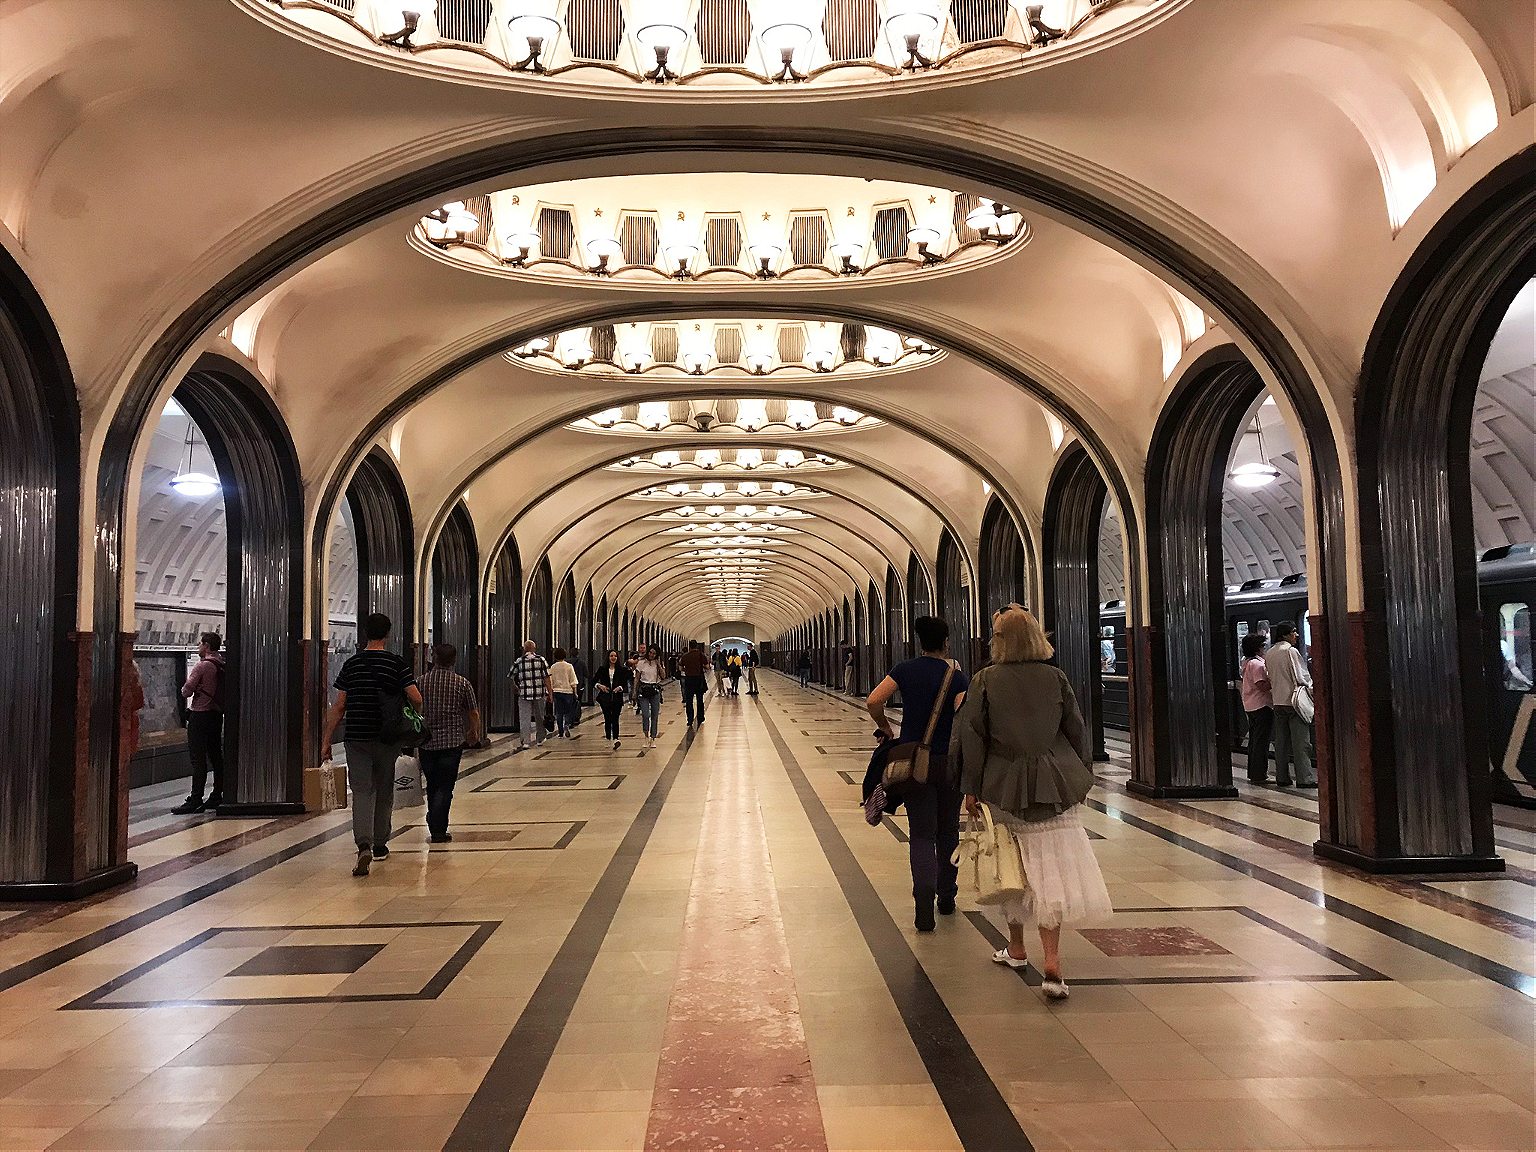
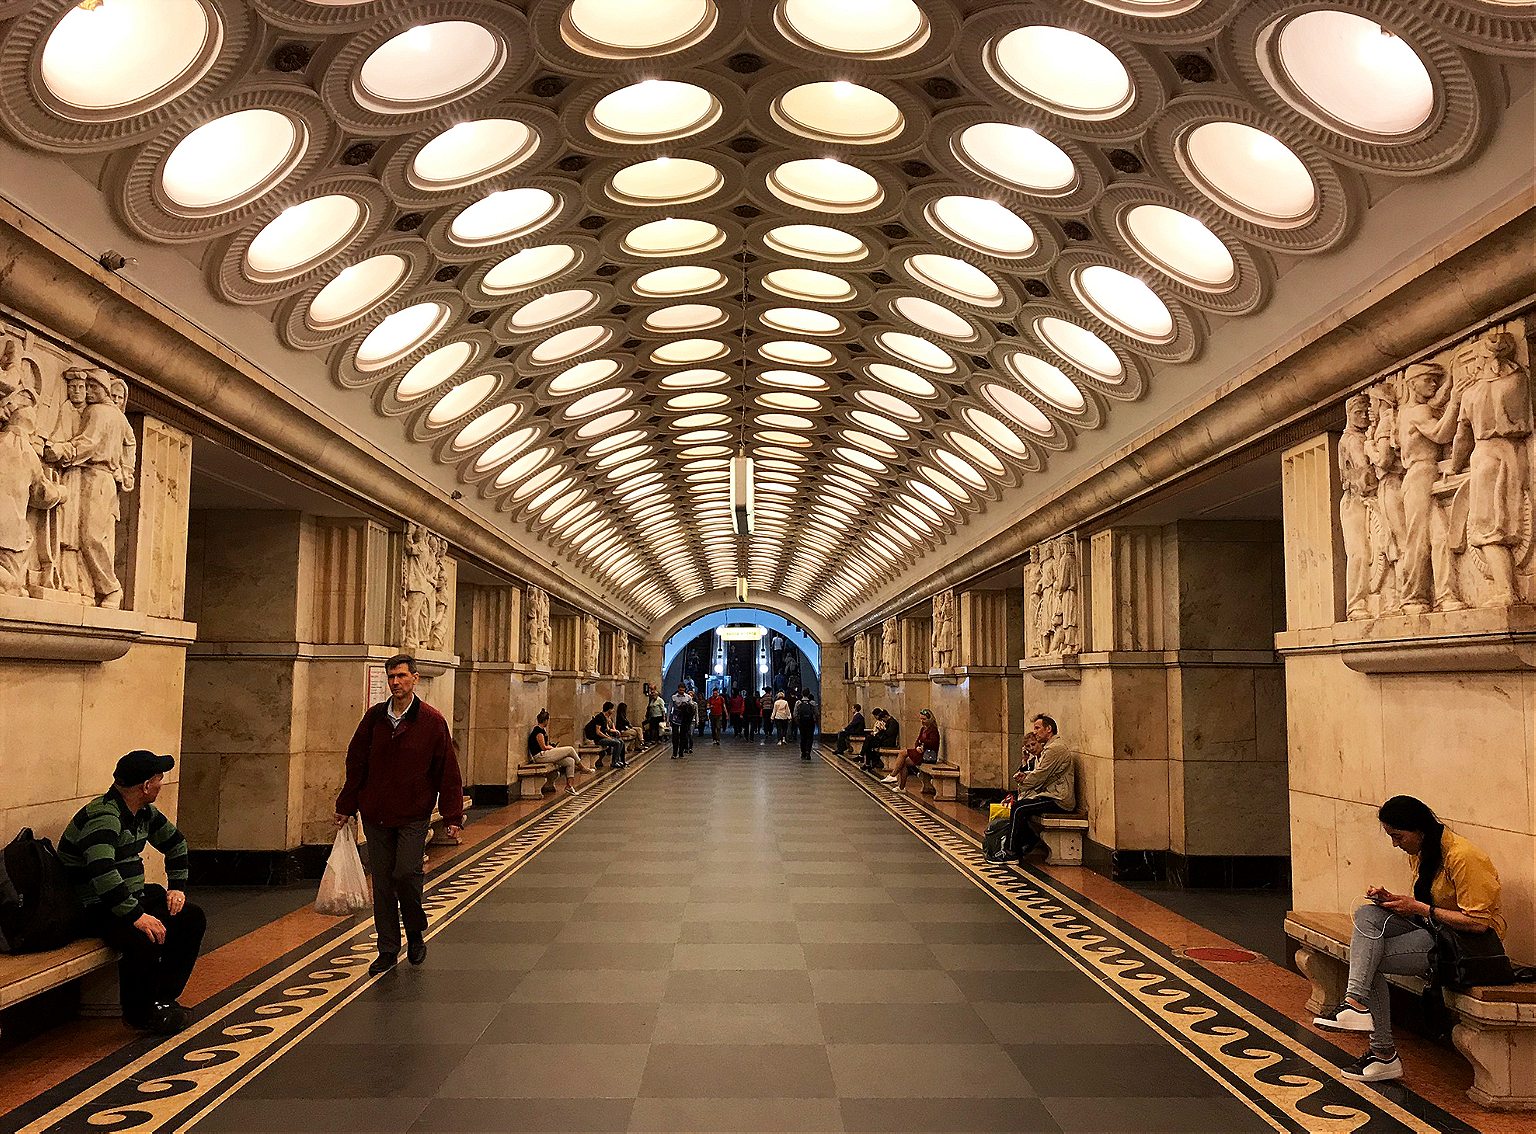
1. Mayakovskaya. Named for Russian Futurist Movement poet Vladimir Mayakovsky and an attempt to bring to life the future he imagined in his poems. (The Futurist Movement, natch, was all about a rejecting the past and celebrating all things speed, industry, modern machines, youth, modernity.) The result: an Art Deco masterpiece that won the National Grand Prix for architecture at the New York World’s Fair in 1939. It’s all smooth, rounded shine and light, and gentle arches supported by columns of dark pink marble and stainless aircraft steel. Each of its 34 ceiling niches has a mosaic. During World War II, the station was used as an air-raid shelter and, at one point, a bunker for Stalin. He gave a subdued but rousing speech here in Nov. 6, 1941 as the Nazis bombed the city above.
Take the 3/Green line one station to:
2. Belorusskaya. Opened in 1952, named after the connected Belarussky Rail Terminal, which runs trains between Moscow and Belarus. This is a light marble affair with a white, cake-like ceiling, lined with Belorussian patterns and 12 Florentine ceiling mosaics depicting life in Belarussia when it was built.
Transfer onto the 1/Brown line. Then, one stop (clockwise) t o:
3. Novoslobodskaya. This station was designed around the stained-glass panels, which were made in Latvia, because Alexey Dushkin, the Soviet starchitect who dreamed it up (and also designed Mayakovskaya station) couldn’t find the glass and craft locally. The stained glass is the same used for Riga’s Cathedral, and the panels feature plants, flowers, members of the Soviet intelligentsia (musician, artist, architect) and geometric shapes.
Go two stops east on the 1/Circle line to:
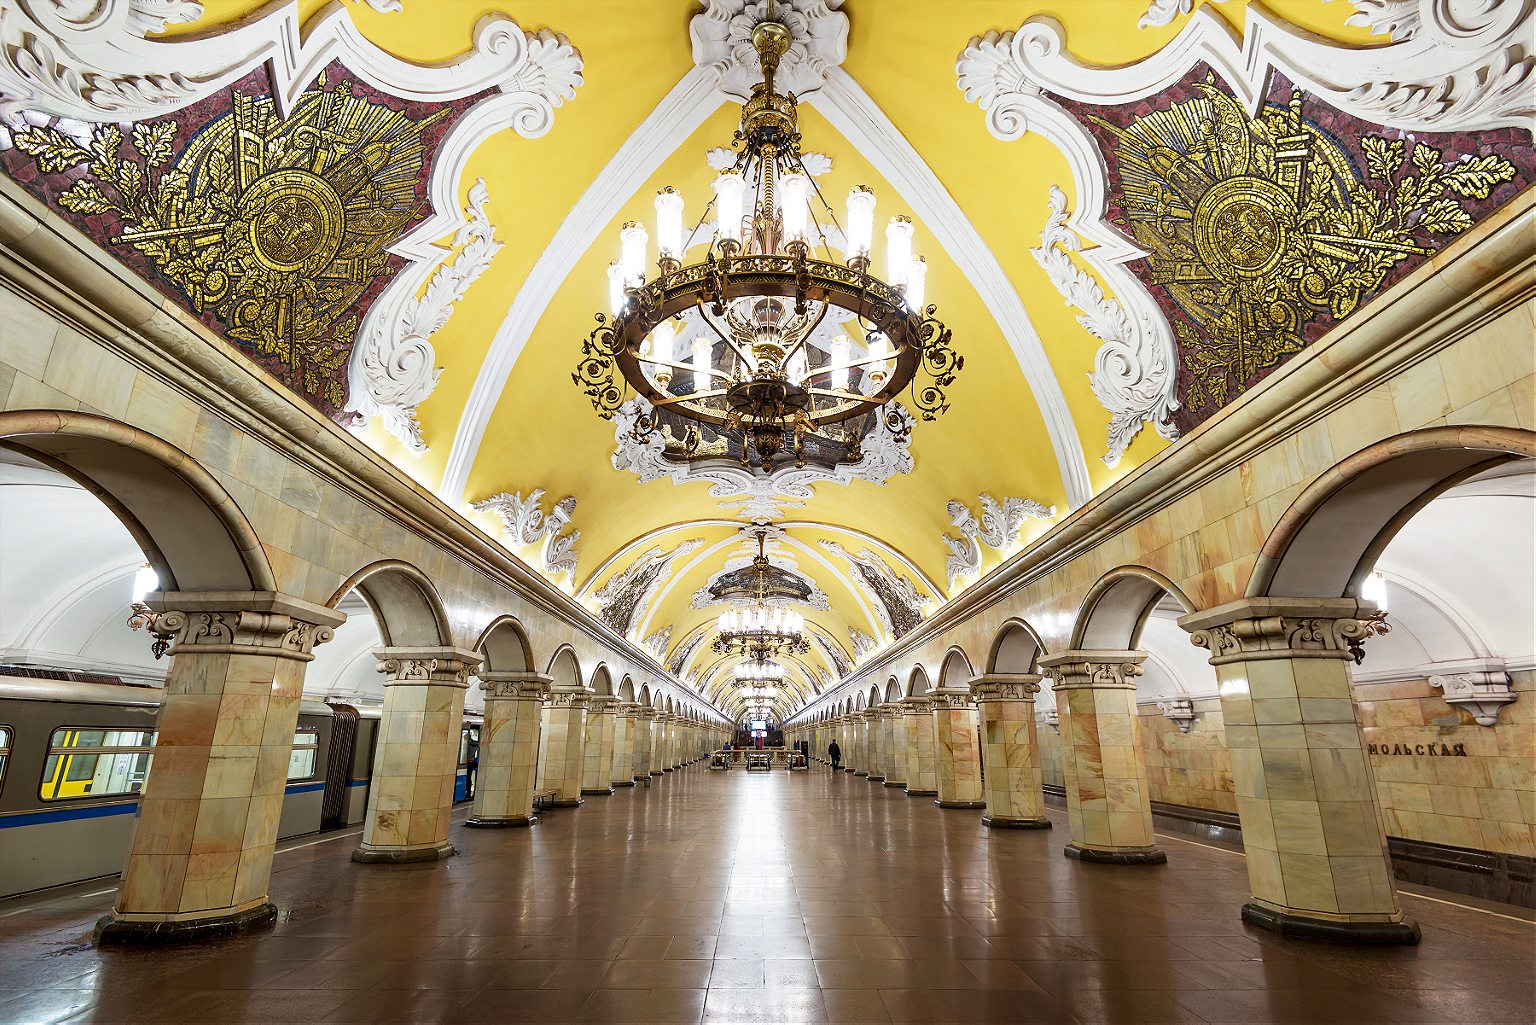
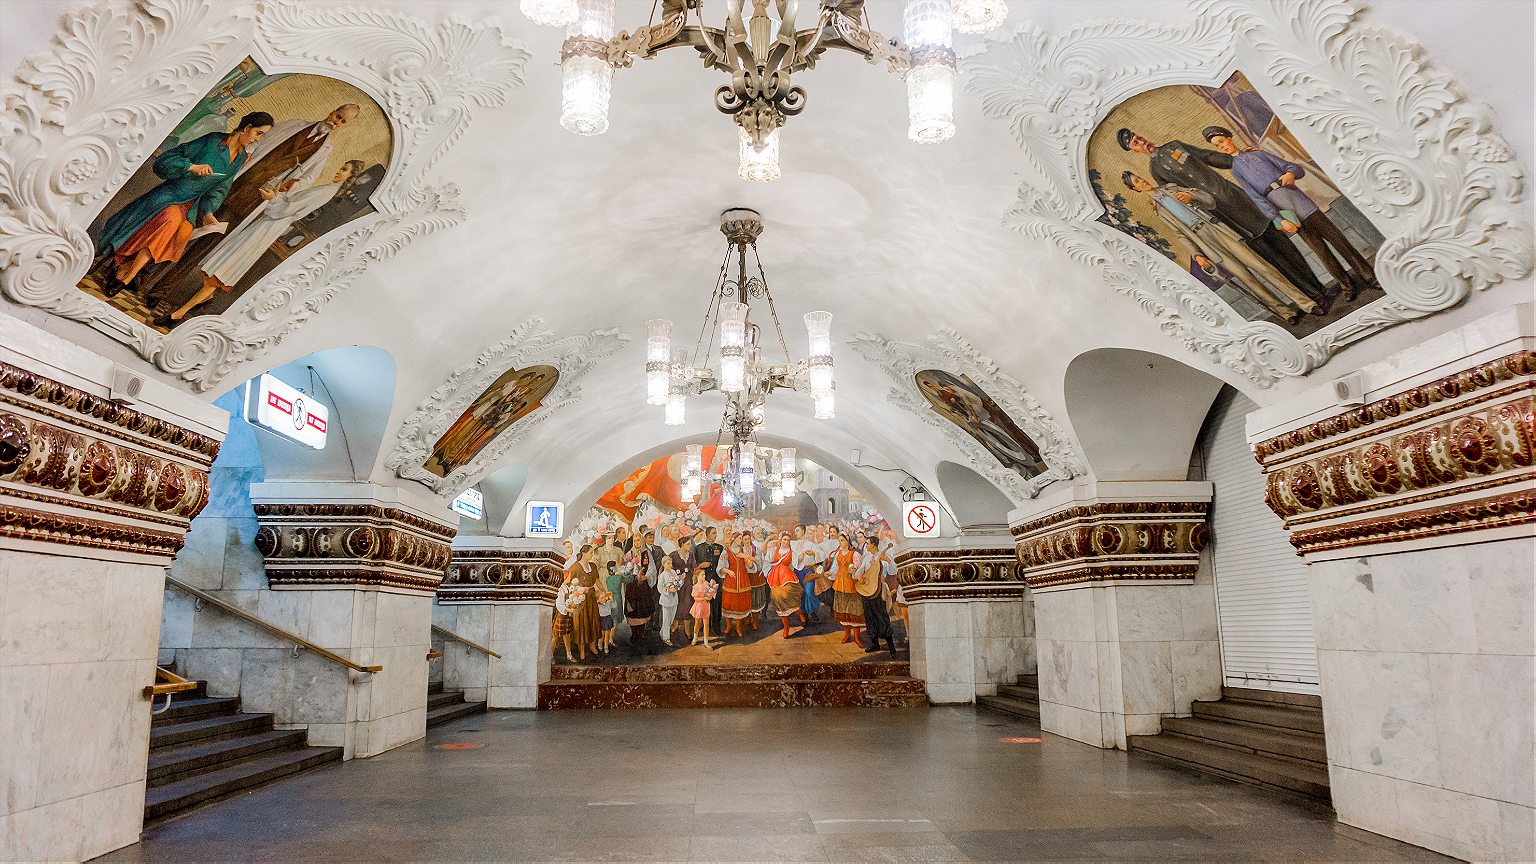
4. Komsomolskaya. Named after the Komsomol, or the Young Communist League, this might just be peak Stalin Metro style. Underneath the hub for three regional railways, it was intended to be a grand gateway to Moscow and is today its busiest station. It has chandeliers; a yellow ceiling with Baroque embellishments; and in the main hall, a colossal red star overlaid on golden, shimmering tiles. Designer Alexey Shchusev designed it as an homage to the speech Stalin gave at Red Square on Nov. 7, 1941, in which he invoked Russia’s illustrious military leaders as a pep talk to Soviet soldiers through the first catastrophic year of the war. The station’s eight large mosaics are of the leaders referenced in the speech, such as Alexander Nevsky, a 13th-century prince and military commander who bested German and Swedish invading armies.
One more stop clockwise to Kurskaya station, and change onto the 3/Blue line, and go one stop to:
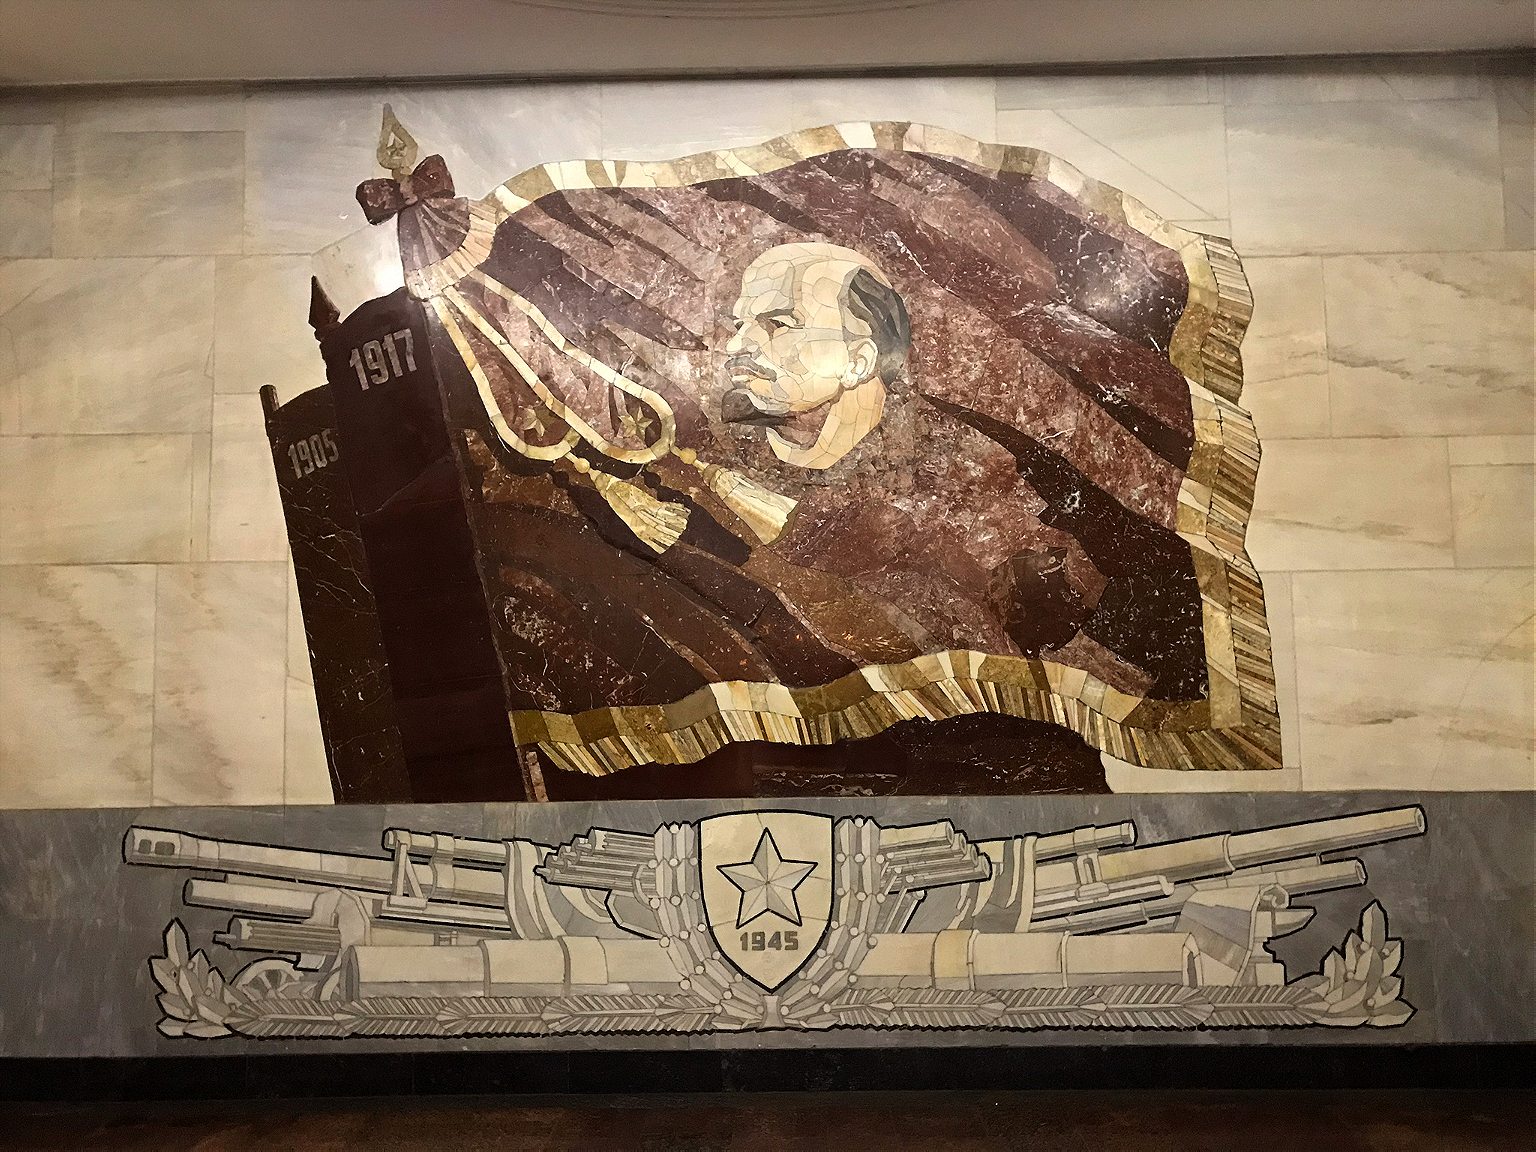
5. Baumanskaya. Opened in 1944. Named for the Bolshevik Revolutionary Nikolai Bauman , whose monument and namesake district are aboveground here. Though he seemed like a nasty piece of work (he apparently once publicly mocked a woman he had impregnated, who later hung herself), he became a Revolutionary martyr when he was killed in 1905 in a skirmish with a monarchist, who hit him on the head with part of a steel pipe. The station is in Art Deco style with atmospherically dim lighting, and a series of bronze sculptures of soldiers and homefront heroes during the War. At one end, there is a large mosaic portrait of Lenin.
Stay on that train direction one more east to:
6. Elektrozavodskaya. As you may have guessed from the name, this station is the Metro’s tribute to all thing electrical, built in 1944 and named after a nearby lightbulb factory. It has marble bas-relief sculptures of important figures in electrical engineering, and others illustrating the Soviet Union’s war-time struggles at home. The ceiling’s recurring rows of circular lamps give the station’s main tunnel a comforting glow, and a pleasing visual effect.
Double back two stops to Kurskaya station , and change back to the 1/Circle line. Sit tight for six stations to:
7. Kiyevskaya. This was the last station on the Circle line to be built, in 1954, completed under Nikita Khrushchev’ s guidance, as a tribute to his homeland, Ukraine. Its three large station halls feature images celebrating Ukraine’s contributions to the Soviet Union and Russo-Ukrainian unity, depicting musicians, textile-working, soldiers, farmers. (One hall has frescoes, one mosaics, and the third murals.) Shortly after it was completed, Khrushchev condemned the architectural excesses and unnecessary luxury of the Stalin era, which ushered in an epoch of more austere Metro stations. According to the legend at least, he timed the policy in part to ensure no Metro station built after could outshine Kiyevskaya.
Change to the 3/Blue line and go one stop west.
8. Park Pobedy. This is the deepest station on the Metro, with one of the world’s longest escalators, at 413 feet. If you stand still, the escalator ride to the surface takes about three minutes .) Opened in 2003 at Victory Park, the station celebrates two of Russia’s great military victories. Each end has a mural by Georgian artist Zurab Tsereteli, who also designed the “ Good Defeats Evil ” statue at the UN headquarters in New York. One mural depicts the Russian generals’ victory over the French in 1812 and the other, the German surrender of 1945. The latter is particularly striking; equal parts dramatic, triumphant, and gruesome. To the side, Red Army soldiers trample Nazi flags, and if you look closely there’s some blood spatter among the detail. Still, the biggest impressions here are the marble shine of the chessboard floor pattern and the pleasingly geometric effect if you view from one end to the other.
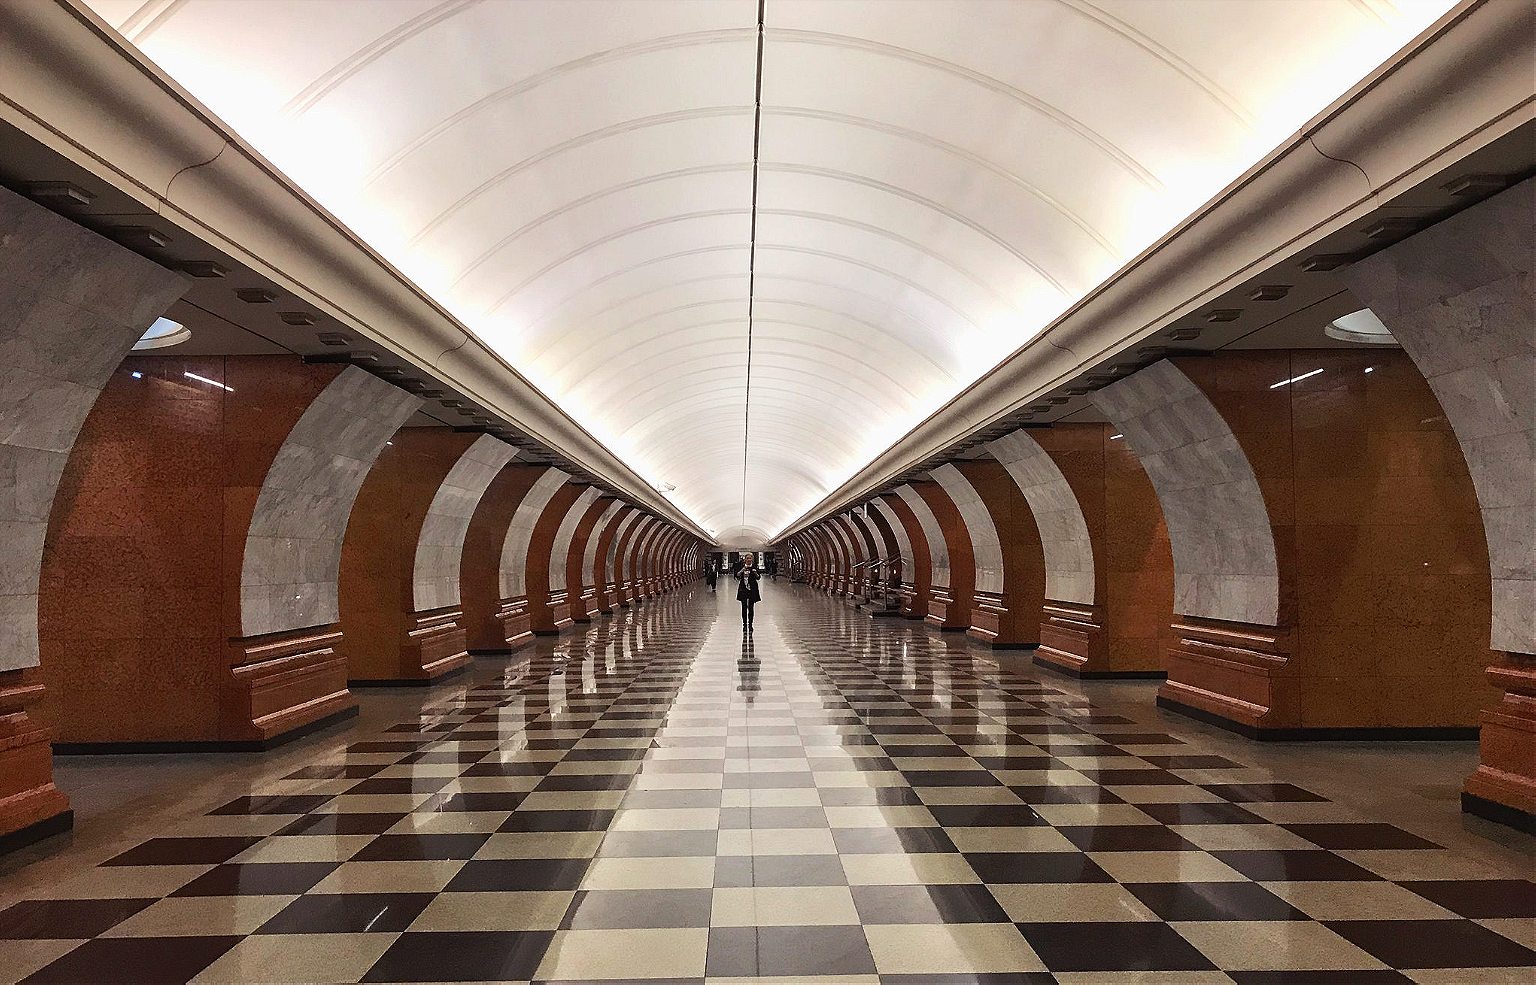
Keep going one more stop west to:
9. Slavyansky Bulvar. One of the Metro’s youngest stations, it opened in 2008. With far higher ceilings than many other stations—which tend to have covered central tunnels on the platforms—it has an “open-air” feel (or as close to it as you can get, one hundred feet under). It’s an homage to French architect Hector Guimard, he of the Art Nouveau entrances for the Paris M é tro, and that’s precisely what this looks like: A Moscow homage to the Paris M é tro, with an additional forest theme. A Cyrillic twist on Guimard’s Metro-style lettering over the benches, furnished with t rees and branch motifs, including creeping vines as towering lamp-posts.
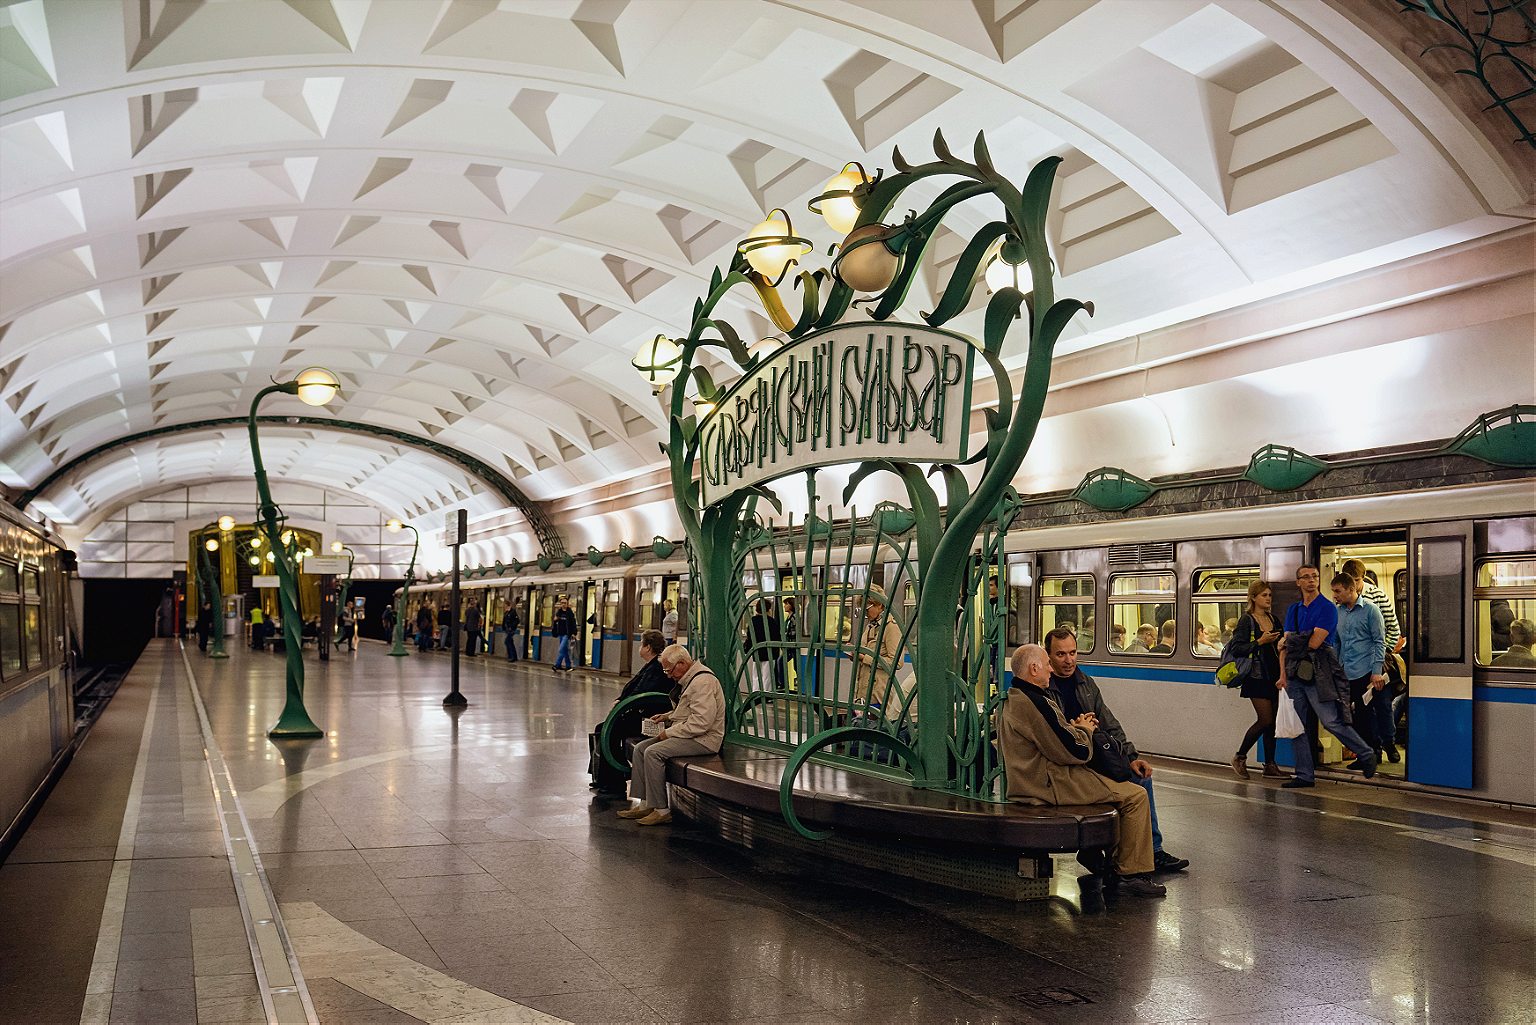
Stay on the 3/Blue line and double back four stations to:
10. Arbatskaya. Its first iteration, Arbatskaya-Smolenskaya station, was damaged by German bombs in 1941. It was rebuilt in 1953, and designed to double as a bomb shelter in the event of nuclear war, although unusually for stations built in the post-war phase, this one doesn’t have a war theme. It may also be one of the system’s most elegant: Baroque, but toned down a little, with red marble floors and white ceilings with gilded bronze c handeliers.
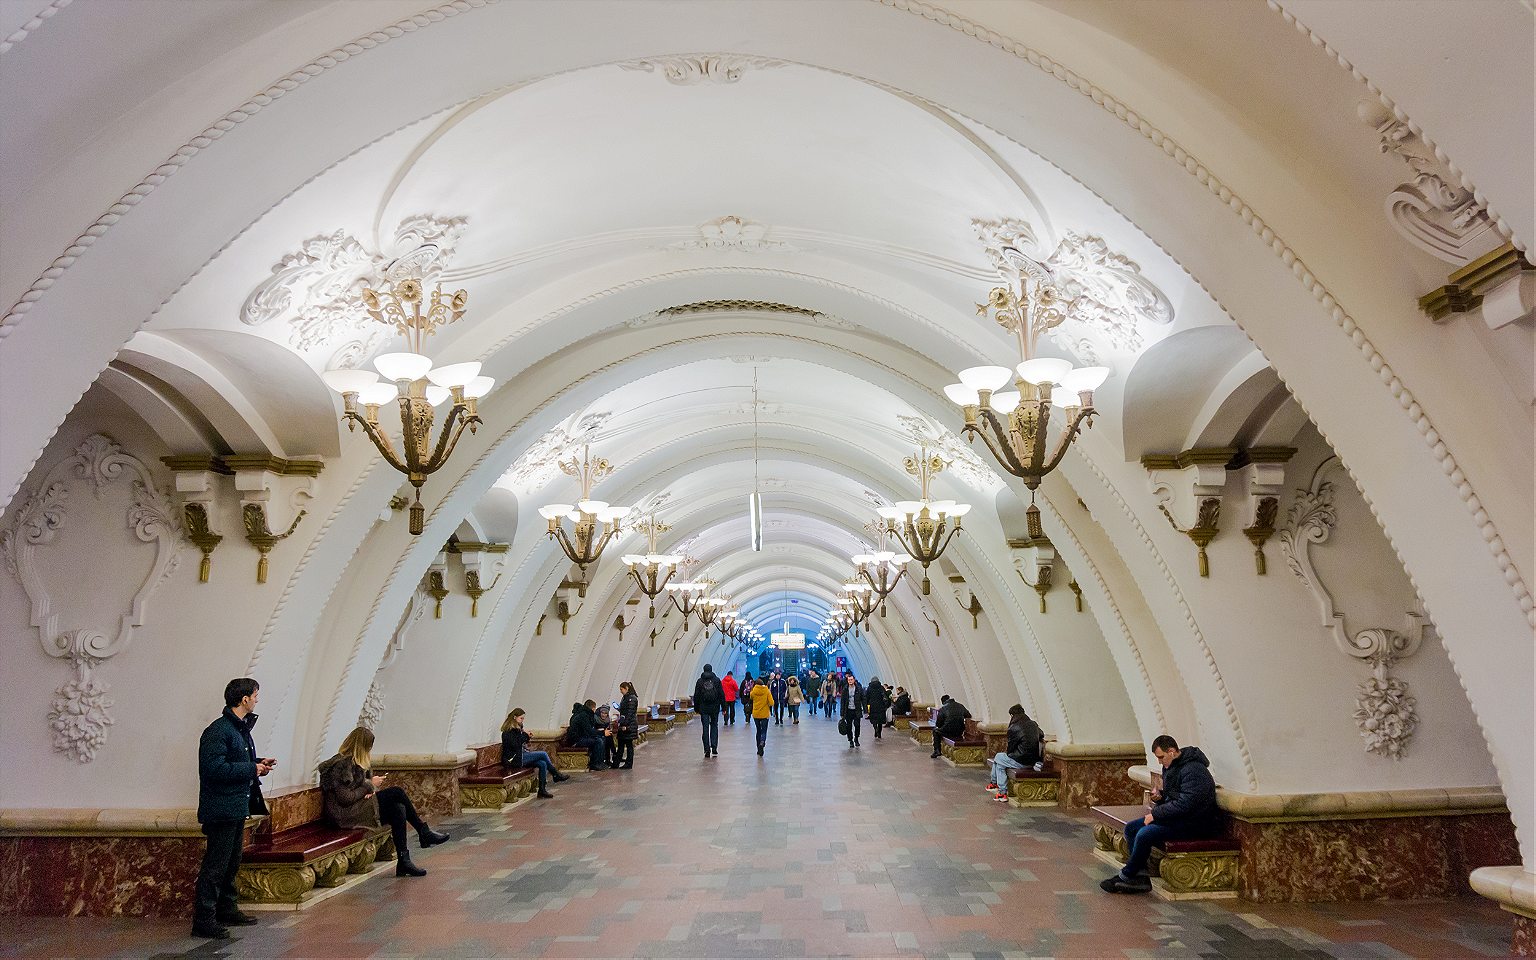
Jump back on the 3/Blue line in the same direction and take it one more stop:
11. Ploshchad Revolyutsii (Revolution Square). Opened in 1938, and serving Red Square and the Kremlin . Its renowned central hall has marble columns flanked by 76 bronze statues of Soviet heroes: soldiers, students, farmers, athletes, writers, parents. Some of these statues’ appendages have a yellow sheen from decades of Moscow’s commuters rubbing them for good luck. Among the most popular for a superstitious walk-by rub: the snout of a frontier guard’s dog, a soldier’s gun (where the touch of millions of human hands have tapered the gun barrel into a fine, pointy blade), a baby’s foot, and a woman’s knee. (A brass rooster also sports the telltale gold sheen, though I am told that rubbing the rooster is thought to bring bad luck. )
Now take the escalator up, and get some fresh air.
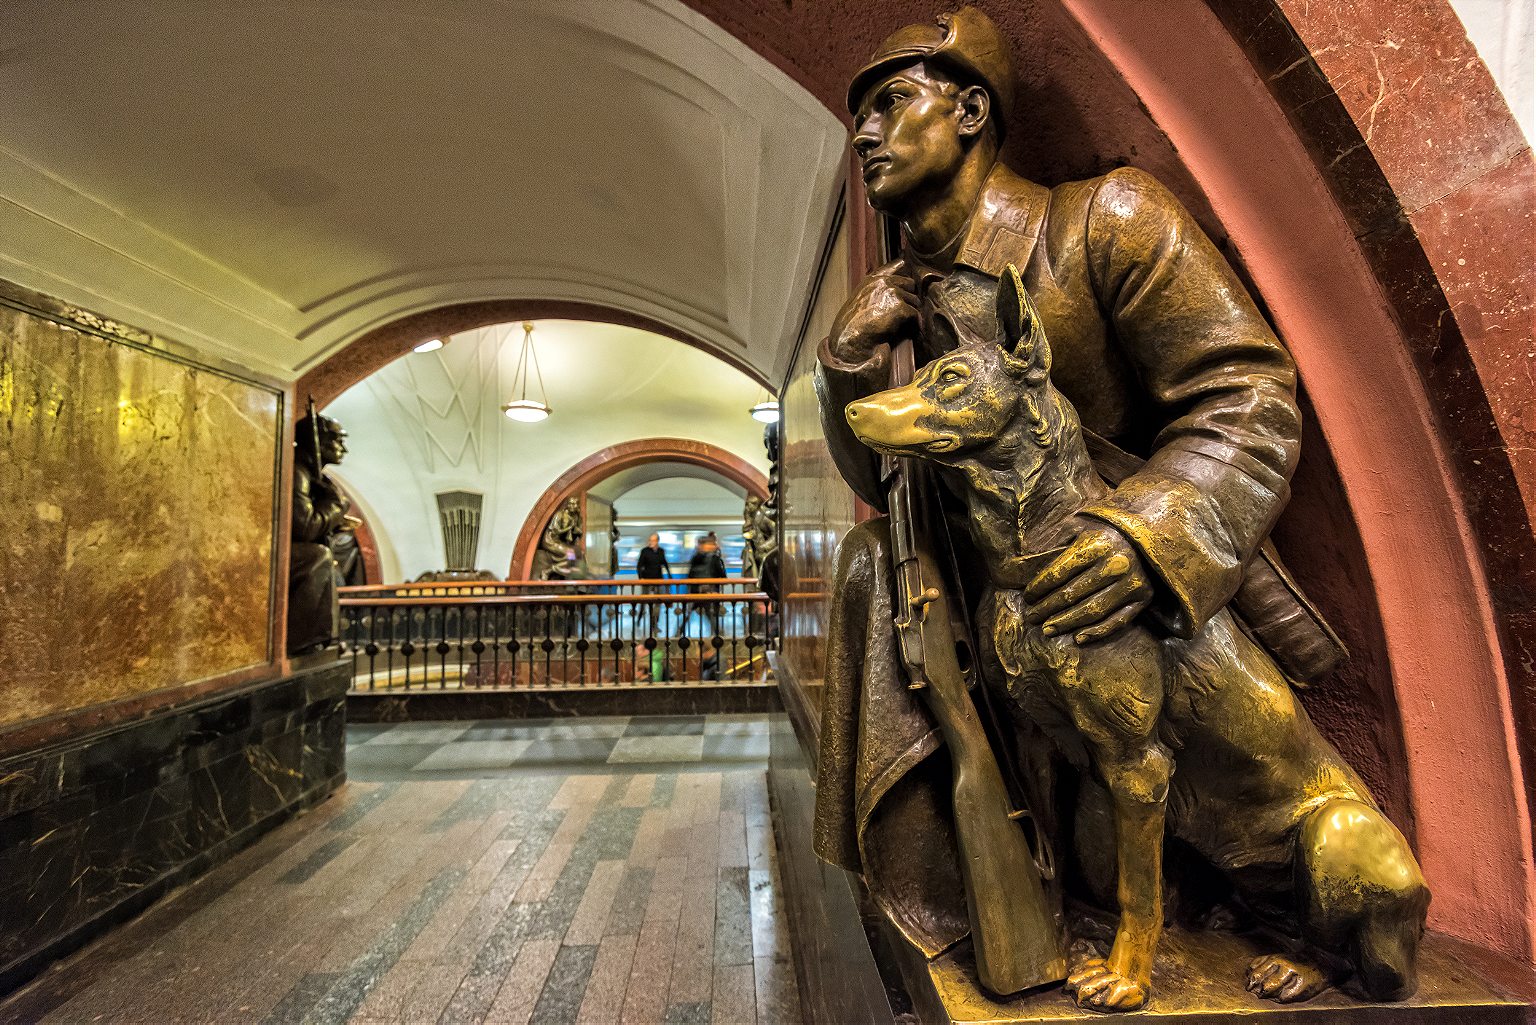
R&K Insider
Join our newsletter to get exclusives on where our correspondents travel, what they eat, where they stay. Free to sign up.
21 Things to Know Before You Go to Moscow
Featured city guides.
The Red Square and beyond: a guide to Moscow’s neighbourhoods
Apr 23, 2019 • 6 min read

The Red Square, Kremlin and St Basil's Cathedral in Moscow at night © Mordolff / Getty Images
One of the world’s largest cities, Moscow is a true metropolis whose ancient neighbourhoods are interspersed with newly built high-rises, inhabited by people from all over the former Soviet Union.
It’s also the city of rings: the innermost is the Kremlin itself; further away are the former defensive rings, Boulevard Ring and Garden Ring; still further are the Third Ring Road and the MKAD, which delineates the city’s borders. There’s an ongoing joke that Moscow Mayor is the Lord of the Rings. Most sights are contained within the Garden Ring, although for some more authentic neighbourhoods one has to venture further out. To help you explore Moscow’s diversity, we picked our favourite ’hoods – but this list is by no means exhaustive.

The Red Square and around
It can be argued that Moscow, or even the whole of Russia, starts at the Red Square – it’s an absolute must-see for any visitor. After standing in line to check out Lenin’s granite mausoleum , go to GUM , Moscow's oldest department store. Full of luxury shops, it’s famous for the glass roof designed by one of Russia’s most celebrated architects, Vladimir Shukhov. Apart from architectural wonders, GUM has several places to eat including the Soviet-style cafeteria Stolovaya No 57 where you can sample mysterious-sounding delicacies such as the ‘herring in a fur coat’.
On the opposite side of GUM, Kremlin ’s walls and towers rise above the Red Square. Walk through the Alexander Garden and past the grotto to the Kremlin’s entrance. It’s a treasure trove for any art and history lover: ancient gold-domed churches, icons galore and the resting place of Moscow tsars.
On the other side of the Red Square is Moscow's symbol, St Basil's Cathedral with its multi-colored domes. Right behind it is the newly built Zaryadye Park , which showcases flora from all over Russia; another attraction is the floating bridge jutting out above the embankment and the Moscow river. A glass pavilion nearby hosts Voskhod , a space-themed restaurant with dishes from all 15 former Soviet Union republics. It’s a perfect spot for a classy evening meal and there’s often live music.

Patriarch’s Ponds
The Patriarch’s Ponds (aka Patriki) is a historical neighbourhood, celebrated in Mikhail Bulgakov’s novel Master and Margarita . Located right off Tverskaya street, Moscow’s main thoroughfare, Patriki recently became the city’s most happening quarter. It has some of the most elegant architecture, including several buildings by art-nouveau genius Fyodor Shekhtel. Narrow streets here have a cozy feel, with recently widened sidewalks and bike lanes. In the summer it becomes party central.
Start by checking out free exhibitions or one of the cutting-edge performances at the experimental theatre Praktika . But make no mistake, the neighbourhood’s main attraction are its bars and restaurants. Patriki’s residents are well-off Russians and expats, so it’s no wonder that Moscow’s recent culinary revolution started here. Uilliam’s , one of the pioneers of this foodie movement, still rules over the scene with its floor-to-ceiling windows. Also try AQ Chicken for everything chicken-related, Patara for a taste of Georgian cuisine, and Cutfish for some great sushi. Finish your gastronomic tour with original cocktails at Pinch or the Moscow outpost of NYC restaurant Saxon+Parole .

Around Kursky train station
For a long time, Kursky train station was surrounded by semi-abandoned factories and the area was best avoided. It all changed in the late 2000s, when a dilapidated wine factory was turned into Winzavod , a mecca for fans of contemporary art. Today these red-brick buildings are occupied by some of Moscow’s leading galleries. After taking in all the art, pop in the small wine bar Barrell for a glass from burgeoning wineries of Russia’s south or grab a bite at Khitrye Lyudi cafe.
Right next to Winzavod is Artplay , another refurbished factory full of design and furniture shops and large exhibition spaces. It’s also home to Pluton , one of the latest additions to Moscow’s dance scene. Other Pluton residents are the multimedia art gallery Proun and another lunch option, Shanhaika , with authentic Chinese cuisine.
A short walk away is Arma, where a cluster of circular gas holders has been turned into offices, restaurants and clubs including Gazgolder (it belongs to one of Russia’s most famous rappers, Basta). Apart from hip-hop concerts, Gazgolder organises regular techno parties that sometimes go non-stop from Friday to Monday.

If you’re interested in religious architecture, Taganka is the place to go. First of all, see the old Moscow at Krutitskoye Podvorye – one of those places where nothing seems to have changed in centuries. The monastery was founded in the 13th century, but in the 16th century it became the home of Moscow metropolitans and most of the surviving buildings are from that epoch. Take a tour of the grounds, and don’t miss the interior and icons of the Assumption Cathedral.
Your next stop is the Rogozhskoe settlement of ‘old believers’, a branch that split from Russian Orthodoxy in the 17th century. The settlement is dominated by an 80m-tall bell tower. The yellow-coloured Intercession Church, built in neoclassical style with baroque elements, has an important collection of icons. Next to the church grounds is the popular Trapeznaya cafeteria, with Russian food cooked using traditional recipes – a perfect spot for lunch.
A short ride away is Andronikov Monastery, which today houses the Rublyov Museum in the old monks’ quarters. There’s a great collection of ancient Orthodox icons although none by Andrei Rublyov, who was a monk here in the 15th century. The main attraction at the monastery is the small Saviour’s Cathedral, considered the oldest surviving church in Moscow.
Finish the day at the craft-beer cluster around Taganskaya metro station. Varka offers both Russian and imported labels, with the Burger Heroes stand serving arguably the best burgers in town. Craft & Draft looks more like a respectable old-fashioned pub, with decent food, 20 beers on tap and a hundred types of bottled brews.

Khamovniki is Moscow’s ancient textile district, named after the word kham (a type of cloth). Two main thoroughfares, Ostozhenka and Prechistenka, cut through the neighbourhood parallel to each other. The former turned into the so-called ‘Golden Mile’ of Moscow in the 1990s, with the highest real-estate prices and some of the best examples of new Russian architecture, while the latter is still mostly lined up with impressive 19th-century mansions.
Khamovniki is somewhat of a literary quarter, as several museums devoted to Russia’s best-known writers – among them Leo Tolstoy , Alexander Pushkin and Ivan Turgenev – popped up here during the last century. There’s also plenty to see for an art lover. The Multimedia Art Museum regularly hosts exhibitions by some of the best photographers from all over the world, as well as contemporary art. Several galleries, including RuArts and Kournikova Gallery , have also found home in Khamovniki.
When you’ve had your fill of literature and art, stop by Gorod Sad on Ostozhenka, an outpost of a local health-food chain, and order dishes such as pumpkin soup or grilled vegetables salads. Afterwards, head to Dom 12 , which is located just off Ostozhenka street. This restaurant and wine bar is frequented by the city’s intellectuals and its schedule includes lectures, book presentations and film screenings, while in the summer guests migrate to a lovely courtyard.
https://shop.lonelyplanet.com/products/moscow-city-guide-7
Explore related stories

Mar 31, 2024 • 10 min read
With savvy planning and a bit of local know-how, you'll find a wealth of ways to enjoy Paris without blowing your budget. Here are our top tips.

Feb 15, 2024 • 16 min read

Jan 25, 2024 • 9 min read

Apr 20, 2023 • 8 min read

Apr 12, 2024 • 12 min read

Apr 12, 2024 • 9 min read

Apr 12, 2024 • 8 min read

Apr 12, 2024 • 4 min read

Apr 12, 2024 • 7 min read

IMAGES
VIDEO
COMMENTS
Loop around the bushes to the north to find a Protein and continue west. Head all the way south and exit south into Area 3. Area 3: Pick up the Gold Teeth to the south, then head west and pick up TM32 ( Double Team) in plain sight. Using Double Team to ramp up your evade stat can be very useful if luck is on your side.
4th Area. The Safari Zone should be your next stop and you'll find yourself coming back quite a few times in order to catch all of the Pokémon inside. You'll find tons of items including the HM03 Surf and the Gold Teeth which need to be returned to the Warden. The Warden lives beside the fishing guru and will reward you with the HM04 Strength.
Pokemon Yellow Walkthrough - Safari Zone in Fuschia City. How to get Gold Teeth, Strength, Surf, HM in Warden's House and Safari
The Warden's Gold Teeth can be found in the last area of the Safari Zone. So you can get HM04 at any point after you reach Fuchsia City. Prerequisites. This is what you need to do before you can get HM04: Have at least 500 Pokédollars to enter the Safari Zone; Find the Warden's Gold Teeth in the west area of the Safari Zone. Getting HM04 ...
Enter the first house you see (with the mailbox). Entering the Warden's house. Step 4: Talk to the Safari Zone Warden inside this house and you'll automatically give him back his Gold Teeth. He will then give you HM04 Strength as a reward. Giving the Gold Teeth to the Warden. Receiving HM04 Strength from the Warden.
Safari Zone Warden's house. The southeastern house belongs to the Safari Zone Warden. It is difficult to understand what he is saying, but seems to have misplaced his set of Gold Teeth. If you happen to find a set of false teeth, be sure to return it to him. Fuchsia Gym
The Safari Zone is home to some rare Pokémon, as well as a number of interesting items. We've already covered how you can find the Gold Teeth, HM 03 and TM 32 above, but there is certainly some ...
--We got to the Safari zone where you can locate some Gold teeth in exchange for the HM surf when we eventually get to Fuchsia City. Join me in my adventure ...
SV. In-Depth Effect. This item is primarily used as a trading item. Once you find the Gold Teeth in the Safari Zone, when you return it to the Warden, he will thank you by giving you HM04 - Strength. Flavour Text. FireRed. LeafGreen. A set of false teeth lost by the SAFARI ZONE'S WARDEN. It makes his smile sparkle.
Pokémon Adventures FireRed & LeafGreen arc. The Gold Teeth were briefly seen in Start the Countdown, Starmie, where Baoba accidentally spat them out of his mouth in shock upon seeing the Team Rocket airship flying in the sky over him.. Pokémon Zensho. The Gold Teeth appeared in Fuchsia City. Satoshi first heard of them from the Safari Zone Warden's assistants.
1.6k. Location: France. IGN: CaptainGrey. Posted February 21, 2015. This guide is made to help you know which Pokemon are available in the Safari Zone in Kanto & Hoenn; What their encounter rates are (Very Common / Common / Average / Rare / Very rare) , what items they can hold, and what items you can find inside. GRASS.
PE. A set of golden false teeth lost by the Safari Zone's warden. They make his smile sparkle. Categories. Community content is available under CC-BY-SA unless otherwise noted. Fantasy. Pokemon. The player can return the Gold Teeth to their owner, the Safari Zone Warden, in exchange for HM04 (Strength). The player can return the Gold Teeth to ...
Description Of Safari Zone: The Safari Zone is a wildlife preserve found in Fuchsia City, and a place to go where players can go to catch many different Pokemon. Some of these Pokemon are found thoughout the game, but a few species can only be found here. Bait can please a Safari Pokemon as a rock will anger it, both, surprisingly, make them ...
This is the Bulbapedia walkthrough for Pokémon Yellow. These pages follow the original Game Boy iteration, not Let's Go, Pikachu! and Let's Go, Eevee!. The guide for those games can be found here. Contents. 1 Saffron City. 1.1 Mr. Psychic's house; 1.2 Silph Co. ... Fuchsia City, Safari Zone:
an old video from my old channel .. !
The Kanto Safari Zone (Japanese: サファリゾーン Safari Zone) is a special Pokémon preserve in Kanto that Trainers can enter to catch wild Pokémon. It is owned by Baoba.. For $ 500, the player can play the Safari Game (Japanese: サファリゲーム Safari Game) and receive 30 Safari Balls.Trainers are limited to 500 R B Y /600 FR LG steps in the Safari Zone before the Game is over.
St. Basil's Cathedral. Few sights are as iconic not only of Moscow and Red Square but indeed of Russia than St. Basil's Cathedral, whose colorful, onion-shaped domes are a symbol of the country around the world. Officially known as the Cathedral of Vasily the Blessed, this church has stood since 1561, which is quite miraculous when you consider ...
In this video I show where to find Warden's Gold Teeth located inside the Safari Zone & get HM03 SURF and HM04 STRENGHT, in Pokémon Fire Red & Leaf Green!🔥 ...
1: Off-kilter genius at Delicatessen: Brain pâté with kefir butter and young radishes served mezze-style, and the caviar and tartare pizza. Head for Food City. You might think that calling Food City (Фуд Сити), an agriculture depot on the outskirts of Moscow, a "city" would be some kind of hyperbole. It is not.
Safari Zone: Pokemon: South Exit: Fuchsia City. Game Anchors: Gen III: Gen I: Area Anchors: Area 1: Area 2: Area 3: Area 4: ... Pokémon Yellow: Nidoran♂ ... Gold Teeth: On Floor; TM32: On Floor. Pokémon of the Week. Next In Japan. Episode 46 How Thrilling! Naranja Academy!
The Metro is very centralized. The brown-colored 1 Koltsevaya ('circular') line forms a ring around the central zone and central stations. (It follows Moscow's above-ground's circular highway, the Garden Ring, which was built over the old city ramparts.) The Metro's radial layout means people coming from outer stations have to travel ...
The Patriarch's Ponds (aka Patriki) is a historical neighbourhood, celebrated in Mikhail Bulgakov's novel Master and Margarita. Located right off Tverskaya street, Moscow's main thoroughfare, Patriki recently became the city's most happening quarter. It has some of the most elegant architecture, including several buildings by art ...